Table of contents
Related Articles
Introduction
In Octopus the work done by Octopus users, approvers and external users is done within activities.
This is an essential part of Octopus and this article describes how it works and the different modes of activities.
Activities from Octopus
In this section, we describe how to add activites and what they look like in Octopus to the Octopus users. The appearance is different from the Web Portal or WebTech, that will be shown further in this document.
The appearance of activities for the Octopus users is configured from the Octopus tab of a user file. The view determines how things appear on the screen, but the same elements are present in both cases.
There are two types of views: Classic and Modern. The difference will be explained further un the document.

Different types of activities
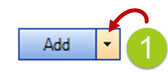
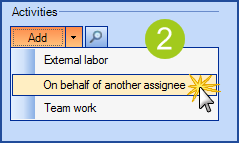
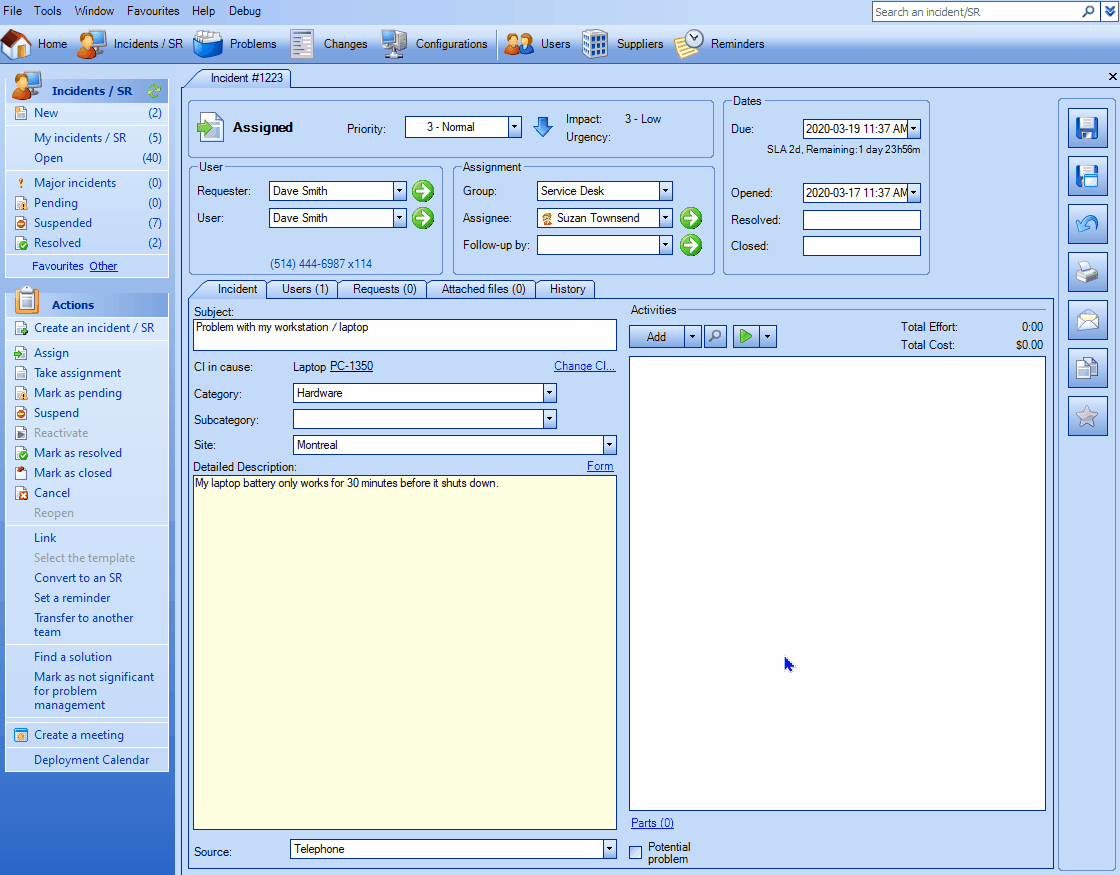
Adding a standard activity to a request is done with the Add button from the Activity section. You must click directly on the button, and not on the arrow at the end. The arrow is used to add activities for External labor or On behalf of another assignee.
Many activity fields are available, you will see them in details a bit further down in the standard activities. The choices made in the options by the Octopus administrator determine which fields are mandatory upon the creation of an activity.
If you forgot to fill a mandatory field, Octopus will give you an error message and there will be an exclamation mark
 in the fields where information is missing.
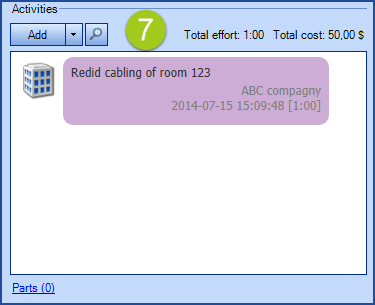
Standard activity in Octopus
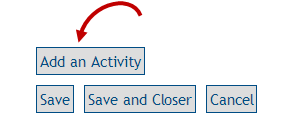
From the Activity section at the bottom right of the window, click directly on the Add button. Do not use the arrow at the end, click the middle of the bottom:

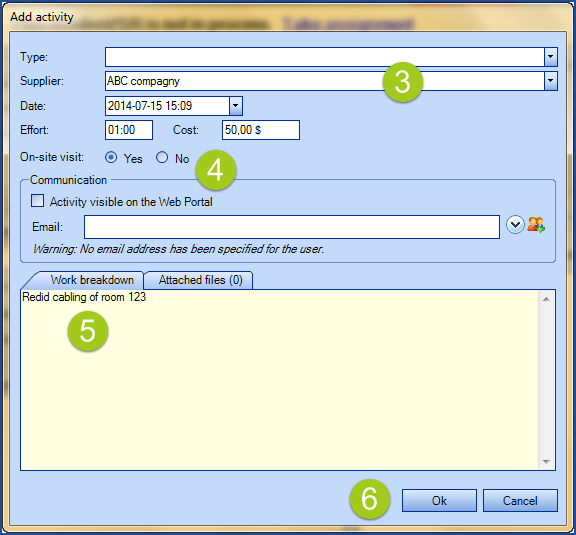
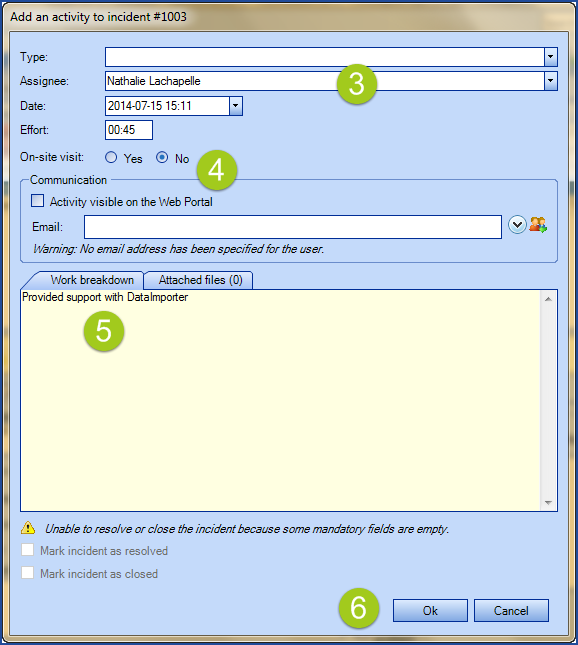
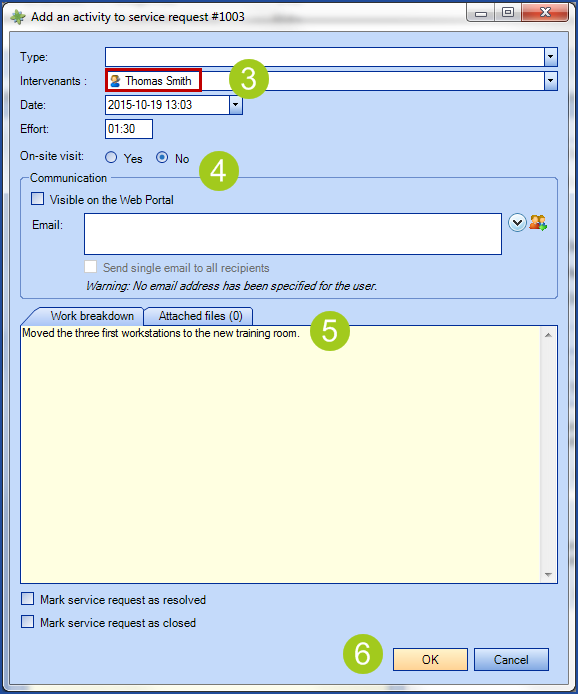
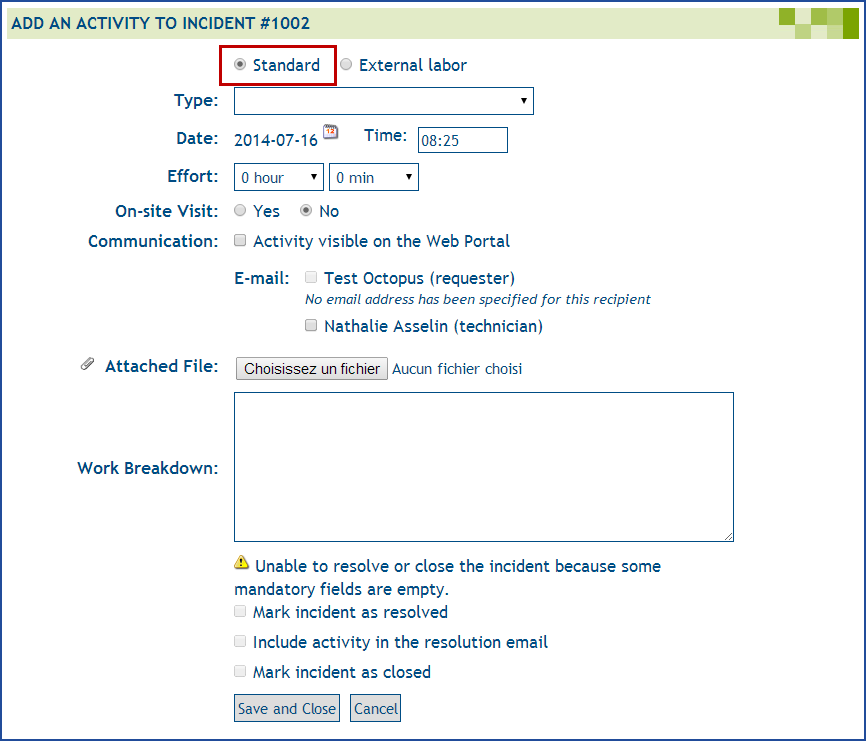
The add an activity window will open. The request activity log is where you record information. It can be an internal note from an Octopus user or a communication sent or received by email. In any case, it is possible to add one or more attachments. You can also indicate the time taken to do the activity, if an on-site visit was required and more.
The available fields are:
- Type: an activity template that can be pre-configured in advance, visible or not according to the options.
- Date: is set to automatic by default.
- Automatic: the date will be set to the moment the activity is saved.
- Manual: to choose a moment in the past. The modification can be done directly in the field or with the calendar by using the little downward arrow.
- Effort: time required to do the activity, mandatory or not, depending on the options.
- On-site visit: indicates if the Octopus user had to go on-site.
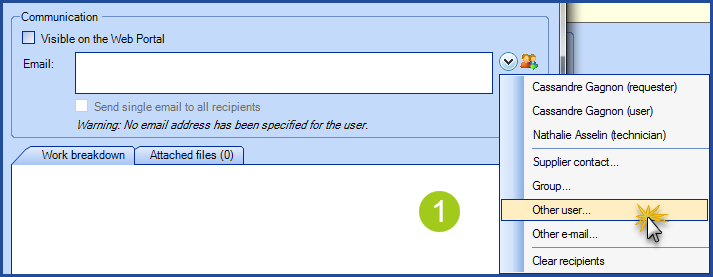
- Communication:
- Activity visible on the Web Portal; by default or not, depending on the options. Will show the activity on the Web Portal of both the requester and the user, when checked.
- Email; allows to send the activity by email to various people (requester, user(s), Octopus user, other user, supplier contact or to another address). Use the arrow at the end to make your choice.
- Work breakdown: this is where the details of the intervention is consigned, the notes and the emails that were sent.
It is possible to format activities in Octopus requests with the HTML editor.
For more information, see the HTML Tool in Octopus article.
- Attached files: allows to attach a file, a shortcut or the content of the clipboard. The number in brackets indicates the number of documents attached to the activity.
- Mark incident as resolved: indicates that this is the resolution activity.
- Mark incident as closed: is visible or not according to the Octopus user's permissions. General if the automated closure is active, this permission would not be given to the Octopus users.

Communication by email in the activities
Communication with users and various people involved in the requests is important. When this communication is made through activities, it leaves a trace in the request. Here's how to communicate effectively through activities in Octopus:
As Octopus communicates by email, the person with which you want to communicate needs to have an email recorded in their file.
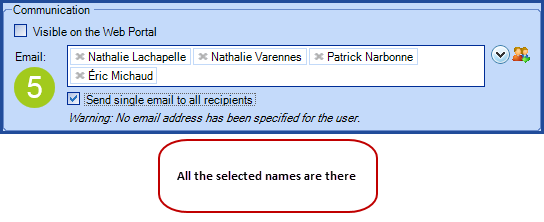
- Adds the requester and the user by double clicking the
 button.
- Please note: this action will automatically make the communication visible on the web portal. Uncheck the box manually if not required.
- Add other recipients with the
 button.
- The requester
- The user
- The technician
-
Task assignee
-
If the activity is sent from a task
-
Register's supervisor (available only in a notification task) ATTENTION: Immediate superior information must be up-to-date and available in the applicant's master record.
User's supervisor (available only in a notification task) CAUTION: Immediate superior information must be up-to-date and available in the user's master record.
-
- Supplier contact
- Group
- Other user
- Other email
-
Additional addresses (0)
-
Allows you to add a list of people who should receive the communication, but who are not necessarily actors in the request or members of the organization.
-
Once additional addresses have been added to an activity, they will be saved and remain available for other activities within the same request.
-
The number in brackets indicates the number of addresses currently in the list.
-
- Clear recipients
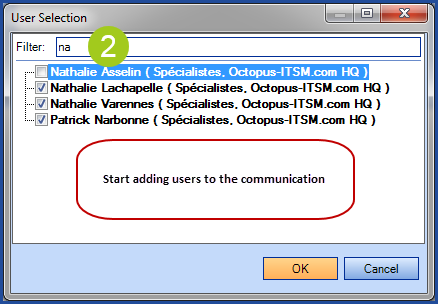
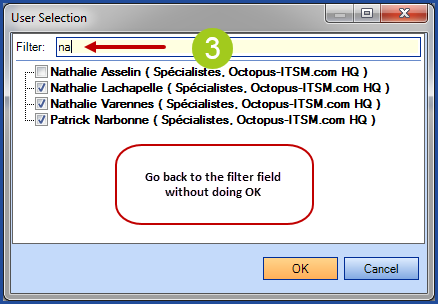
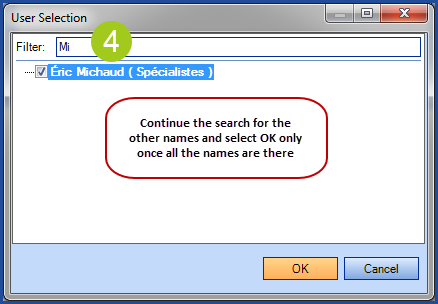
 Trick: The Other user option can be used to communicate with people that are not directly associated with the request.
However, it is generally not known that it is possible to add multiple users without going out of the screen. Start searching names and check the ones that are required, then go back to the top of the screen and continue to search names. All the items that were checked will be added when you click OK.
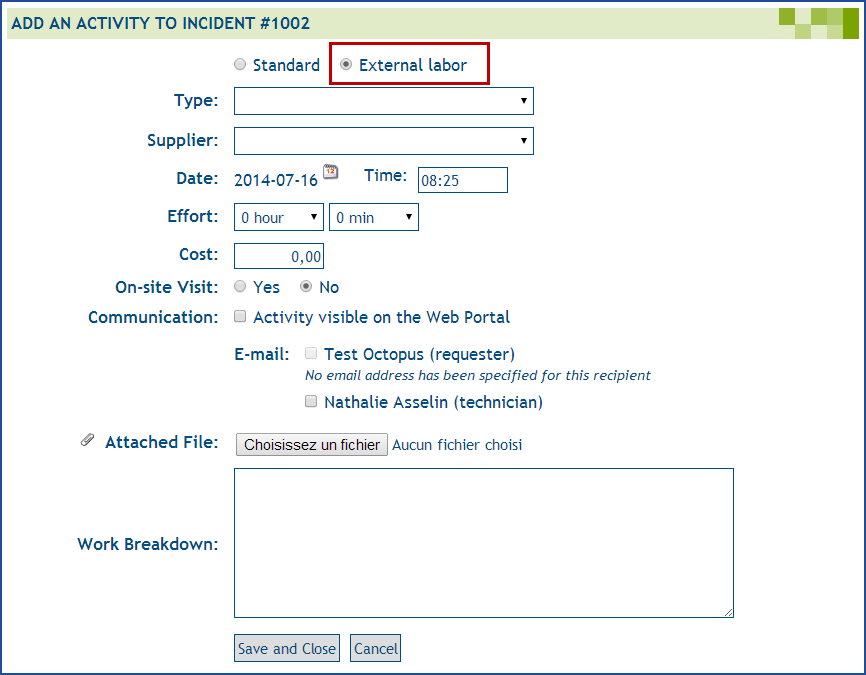
Add an external labor activity from the application
An external labor activity is used to consigned work done by a supplier in the request. Most fields are the same, but you can also include the cost of the supplier activity to add it to the calculation of the request's total cost. If a CI is linked to the request, this cost will be reported in the CI file as well.
To add an external labor activity:
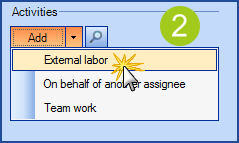
- Click the arrow at the end of the Add button.
- Pick External labor.
- Choose the supplier (it must already exist in Octopus).
- Add information; Date, Effort, Cost, On-site visit and Type of Activity.
- Describe the work done by the supplier. If you have an invoice in any format, add it as an attachment.
- Click OK to save.
- The activity will be saved in the request with a different appearance from the standard activity (purple in colour and an additional supplier icon if Octopus is set to Modern view).
Add an activity on behalf of another assignee
It is possible for an assignee to enter an activity on behalf of another assignee. For people who are on the road for example. Before this can be done, the Octopus user needs to have the Create an activity on behalf of another assignee permission first. See the permissions section from the Role management wiki for more details.
To add an activity on behalf of another assignee:
- Click the arrow at the end of the Add button.
- Pick On behalf of another assignee.
- Select the Octopus user.
- Add the information; date, effort, cost, on-site visit, and type of the activity.
- Describe the work done and add an attachment if required.
- Click OK to save.
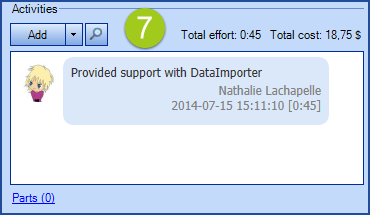
- The activity will be saved in the request the same way as a standard activity (blue in colour, and with an additional avatar icon of the Octopus user with the modern view).
When a user adds a resolution activity on behalf of another assignee, the Resolved by column will reflect the name of the tech who did the resolution. To find out if the activity was entered by another person, add the Created by column.

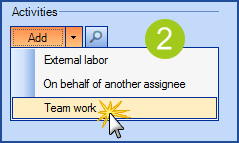
Team Work
Sometimes, more than one person will be working on a common activity for the same request, during a move for example. Use the Team work option for this type of activity, this ensures that the time for each is recorded. You need to have the Create an activity on behalf of another assignee permission to enter Team work activities for another person, see the permission section of the Role Management wiki for more details.
Only one person can add the activity for the group and the effort will be calculated for each Octopus user and imputed in their timesheet.
Here are the steps to add Team work:
- Click the arrow at the end of the Add button.
- Choose Team work.
-
Select the Octopus user.
-
Add the information; date, effort, cost, on-site visit, and type of the activity.
-
Describe the work done and add an attachment if required.
-
Click OK to save.
- An activity for each Octopus user will be added to the request the same way as a standard activity. The description text will be reproduced in each activity with Team work mentioned at the beginning.


The Classic view
The following log shows multiple activities sent and received by the Octopus user and a customer.
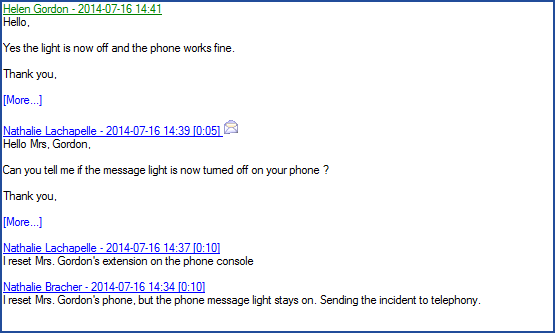
Many elements present in the activity log of a request give information about the activity.
The following image gives an overview of these elements.
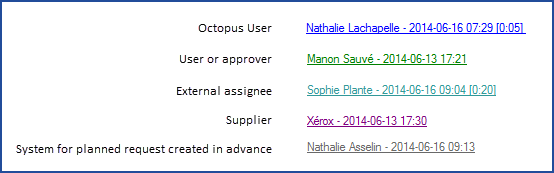
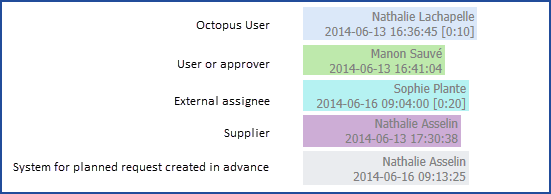
The colour of the activities indicates the type of person who wrote the activity. This helps to quickly identify if the elements came from users, external assignees or suppliers.
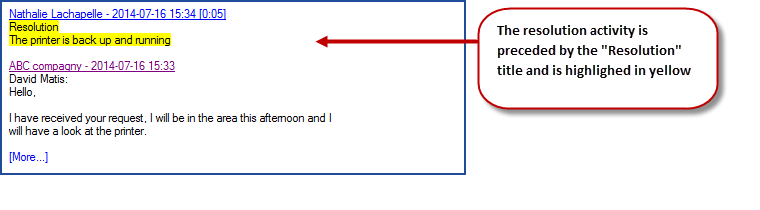
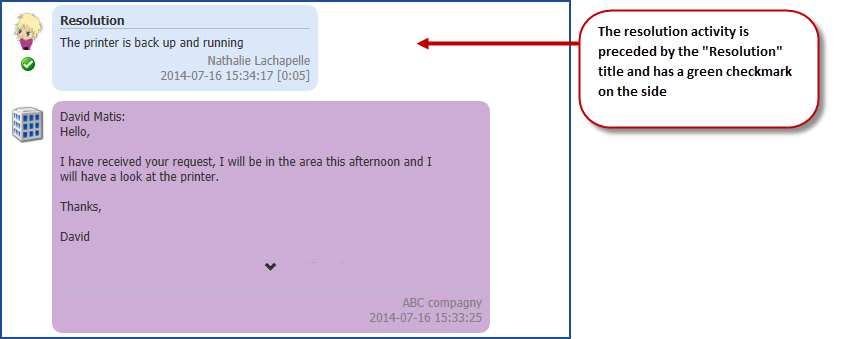
The resolution activity is a specific activity in Octopus. It always has a different appearance than the others to make it easily recognizable. In the Classic view, it is preceded by the Resolution title and is highlighted in yellow.
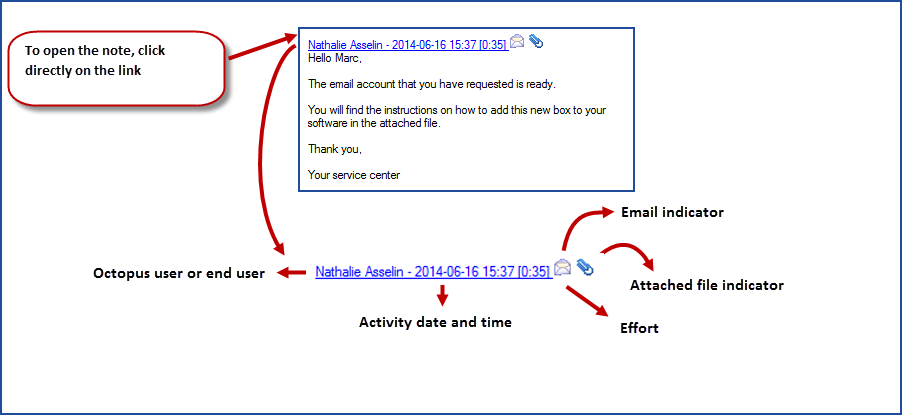
The Modern view
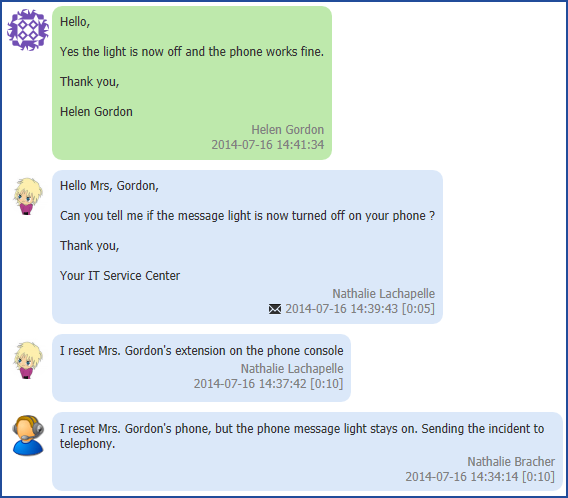
The following log shows multiple activities sent and received between the Octopus user and a customer. You can also see an avatar (little picture) that represents the Octopus user and the customer.
For more information on avatars, see the User management document.
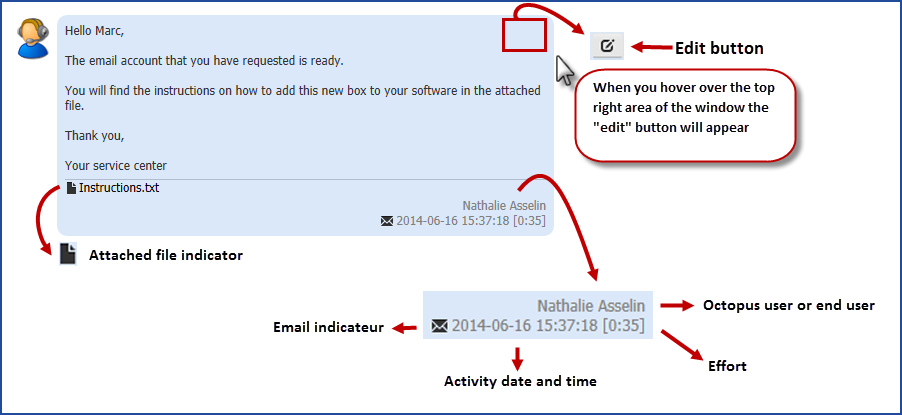
Many elements present in the activity log of a request give information about the activity.
The following image gives an overview of these elements.
The colour of the activities indicate the type of person who wrote the activity. This helps to quickly identify if the elements came from users, external assignees or suppliers.
The resolution activity is a specific activity in Octopus. It always has a different appearance than the others to make is easily recognizable. In the Modern view, it is preceded by the Resolution title and has a green checkmark on the side.
Using Activity Types
Activity types make data entry much easier and help standardize communication to users.
It is very simple to use, from the activity window select an activity type using the cursor or search for a type with the name.
Validate the information in the type and complete the text if necessary before saving.
To make the field visible or to find out how you can configure the activity types, see the Activity Type Manangement article.
Activities from the Web Portal
For the users
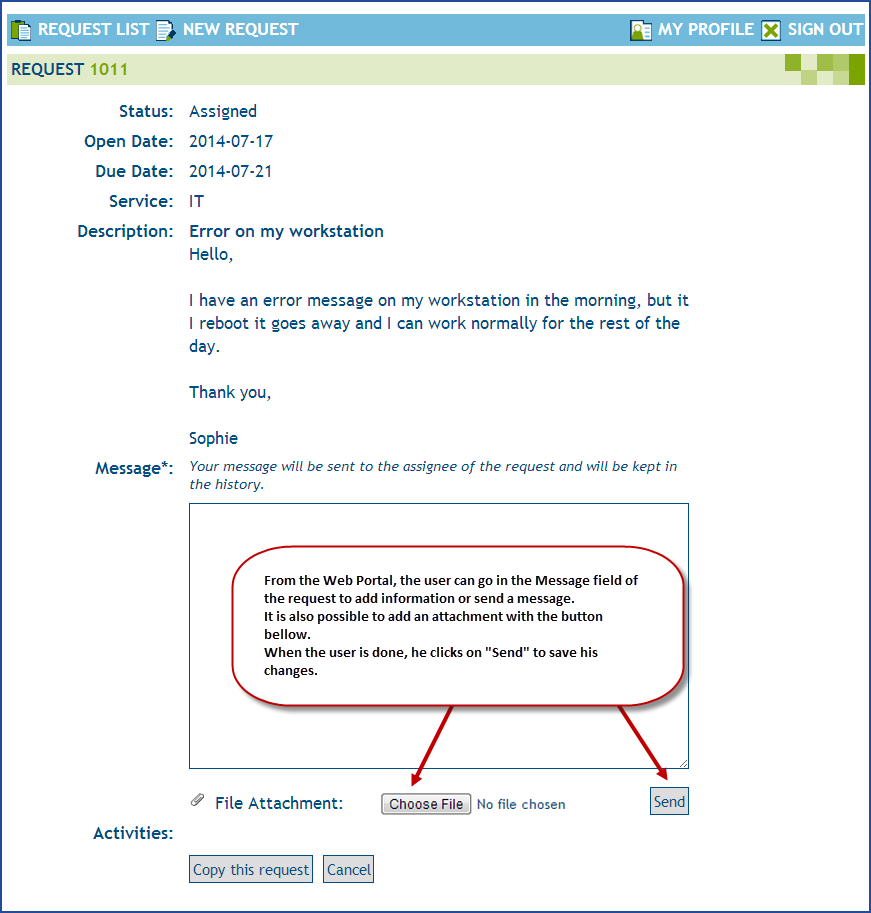
For the end user, the activities from the Web Portal allow him to communicate with the people who take care of his request. He can access the Web Portal to create a request, add information in an existing request or send a message to the Octopus user with the Message field. He can also add attachments from the bottom section. To save and send the message, he must click on the Send button.
For external assignees
The external assignee can add an activity to a task with the Add an activity button. Once in the activity window, the available fields are similar to the ones from the Standard activity section.
For more information on external assignees, see the External Assignee - How to uses the Tasks document.

Activities From WebTech
The Octopus user can add a standard or an external labor activity from a request using the Add an activity button. Once in the activity window, the available and mandatory fields are the same as with a standard activity. The choice of activity type can be done with the radio button at the top of the page. By default, the activity type is Standard.
For more information on how to use WebTech, see the Web Portal for Building Maintenance Workers document.

Thank you, your message has been sent.