Table of contents
Introduction
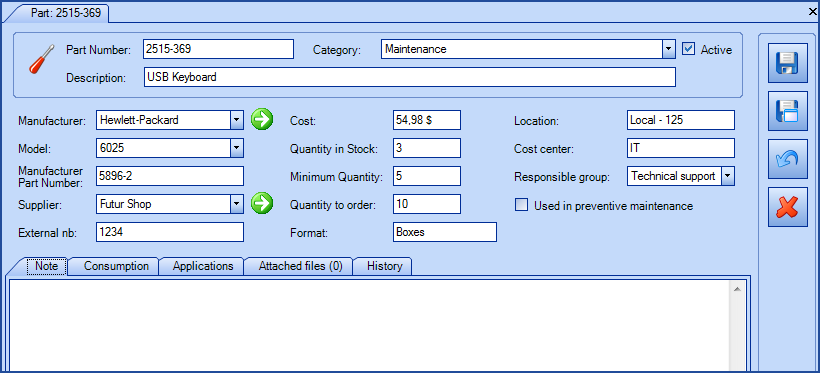
This article presents the information to import parts in the CMDB.
References
 The reference template files (.xlsx and .xml) to prepare imports are included in the Parts.zip file.
Required Fields
- Number - Text (250)
- Unique identifier for the part.
- If the ExternalIdentifier field is present, it will have precedence on the part number. See description of the field below.
- Description - Text (250)
- Name or description of the part.
Optional Fields
- Manufacturer - Text (500)
- Represents the manufacturer of the part.
- When there is a model, this field becomes mandatory.
- The system will create the supplier during import if it does not already exist.
- This information is related to the supplier module. For more information, refer to the Import suppliers article.
- Model - Text (50)
- Represents the part model and is always linked to the manufacturer.
- The system will create the model if it does not already exist.
- ManufacturerPartNumber - Text (250)
- This field is used to identify the manufacturer's number of the part.
- The manufacturer is mandatory when the ManufacturerPartNumber is present.
- Supplier - Text (500)
- Part supplier. Generally the vendor of the part.
- The system will create the supplier during import if it does not already exist.
- This information is related to the supplier module. For more information, refer to the Import suppliers article.
- Cost - Decimal
- Cost of the part per unit.
- The value must be between 0 and 9 999 999.99.
- Example : 1234567.89.
- MinimumQuantity - Whole number
- Minimum quantity to keep in stock.
- Example: 25.
- QuantityInStock - Whole number
- Present quantity in stock.
- Example: 40.
- Site – Text (200)
-
The system will create the site or sub-site during import if it does not already exist.
-
The site can be configured from the Tools > Reference data management > General > Sites menu.
-
It is possible to import many levels of sites, so you can have a main site and it's sub-sites.
-
Site|Sub-Site1|Sub-Site2|Sub-Site3 ... and so on.
All your sites and sub-sites will hence be imported within the same field in Excel, Access or other ODBC source. The system will create the sites and sub-sites if they do not already exist.
Example: Canada|Quebec|Montreal|East Montreal
- Location - Text (100)
- Indicates where the part is stored.
-
CostCenter - Text (50)
-
Part cost center.
-
-
ResponsibleGroup - Text (50)
-
Octopus user group that manages this type of part.
-
This group must already exist.
-
-
Category - Text (100)
-
Part Category defined by the Octopus Administrator. The option is accessible from the Tools > Reference data management > Parts > Category menu.
-
The system will create the category during import if it does not already exist.
-
-
Quantity to order - Whole number
-
Quantity to order.
-
-
Format - Text (100)
-
Part units in inventory.
-
Example: box, packs of 10, etc.
-
-
UsedInPreventiveMaintenance - Boolean
-
Indicates that the part is used in preventive maintenance.
-
Accepted values are: 1 or 0, True or False, Oui or Non.
-
-
IsActive - Boolean
-
Indicates if the part is active.
-
Accepted values are: 1 or 0, True or False, Oui or Non.
-
-
ExternalIdentifier - Text (50)
-
Corresponds to the External nb field.
-
Part number from an external system used for import.
-
When present, serves as the primary key when importing.
-
- Note - Text (5000)
- Note tab of the part.
Configuration File (XML)
The declaration of the source is done by indicating the PART value in the <Content> tag.
<?xml version="1.0" encoding="utf-8" ?>
<Sources>
   <Source Name="ImportParts">
      <ConnectionString>Provider=Microsoft.ACE.OLEDB.12.0;Data Source=c:\Import\Parts.xlsx;Extended Properties="Excel 12.0 xml;HDR=YES";</ConnectionString>
      <ViewName>[Import Parts$]</ViewName>
      <Content>PART</Content>

<!-- Additional Tags -->
     <SiteSplitStrategy>ByPipe</SiteSplitStrategy>
     <EmptyValueHandling>Clear</EmptyValueHandling>

   </Source>
</Sources>
Refer to the XML Configuration File article that explains how to program references to the data sources.
Information on Additional Tags
To import parts, the XML file can contain some additional tags. These tags are not mandatory and if they are not specified, the default value will be used.
Data Separator Management
When importing choices for categories, a separator must indicate the delimitation of the data.
The two choices are:
- The pipe ( | )
- The comma ( , )
To specify which separator to use in the file, the SiteSplitStrategy tag must be added to the XML file
Values allowed for the SiteSplitStrategy tag:
- ByPipe (default value)
- ByComma
To use this tag, add the following line in the XML file.
<SiteSplitStrategy>VALUE</SiteSplitStrategy>
If the tag is not specified in the XML file, the default value is applied.
Management of Empty Fields
DataImporter can help clean the data contained in Octopus when empty fields are encountered. If this tag is not present, the NoChange default value will be used.
If you want to use this tag as part of an import, it is important that your data source only contains columns to act on. DataImporter will systematically try to clean all these columns. You can clean all fields except:
- Required fields
- Fields that have been configured as mandatory in the Octopus database
- Fields that accept only specific values, for example boolean type fields (yes/no).
Permitted values for the EmptyValueHandling: tag
- Clear: The existing value in Octopus will be cleared and the field will be empty
- NoChange (Default Value): Fields that are empty in the data source being imported will be ignored and the existing value in Octopus will be kept.
To use this tag, add the following line to the XML file :
<EmptyValueHandling>VALUE</EmptyValueHandling>
Thank you, your message has been sent.