Table of contents
Related Articles
Introduction
The ability to customize the lists is a feature that provides flexibility and allows to exploit the many features of Octopus. It is possible to:
- Add new lists / modify existing ones.
- Allocate lists to the desired module.
- Personalize the display by selecting your Favorite lists.
- Select the default list when opening a module.
- Centralize your lists in Home and access all desired information from this module.
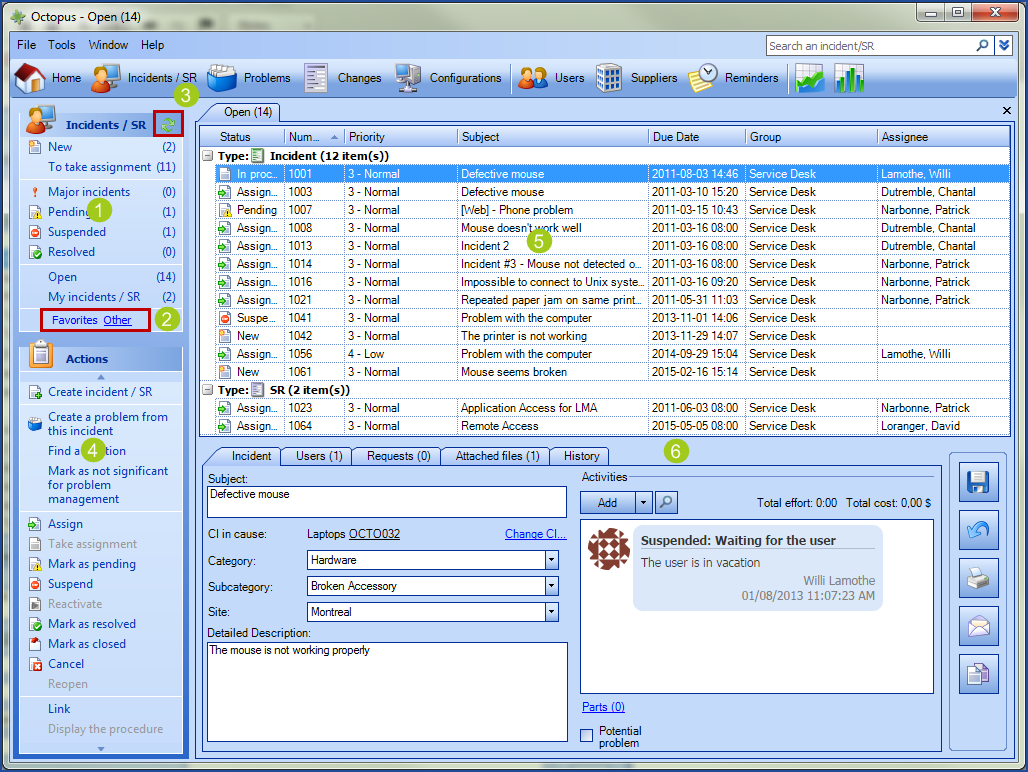
Main Octopus screen
The main Octopus screen is composed of the following items:
- List Menu
- List Pages
- Refresh button
- Actions menu
- Record list
- Zone d'édition
List menu customization
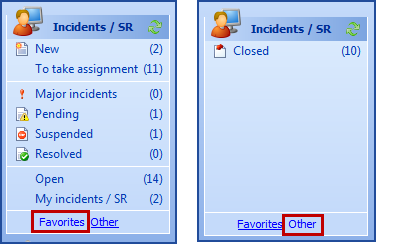
The list menu is customizable, in the sense that you can select and sort the lists used in your day to day work.
It is preferable to position the most used lists in your Favorites page and the occasional ones in your Other page.
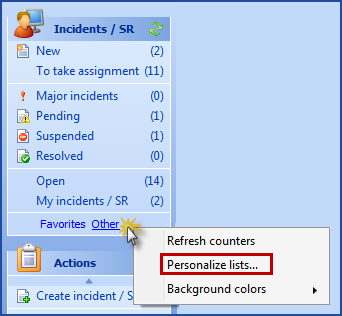
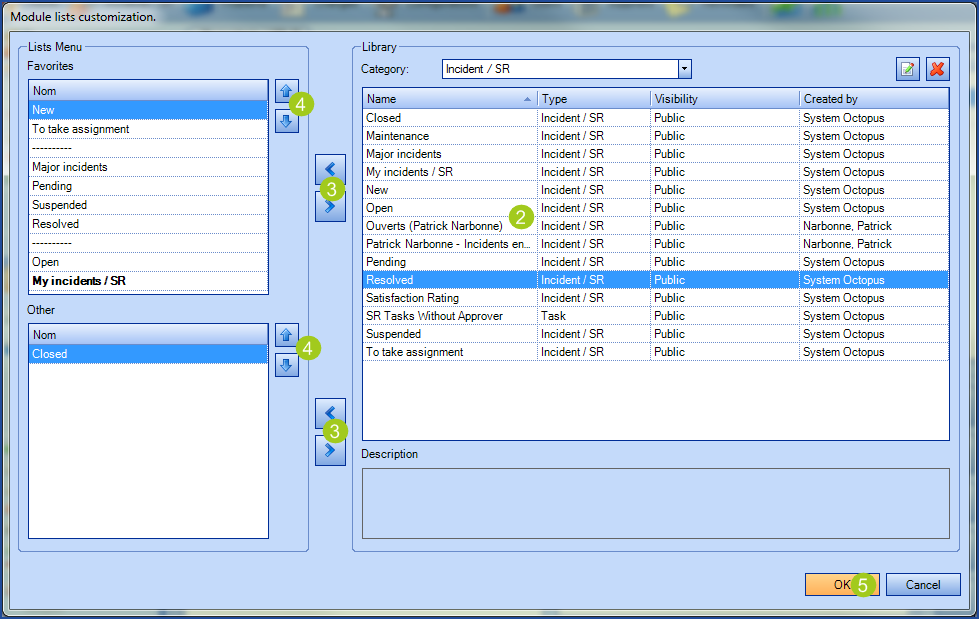
To acces the list disposition:
- Right click in the List Menu section to open the contextual menu and select Personalize lists...
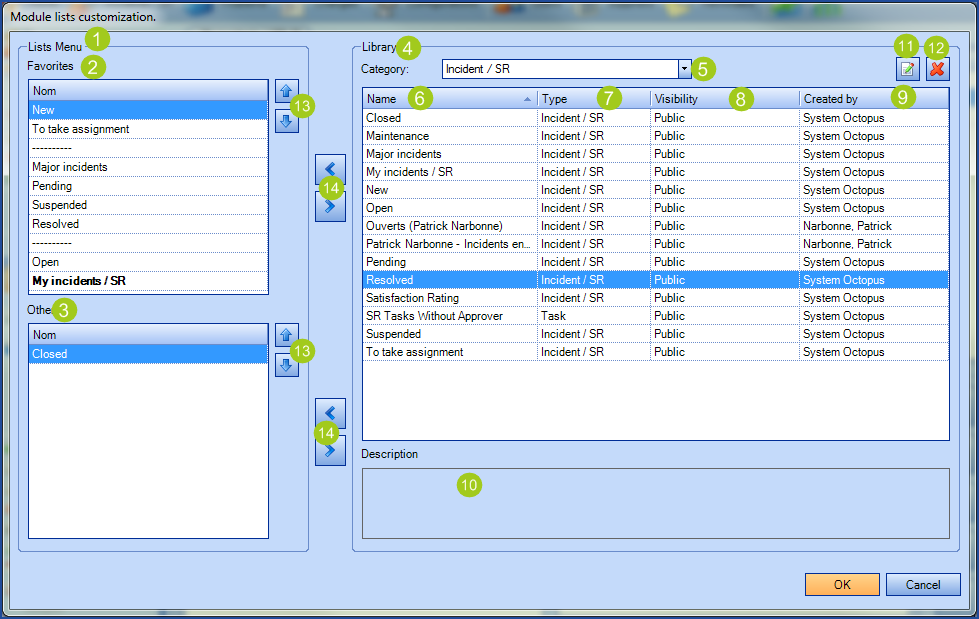
- List Menu
- Favorites page content
- Other page content
- Library containing all lists
- Category sorting your custom and public lists
- List Name
- List Type
- Visibility
- Public: public lists are visible in the Library for all Octopus users
- Private: private lists are exclusive to their creator
- Created by
- List Description
- Edit list button
- Delete list button
- Arrows to move lists to Favorites or Other pages
- Arrows to add or remove a list from Favorites or Other pages
Manage lists Permission
The Manage lists permission allows you to:
- Create, modify or delete any list (public or private) created by Octopus users.
- Define the default List Menu displayed to all Octopus users.
Octopus users without this permission can still:
- Create, modify or delete their own lists (public or private) only.
Add an existing list
- Acess the List customization menu
- Select the desired list from the Library.
- Use the left/right arrows to add or remove the list from your Favorites or Other pages.
- Use the up/down arrows to change the lists order in your Favorites or Other page.
- Click OK when done.
Other options
Other options are also available:
-
Acess the List customization menu.
-
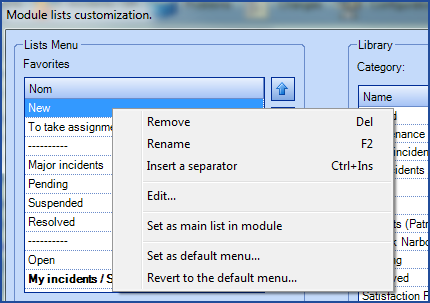
Right click on a list from the Favorites or Other pages to open a contextual menu that offers the following possibilities:
-
Remove: Removes the list from the page. The Delete key can also be used.
-
Rename: Renames the list (this action does not modify the name of the original list). The shortcut key F2 can also be used.
-
Insert a separator: Inserts a dotted line to separate groups of lists. The shortcut keys combination CTRL + Insert can also be used.
-
Edit...: Opens up the Save list window to edit the previously entered fields.
-
Set as main list in module: Sets the list as the default one that opens in the corresponding module.
-
Set as default menu...: Pushes the whole List Menu to all Octopus users. The Manage lists permission is required for this action.
-
Revert to the default menu...: Reverts back to the Default List Menu or the menu set by the Octopus administrator.
-
List Creation
Create a list from an advanced search
The followins scenario explains how to create a list from the Home module. It is important to understand the following points:
- When a list is created from the Home module, fields from all request types (Incident/SR, Problem, Change, Event, Task) are available. Therefore, if a list must contain criteria from 2 different types of requests, it has to be created from the Home module. Otherwise, some fields won't be available.
- To create a list that searches of only one type of request, it is easier to create it directly from the related module so only the related fields will be displayed.
- Select the Home module.
- Click on the double arrow beside from the Search field to display additional criteria.
- From the General or Date tabs, enter the desired fields for your search; each field allows a multiple selection to enable you to combine several critera at a time .
- The Avanced tab gives additional ways to search (field, operator and value), based on all available criteria.
- Click on the magnifiying glass to display the results. Consult the Advanced Search article for more information.
- Save the search and create the list by clicking on the
 icon.
Visual explanation
icon.
Visual explanation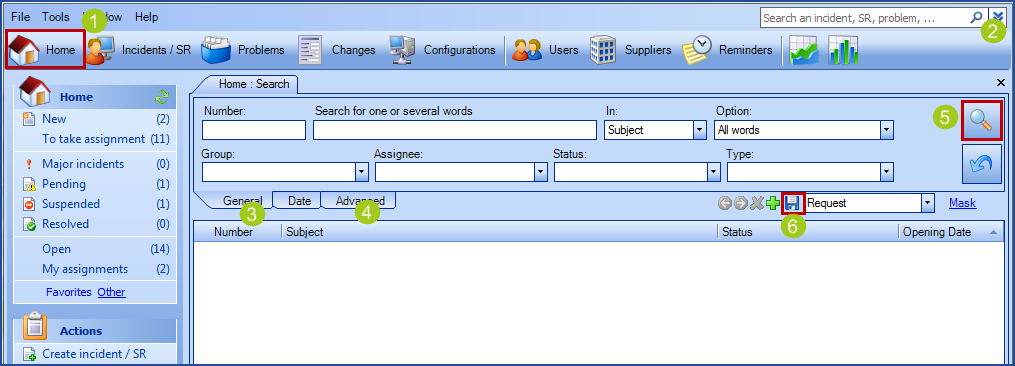
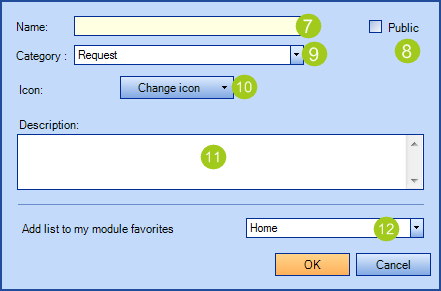
- Write a list name.
- Indicate if you want this list to be public. If not, it will only be visible to you and not to all Octopus users.
- Choose the search category from the drop down list (note that if you create a list from another module than Home, the category will match the selected module).
- Click on the Change Icon button to add, modify or remove an icon associated with the list.
- Enter a description that resumes the purpose of your new list.
- Select the module where should this list appear.
- Click on OK to conclude and create the list.
Creating a new list from an existing one or modify an existing list
Octopus users with permissions to administer lists will be able to modify any user created list or even push the defaut List Menu.
- Click on an existing list from your List Menu.
- Right click anywhere in one of the columns to open a contextual menu.
- Select Modify criteria.
- Proceed to adjust the critera as required and use the magnifying glass button to search.
- Click on the Save icon and Octopus will provide two choices:
- Redefine the list (all Octopus users using this list will be affected) or
- Create a new list
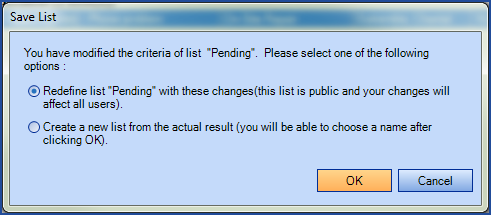
- Make your choise and click on OK.
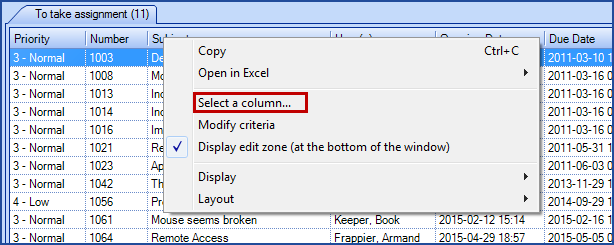
Customizing the field position in a list
Fields (columns) can be added or removed in a list.
- Right click on the upper part of the main section (records list) to access the contextual menu and click on Select a column...
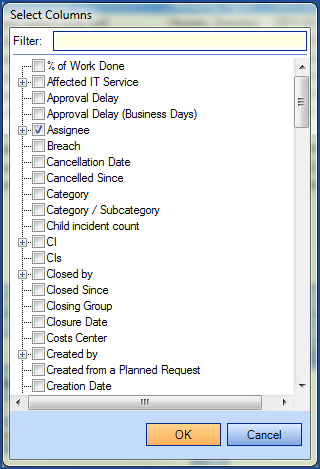
- Check a field box to insert it as a column or uncheck it to remove its column. Click OK.
- To facilitate your search, you can write a partial or complete field name in the Filter box.
- If you must check more than one box, the order in which they were check will also apply to the colums order.
- A single selection will position the column to the far right.
- If necessary, move the columns by sliding them to the desired position.
- The redefined list is part of the Octopus user profile and will be kept automatically, even when using a different computer
Copying a list disposition to another list
When creating or modifying a list, it is possible to reproduce a list disposition onto another list without having to complete all steps each time.
- Click on a list, let's call it List 1.
- Press on CTRL + SHIFT + C to copy the disposition.
- Acces the list on which you want to reproduce the disposition to; list 2.
- Press CTRL + SHIFT + V to reproduce the disposition from "List 1" to "List 2".
Thank you, your message has been sent.