Table of contents
Related articles
Introduction
MailIntegration (ESI.Octopus.MailIntegrationApp.exe) is a program used in Octopus to create new requests (incidents, service requests or events) or update the activities of a requests received via email. The program needs to be automated using the Windows Task Manager.
If you want to create incidents from a surveillance system, System Center Operations Manager 2007 for example, please consult the Create events from emails section.
To use MailIntegration, you need a dedicated email account and you need to make sure that the POP3 protocol is enabled on your email server.
How MailIntegration Works
When MailIntegration is started, it will read the mailbox to see if it contains any new messages. If it does, the program will validate if the email is a new incident, an event or meant to update an activity in an existing request.
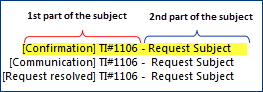
The method used by Octopus to "recognize" an email is the following. Octopus reads the email subject and if the request number is found in a specific format, it will update the request, otherwise it will create a new incident/event.
In the image bellow, the first part represents the format that Octopus looks for to update a request:
- The communication type in between square brackets.
- Sometimes followed by the name of the DB or the team name.
- The request number.
In the case where it is a new email, MailIntegration will create a new incident or event in Octopus. The email subject will be the incident/event subject and the email body will be placed in the detailed description. For an incident the sender will be tagged at the requester/user. If the email of the sender is not recognized by Octopus, the incident requester/user will be the system user previously defined (Fallback user).
If the email concerns an existing request, an activity will be added to the request containing the name of the sender, as well as the date and time of the activity in Octopus.
Email processed by MailIntegration will then be deleted. This is the standard behavior for the POP3 protocol. To keep a copy of received mails, you will have to configure your system in one of the following way, depending on the Mailing system used. We invite you to contact your mail administrator to decide which is right for you.
- Use a distribution list that delivers email in a mailbox meant for MailIntegration and a mailbox meant for archives.
- Configure a server-side mail delivery rule that will also send email received in a mailbox meant for archives.
- Configure a server-side mail copy rule that will also copy email received in a folder meant for archives.
Prerequisites
Email Account
Have an email account that is dedicated to Octopus. To configure MailIntegration, you need the following information:
- The complete address of the account.
- The name of the user of the account.
- The account password.
- The email server name.
POP3 Protocol
The only supported protocols for the MailIntegration program are POP3 and secure mode POP3 (SSL). The protocol to use needs to be activated on the email server that will be used.
If you want to use POP3 in secure mode (SSL), you have to make sure the machine executing MailIntegration recognizes the authenticity of the certificate used, either by using a trusted certificate authority, or by locally installing the server's self-signed certificate.
Test the POP3 Protocol
MailIntegration will not function if the protocol test does not work, you will find the information to do this test in the MailIntegration - Testing the POP3 connection page.
System User
A system user should be designated to associate with incidents when the sender's email is not recognized by Octopus.
This user could also be configured to run the Windows task. For more information on the subject, see the Octopus System Account article.
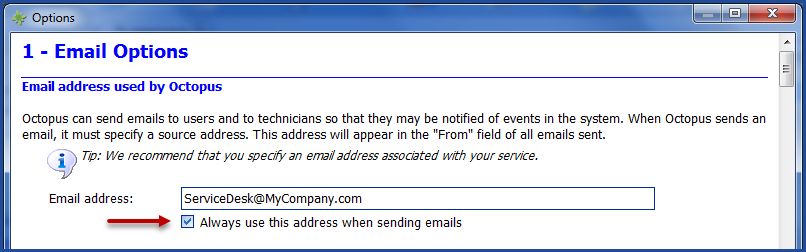
Configure the email address used by Octopus
Before using MailIntegration, you need to have configured the dedicated email address that the system will use to communicate with users.
Go to Tools > Options > Section 1 - Email Options > Email address used by Octopus.
Add the address of the dedicated email account and check the Always use this address when sending emails box.
Attachment Directory
Before using MailIntegration, the network path for the Attachments needs to be configured in Octopus.
Go to Tools > Options > Section 3 - Important general options > Network directory containing the attached files.
In case of a problem an event is automatically created
It is important to note that in case of issues with MailIntegration, Octopus will create an event with instructions on how to resolve it. For this reason, before activating MailIntegration, we recommend to ensure members of your Service Desk have subscribed to the New Event notification.
- (File menu > My notification preferences... > New Event).
- The permission Access the Event Management module is also required.
Octopus displays a specific content when an error with an email message is encountered.
When a problem is detected, the event management shows a new entry that contains the original message blocking the application.

The message can be seen in the "Attached Files" tab.

Attached Files
MailIntegration will do the same when an already existing event gets a new activity.
In case of an infrastructure outage detection, Octopus also creates an event but this time, it displays a message that contains the issue's source.

Infrastructure issue
The configuration file will be attached(without passwords, if required) in an .XML format.

Infrastructure issue - XML file
Octopus will continue to add additional activities as long as the issue is still occurring.

Additional activities
Furthermore, once the MailIntegration issue gets resolved, Octopus then proceeds to automatically mark the event as processed.
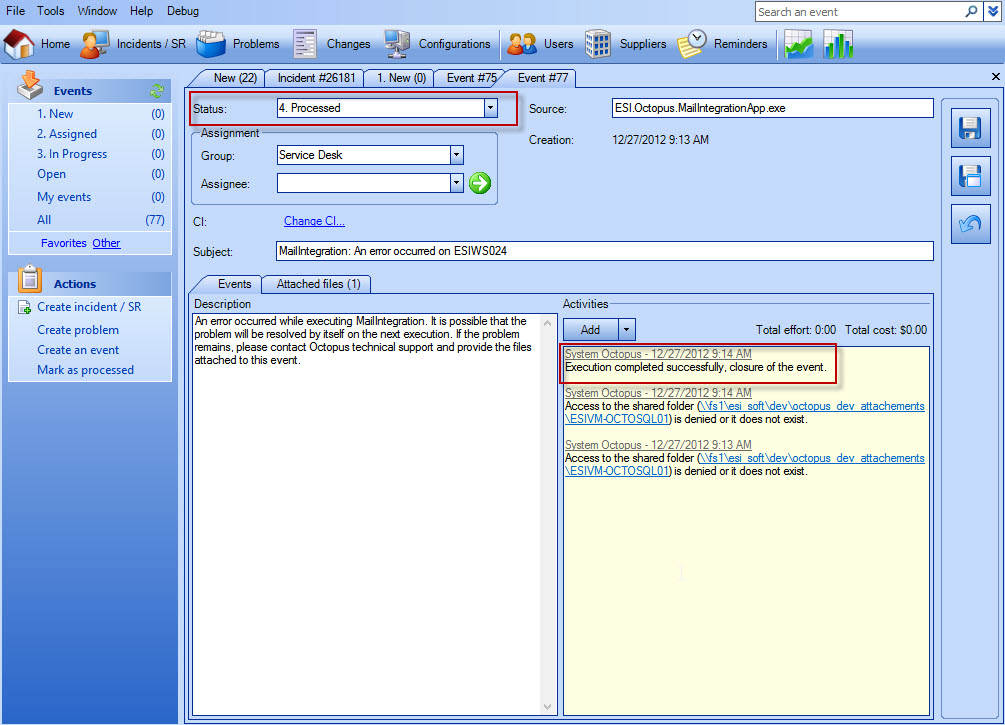
Automatic closure
Using the MailIntegration Program
MailIntegration is a command line type program (DOS). It is designed this way to be easy to automate (the Automate email updates in Octopus section describes how to automate the execution of MailIntegration).
- The complete name of the program is: ESI.Octopus.MailIntegrationApp.exe
- It is located in the local Octopus folder (C:\Program Files\Octopus) or in (\%homepath%\AppData\Local\Octopus)
- Example of the folders where Octopus can be found:
- For Windows 7: C:\Users\slevesque\AppData\Local\Octopus
- For Windows XP: C:\Documents and Settings\Slevesque\Local Settings\Application Data\Octopus
What you need to know:
Each time the program is run a .LOG file is created in this format; ToolName_YYYYMMDD_HHMMSS.log
- For example MailIntegrationApp_20190618_105242.log.
Use this file to see the results of the command execution and errors if there are any.
Also see the Octopus Tools | Maintenance of log files article about the importance of the log file management.
It is possible to generate an encrypted password and hide the password at runtime, see this article for details.
Parameters
There are 6 available parameters to execute MailIntegration, of which 4 are mandatory:
Mandatory Parameters
- /Login
- Octopus user name.
- This account will be used to create the incidents and will be visible in the history tab. It is better to use a dedicated account for this program. (Example: Mail Octopus).
- /Password
- Octopus password.
-
/Team
-
The number of the team to be updated.
-
By default, IT is team number 1.
-
- /ConfigFilePath
- Path to the configuration file.
The next section explains how to prepare the configuration file.
Optional Parameters
- /LogFilePath
- To replace the path to the log file. By default, the file is named MailIntegration_YYYYMMDD_HHMMSS.log and is located in the Octopus folder. If you move the file to another folder, the folder needs to exist (the system cannot create the folder). Furthermore, the path needs to contain the file name.
- Example:/LogFilePath:C:\LogFiles\MAILINTEGRATION.log
- To replace the path to the log file. By default, the file is named MailIntegration_YYYYMMDD_HHMMSS.log and is located in the Octopus folder. If you move the file to another folder, the folder needs to exist (the system cannot create the folder). Furthermore, the path needs to contain the file name.
- /PurgeLogs
- Can automatically erase old log files
- The parameter is used to determine how many days of log files that you want to keep.
- For more information, see the Octopus Tools | Maintenance of log files.
-
/NoRestartOnUpdate
-
This parameter prevents the application from restarting after an update is downloaded and installed
-
This is usefull when multiple occurences of MailIntegration are run from a batch file. We recommend using this parameter to prevent corruption of the Octopus installation folder when an update occurs, which may prevent future execution of MailIntegration.
-
Operations Log File
Files generated by the execution of the MailIntegration program:
- MailIntegrationApp_YYYYMMDD_HHMMSS.log
- Operation log file generated each time the program is executed
- RawMessage.txt
- Content of the email in raw text in case of problem or at the request of the Octopus Service Center by adding the /DEBUG parameter
The files are created in the same folder at the executable "ESI.Octopus.MailIntegrationApp.exe". Furthermore, these files can be requested to troubleshoot a MailIntegration issue.
Configuration File (XML)
The configuration file is a text file containing the information on the mail server, the username and password of the mailbox to use, as well as other parameters required by the program. This file uses the .XML format. The following section explains the 2 formats available for the .XML file, one for POP3 and the other for SSL.
Be careful not to change the format of the information contained in the file. As any "/" or "<" missing in the structure can render the file unusable. Make sure that the specified values are valid. Do not leave any empty spaces before or after the values.
In case of errors with the configuration, the program will stop working and an Event will be created in Octopus with details on the problem.
To view the information contained in the file, you can use a software like Internet Explorer. And to edit, we recommend Notepad or Notepad++.
Accents are not supported in the XML file. You need to replace the accents with the corresponding HTML code Entity
Example:
 must be replaced by
To find the HTML Entity accent correspondence, consult the following Correspondence Table.
Incident creation using a XML POP3 file
Open the following file in Notepad:
<?xml version="1.0" encoding="utf-8" ?>
<MailIntegration>
<MessageProcessorTypeName>ESI.Octopus.MailIntegration.EndUserIncidentMailMessageProcessor, ESI.Octopus.MailIntegration</MessageProcessorTypeName>
<Server>
<GatewayTypeName>ESI.Octopus.MailIntegration.MailKitMailboxGateway,ESI.Octopus.MailIntegration</GatewayTypeName>
<ServerName>SERVER</ServerName>
<Port>110</Port>
<secureSocketOption>None</secureSocketOption>
<!-- <useSsl>false</useSsl> -->
<authentication>Basic</authentication>
<userName>MAILBOX</userName>
<password>PASSWORD-CLEAR-TEXT</password>
<clientId></clientId>
<tenantId></tenantId>
</Server>
<IncidentFallbackSiteName>FALLBACK-SITE</IncidentFallbackSiteName>
<IncidentFallbackUserLogon>FALLBACK-USER</IncidentFallbackUserLogon>
<IncidentPriority>PRIORITY</IncidentPriority>
<IncidentGroup>ASSIGNED_GROUP</IncidentGroup>
<IncidentSource>Email</IncidentSource>
<IgnoredAttachments></IgnoredAttachments>
<traceMessageInfo>False</traceMessageInfo>
<sleepTimeAfterDeletion>0</sleepTimeAfterDeletion>
</MailIntegration>
The highlighted sections need to be configured. These tags are explained in the following section.
Explanation of the Tags
- <ServerName>SERVER</ServerName>:
- Name of email server.
- Replace SERVER with the name of the email server
- Name of email server.
- <UserName>MAILBOX</UserName>:
- Username of the mailbox account.
- Replace MAILBOX with the user account name used to authenticate. Normally this does not include the domain part of the public email address. For example, you would indicate “newincident” here, not “newincident@mycompany.com”.
- Username of the mailbox account.
- <Password>PASSWORD-CLEAR-TEXT</Password>:
- Mailbox account password
- Replace PASSWORD-CLEAR-TEXT with the password of the mailbox account.
- Mailbox account password
- <IncidentFallbackUserLogon>FALLBACK-USER</IncidentFallbackUserLogon>:
- Generic username to be used in cases where the email address of the sender is not recognized by Octopus.
- Replace FALLBACK-USER by the windows username of an existing Octopus user. This must be the same value as recorded in the Windows Username field of the user's file in Octopus. If an email is received form an address that is not recognized by Octopus, the system will use the fallback user indicated here as the incident’s “Requestor” and “User”.
- Generic username to be used in cases where the email address of the sender is not recognized by Octopus.
- <IncidentFallbackSiteName>FALLBACK-SITE<IncidentFallbackSiteName>:
- This tag will be mandatory only when the site is mandatory in Octopus. (Tools menu > Options > section 3 - Important general options > Visible and required fields)
- Replace FALLBACK-SITE with the name of a site that exists in Octopus. When the program runs it tries find the Octopus user based on the email address of the sender. If that sender is not recognized or if the user has no site, the system will use the site indicated here. If the site is not mandatory in the options, this tag can be removed.
- This tag will be mandatory only when the site is mandatory in Octopus. (Tools menu > Options > section 3 - Important general options > Visible and required fields)
- <IncidentSource>INCIDENT_SOURCE</IncidentSource>:
- Indicates the incident creation source
- Leave Email in this tag to indicate that the incident was created from an email.
-
For another source, it needs to previously have been configured in the reference data management of Octopus.
- Indicates the incident creation source
- <IncidentPriority>PRIORITY</IncidentPriority>
- This tag is not mandatory. It allows to add a default priority to incidents/SRs created from MailIntegration. Note that this tag will take precedence over the default priority of the options and those of SR types.
- Replace PRIORITY with the name of an existing priority in Octopus.
- If according to the best practices, the priority is evaluated at the reception of the request, the tag will not need to be changed, remove this line from the XML file.
- This tag is not mandatory. It allows to add a default priority to incidents/SRs created from MailIntegration. Note that this tag will take precedence over the default priority of the options and those of SR types.
- <IncidentGroup>ASSIGNED_GROUP</IncidentGroup>:
- This tag is not mandatory. It indicates the name of group that differs from the service center during the incident creation. This option is usually used if mailintegration is configured for more then one mailbox
- Replace ASSIGNED_GROUP by the name of the group that would be assigned to requests from this mailbox. To assign requests to the service center by default, remove this line from the XML file.
- This tag is not mandatory. It indicates the name of group that differs from the service center during the incident creation. This option is usually used if mailintegration is configured for more then one mailbox
- <IgnoredAttachments></IgnoredAttachments>
- This tag is not mandatory. It is used to ignored some attached files. For example: a logo.
- Indicate a comma-separated list of files to be ignored, including the extension.
- This tag is not mandatory. It is used to ignored some attached files. For example: a logo.
- <CreateNewRequests>True</CreateNewRequests>
- This tag will determine if new incidents can be created from an email message that is not linked to an active request.
- If the new request creation is deactivated, the system will respond to the user with an email message based on a template that can be found in Tools > Options > Other messages section - Automatic reply for denied request creation by MailIntegration.
- <IncludeRawMessageAsAttachment>True</IncludeRawMessageAsAttachment>
- This tag controls if a copy of the email message in EML format will be attached to the created incident.
-
<traceMessageInfo>False</traceMessageInfo>
-
This tag is not mandatory. It allows adding more information to the log file:
-
MessageID
-
From
-
To
-
Subject
-
Date
-
-
-
<sleepTimeAfterDeletion>0</sleepTimeAfterDeletion>
-
This tag is not mandatory. It allows for a delay before retrieving an email after deleting the previous one.
-
This tag must contain a number representing the delay in milliseconds.
-
If you are experiencing issues with requests or activities being recorded twice, we recommend adjusting this setting upward by 5000 milliseconds increment.
-
Once the tags have been configured with the proper information, save the file to the Octopus folder with the .xml extension. For example "Email-Integration.xml"
Using a POP3 TLS
Open the following file in Notepad:
<?xml version="1.0" encoding="utf-8" ?>
<mailIntegration>
  <messageProcessorTypeName>ESI.Octopus.MailIntegration.EndUserIncidentMailMessageProcessor, ESI.Octopus.MailIntegration</messageProcessorTypeName>
  <server>
    <gatewayTypeName>ESI.Octopus.MailIntegration.MailKitMailboxGateway,ESI.Octopus.MailIntegration</gatewayTypeName>
    <serverName>SERVER</serverName>
    <port>995</port>
    <secureSocketOption>SslOnConnect</secureSocketOption>
    <!-- <useSsl>True</useSsl> -->
    <authentication>Basic</authentication>
    <userName>MAILBOX</userName>
    <password>PASSWORD-CLEAR-TEXT</password>
    <clientId></clientId>
    <tenantId></tenantId>
  </server>
  <incidentFallbackSiteName>FALLBACK-SITE</incidentFallbackSiteName>
  <incidentFallbackUserLogon>FALLBACK-USER</incidentFallbackUserLogon>
  <IncidentPriority>PRIORITY</IncidentPriority>
  <incidentGroup>ASSIGNED_GROUP</incidentGroup>
  <incidentSource>Courriel</incidentSource>
  <ignoredAttachments></ignoredAttachments>
</mailIntegration>
The sections in yellow are the additional ones used with TLS. These new tags are explained in the following section.
Explanation of the Additional Tags
Refer to the previous section for the description of the tags common to both files.
- <serverName>SERVER</serverName>
- When SSL mode is enabled, make sure you enter a server name that matches the certificate named used to secure communications.
- <useSsl>true</useSsl>
- The <useSSL> tag has been deprecated. Please use <secureSocketOption> instead.
- <secureSocketOption>SslOnConnect</secureSocketOption>
- The <secureSocketOption> replaces the deprecated <useSSL> tag
- The following values are accepted:
- None: no TLS encryption.
- StartTLS: start with an unsecured connection, then upgrade to TLS.
- SslOnConnect: start the connection using TLS.
- <port>995</port>
- Indicates the port to use.
Using the OAuth authentication mode on Office 365
Shortly, Microsoft will cease support for basic authentication for accounts on Office 365. You will have to switch the authentication to Azure. This feature is supported starting with version 6.0.100,
If necessary, refer to the following online documentation:
- Quickstart: Register an application with the Microsoft Identity Platform
- Authenticate an IMAP, POP or SMTP connection using OAuth
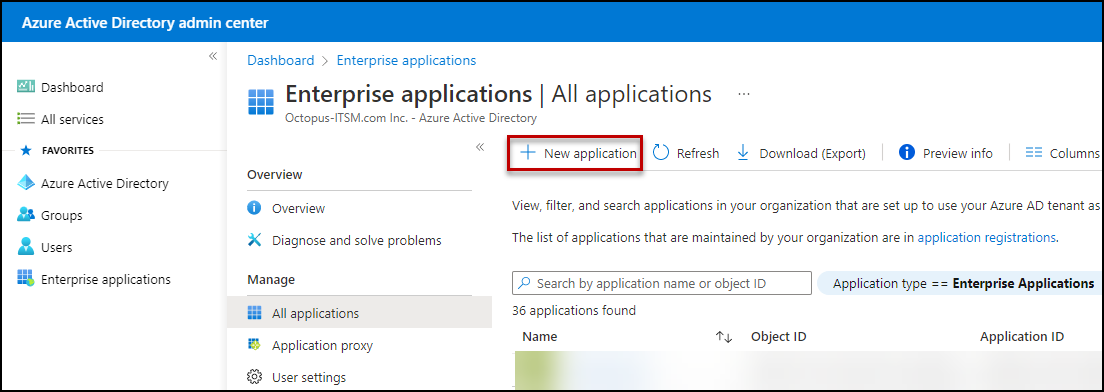
To do so, first create a single App registrations for MailIntegration, unique to each tenant:
- Create a new App registration:
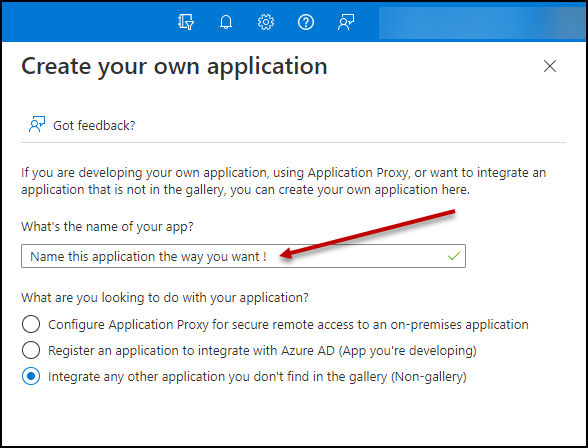
- In Azure Active Directory admin center Portal, choose Enterprise applications and click on + New application.
- Clik on + Create your own application
- Specify a chosen name, which will be used only by your administrators and click on the Create button at the bottom
-
VISUAL EXPLANATION

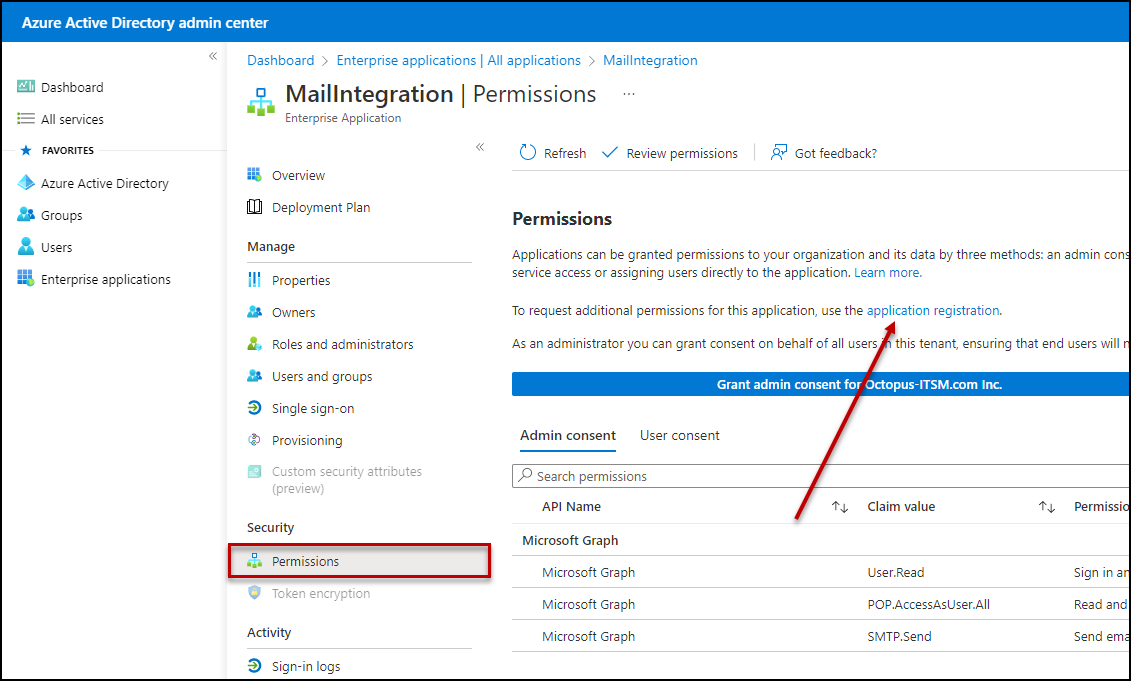
- Delegate appropriate permissions
- Browse the newly created application
- Access to the Permissions configuration blade (under Security)
- Click on the application registration link
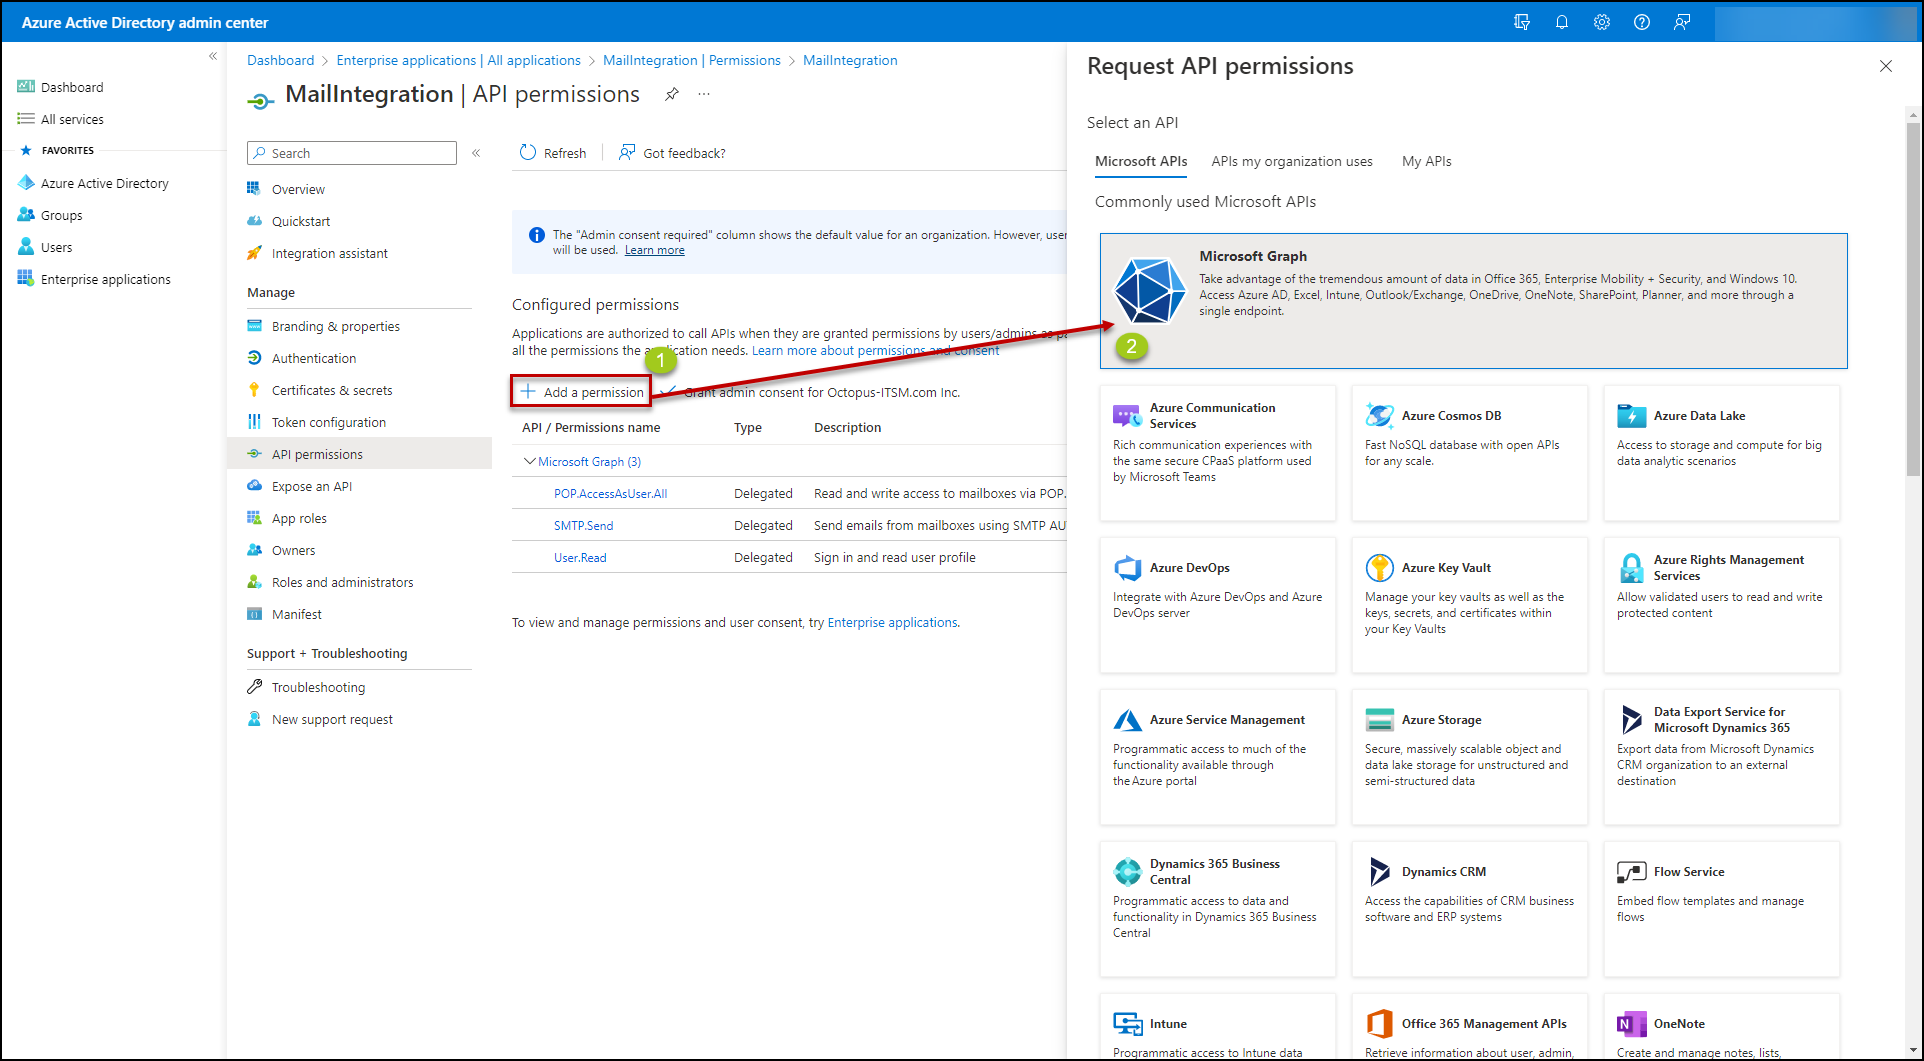
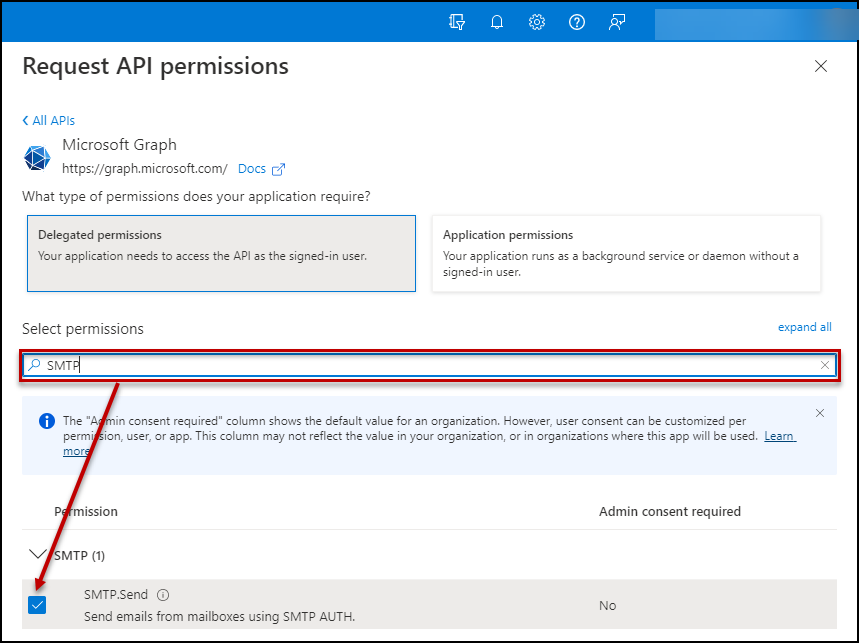
- Add the following Microsoft Graph delegated permissions:
- POP.AccessAsUser.All
- SMTP.Send
- Click on Grant admin consent button.
- Click on the Authentication section
- Under Advanced settings, Allow public client flows
- Save your modification
-
VISUAL EXPLANATION

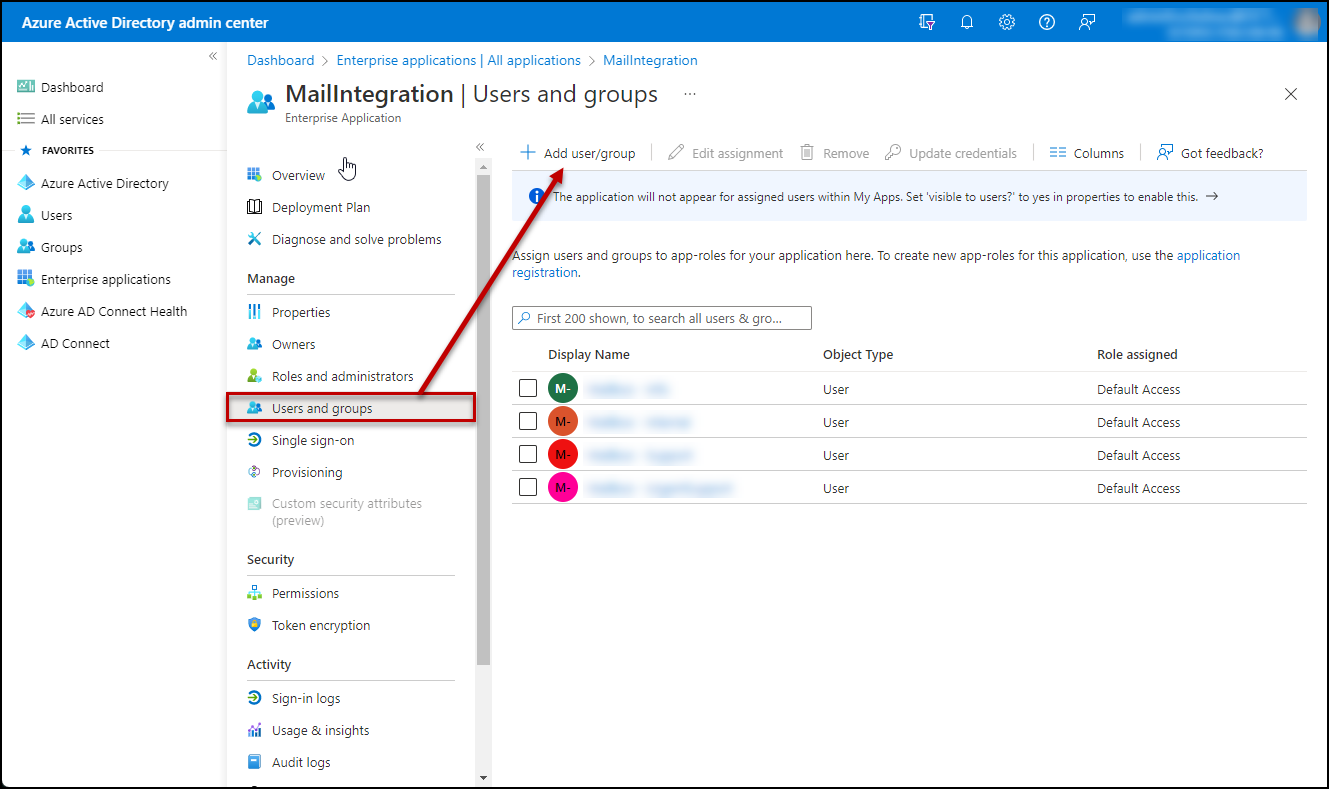
- Authorize your mailbox user(s)
- In the main page of your enterprise application, click on the Users and groups blade
- Add each mailbox that will use this enterprise application
- Save your modifications
-
VISUAL EXPLANATION
- Note the relevant information:
- Choose the Overview section.
- Note the Application (client) ID in xxxxxxxx-xxxx-xxxx-xxxx-xxxxxxxxxxxx format.
-
Note the Directory (tenant) ID in yyyyyyyy-yyyy-yyyy-yyyy-yyyyyyyyyyyy format.
At this point, you have all required information to configure your XML configuration file. You can either manually edit it, or use the MailIntegration.ConfigurationEditor tool provided with your Octopus Windows Client. Check out this Wiki for more information.
Once the app registration is created, you'll be able to use the relevant information to fill out the XML file. The sections in yellow are the ones that need to be configured. These tags are explained in the next section. Then save the file in the Octopus folder with the ".xml" extention file. For example "event-email-integration.xml"
<?xml version="1.0" encoding="utf-8" ?>
<mailIntegration>
  <messageProcessorTypeName>ESI.Octopus.MailIntegration.EndUserIncidentMailMessageProcessor, ESI.Octopus.MailIntegration</messageProcessorTypeName>
  <server>
    <gatewayTypeName>ESI.Octopus.MailIntegration.MailKitMailboxGateway,ESI.Octopus.MailIntegration</gatewayTypeName>
    <serverName>Outlook.Office365.com</serverName>
    <port>995</port>
    <secureSocketOption>SslOnConnect</secureSocketOption>
    <!-- <useSsl>false</useSsl> -->
    <authentication>Azure</authentication>
    <userName>MAILBOX</userName>
    <password>PASSWORD-CLEAR-TEXT</password>
    <clientId>xxxxxxxx-xxxx-xxxx-xxxx-xxxxxxxxxxxx</clientId>
    <tenantId>yyyyyyyy-yyyy-yyyy-yyyy-yyyyyyyyyyyy</tenantId>
  </server>
  <incidentFallbackSiteName>FALLBACK-SITE</incidentFallbackSiteName>
  <incidentFallbackUserLogon>FALLBACK-USER</incidentFallbackUserLogon>
  <IncidentPriority>PRIORITY</IncidentPriority>
  <incidentGroup>ASSIGNED_GROUP</incidentGroup>
  <incidentSource>Courriel</incidentSource>
  <ignoredAttachments></ignoredAttachments>
  <CreateNewRequests>True</CreateNewRequests>
  <IncludeRawMessageAsAttachment>True</IncludeRawMessageAsAttachment>
  <traceMessageInfo>False</traceMessageInfo>
  <sleepTimeAfterDeletion>0</sleepTimeAfterDeletion>
</mailIntegration>
Explanation of the Tags
- <serverName>Server</serverName>
- Use outlook.office365.com with Office 365.
- <secureSocketOption>SslOnConnect</secureSocketOption>
- Use SslOnConnect with Office 365.
- <Port>995</Port>
- Use port 995 with Office 365.
- <authentication>Azure</authentication>
- Use Azure authentication with Office 365.
- <clientId>xxxxxxxx-xxxx-xxxx-xxxx-xxxxxxxxxxxx</clientId>
- Use the Application (client) ID noted earlier.
- <tenantId>yyyyyyyy-yyyy-yyyy-yyyy-yyyyyyyyyyyy</tenantId>
Create events from emails
Copy the following file to your text editor:
<?xml version="1.0" encoding="utf-8" ?>
<mailIntegration>
  <messageProcessorTypeName>ESI.Octopus.MailIntegration.EventMailMessageProcessor, ESI.Octopus.MailIntegration</messageProcessorTypeName>
  <server>    <gatewayTypeName>ESI.Octopus.MailIntegration.MailKitMailboxGateway,ESI.Octopus.MailIntegration</gatewayTypeName>    <serverName>SERVER</serverName>
    <port>110</port>
    <useSsl>false</useSsl>
    <userName>MAILBOX</userName>
    <password>PASSWORD-CLEAR-TEXT</password>
  </server>
  <group>GROUP</group>
  <assignee>ASSIGNEE</assignee>
</mailIntegration>
The sections in yellow are the ones that need to be configured. These tags are explained in the next section. Then save the file in the Octopus folder with the ".xml" extention file. For example "event-email-integration.xml"
Explanation of the Tags
- <ServerName>SERVER</ServerName>:
- Name of email server.
- Replace SERVER with the name of the email server
- Name of email server.
- <UserName>MAILBOX</UserName>:
- Username of the mailbox account.
- Replace MAILBOX with the user account name used to authenticate. Normally this does not include the domain part of the public email address. For example, you would indicate “newincident” here, not “newincident@mycompany.com”.
- Username of the mailbox account.
- <Password>PASSWORD-CLEAR-TEXT</Password>:
- Mailbox account password
- Replace PASSWORD-CLEAR-TEXT with the password of the mailbox account.
- Mailbox account password
- <Group>GROUP</Group>
- This tag is used to designate the group in charge of events
- Replace GROUP with the name of the group assigned to events
- This tag is used to designate the group in charge of events
- <Assignee>ASSIGNEE</Assignee>
- This tag allows to assign events directly to an Octopus user in the case where only one person takes care of events
- Replace ASSIGNEE with the Windows username of the technician assigned to events. This tag can be left empty (<assignee></assignee>)
- This tag allows to assign events directly to an Octopus user in the case where only one person takes care of events
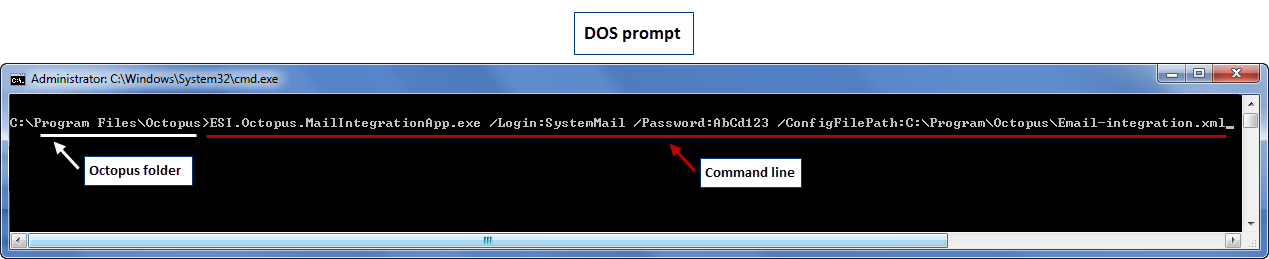
Execute MailIntegration from a Command Line
To run the MailIntegration executable file, open a DOS prompt and go to the Octopus folder. Then use the following command line:
Before 3.8

ESI.Octopus.MailIntegrationApp.exe /login:system /password:octo /ConfigFilePath:C:\Program Files\Octopus\email-integration.xml

After 3.8

ESI.Octopus.MailIntegrationApp.exe /login:system /password:octo /team:1 /ConfigFilePath:C:\Program Files\Octopus\email-integration.xml
To test MailIntegration for the first time, follow these steps:
- Send an email to the Octopus dedicated mailbox
- Open a DOS prompt
- Go to the Octopus folder
- Enter the following command along with the proper values for the 3 parameters and do ENTER:
ESI.Octopus.MailIntegrationApp.exe /Login:OctopusUserName /Password:OctopusPassword /ConfigFilePath:(path to XML file)

OR

ESI.Octopus.MailIntegrationApp.exe /Login:OctopusUserName /Password:OctopusPassword /team:TeamNumber /ConfigFilePath:(path to XML file)
The program will work for a few seconds and finish.
-
Open Octopus and check the incidents listed under "New" to find the one just created.
Automate Email Updates in Octopus
MailIntegration only runs once at a time. Therefore, the execution of MailIntegration needs to be automated to check the mailbox regularly.
Refer to the Windows Scheduled Tasks article to automate the reception and updates of email.
Use MailIntegration with Office 365
The following points are required for MailIntegration to work with Office 365:
- Use MailIntegration with the SSL Mode and Port 995 configured in the XML file.
- The mailbox must have an Office license.
- Configure outlook.office365.com as the server name in the MailIntegration XML file.
-
Adjust firewall rules so the automation server (running MailIntegration) is able to establish outbound connections to port 995 of the following machines:
-
Outlook.office365.com (as per Microsoft's documentation)
-
SMTP.office365.com
-
Outlook.ms-acdc.office.com
-
-
Use MailIntegration on a machine having at the minimum version 4.7.2 of .Net Framework. We recommend however to install the latest version available.
-
With the end of life for basic authentication on Office 365 announced by Microsoft planned for mid-2021, support for modern authentication (OAuth) has been added to MailIntegration starting with version 6.0.100. Environments using MailIntegration to connect to Office365 must update their configuration to activate and rely on OAuth authentication, lest a service outage occurs. Refer to the OAuth section to configure it.
End of support for TLS1.0 and TLS1.1 protocols for Office 365
On October 15th, 2020, Microsoft will cease support of TLS1.0 and TLS1.1 protocols on Office 365 for email.
- If you are already running Octopus v6.0:
- You do not have anything to do. Communications to your Office 365 mailbox are already established with TLS1.2 protocol.
- If you are using version 4.2.900 or later:
- The application will try to use TLS1.2 protocol if it is available.
- At a minimum, MailIntegration will require version 4.7.2. of .Net Framework. We recommend however to install the latest version available.
- For some operating systems (Windows 2012 and prior), you will also have to manually enable TLS1.2 protocol using the registry. Refer to the Support for TLS1.2 protocol Microsoft article.
- If you are using an earlier version than 4.2.900:
- The application is still configured to natively use TLS1.0 and TLS1.1. You will have to manually deploy instructions to make sure the newer protocols are used:
- Edit the file ESI.Octopus.MailIntgrationApp.exe.config file located under your Octopus client folder used for MailIntegration.
- Add the following snippet at the correct location:
<configuration>
  [...]
  <runtime>
     [...]
     <AppContextSwitchOverrides value="Switch.System.Net.DontEnableSchUseStrongCrypto=false" />
     <AppContextSwitchOverrides value="Switch.System.Net.DontEnableSystemDefaultTlsVersions=false" />
     <AppContextSwitchOverrides value="Switch.System.ServiceModel.DisableUsingServicePointManagerSecurityProtocols=false" />
     <AppContextSwitchOverrides value="Switch.System.ServiceModel.DontEnableSystemDefaultTlsVersions=false" />
     [...]
  </runtime>
  [...]
</configuration>
-
At a minimum, MailIntegration will require version 4.7.2. of .Net Framework. We recommend however to install the latest version available.
-
For some operating systems (Windows 2012 and prior), you will also have to manually enable TLS1.2 protocol using the registry. Refer to the Support for TLS1.2 protocol Microsoft article.
- The application is still configured to natively use TLS1.0 and TLS1.1. You will have to manually deploy instructions to make sure the newer protocols are used:
Thank you, your message has been sent.