Table of contents
Related Articles
Service Asset and Configuration Management - ITIL® Process
Maintaining the configuration of a CI
Introduction
The Service Asset and Configuration Management process is managed in the Configurations module; it represents the heart of Octopus due to the relations that can be established between its components and all other modules. It is often referred to as the CMDB.
This article explains how to set up the structure of the module, in order to constitute a powerful relational database of configuration items (CIs) that will be used throughout Octopus.
Configurations Module Structure
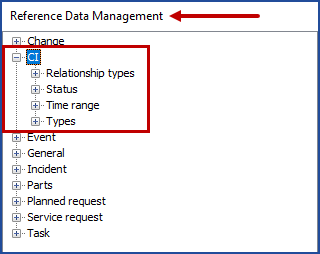
The configuration of the CI structure can be done from the Tools > Reference Data Management... > CI menu.
- Administer Octopus
Before creating or importing CIs, it is recommended to adapt the structure to your context and infrastructure reality, by identifying the essential components and the configuration that will be part of your IT service delivery.
 f
f
Status
The Status represent the CI lifecycle; can even extend this lifecycle by including statuses specific to software development such as design, construction, testing, QA, deployment, etc., or these could be added as a substatus.
The CI status can be configured in Tools > Reference Data Management > CI > Status.
- Add a status: Right click on Status, select add, enter status name in French and English then save. The status will be available in CI records
- Delete a status: Right click a status and delete.
- Note that the system will refuse to delete the status if it is used or if its a system status like
- Merge a status: If two statuses have a similar use, they can be merged. Select the status to be merged into the other one, then click the Merge button, and select the status that will remain
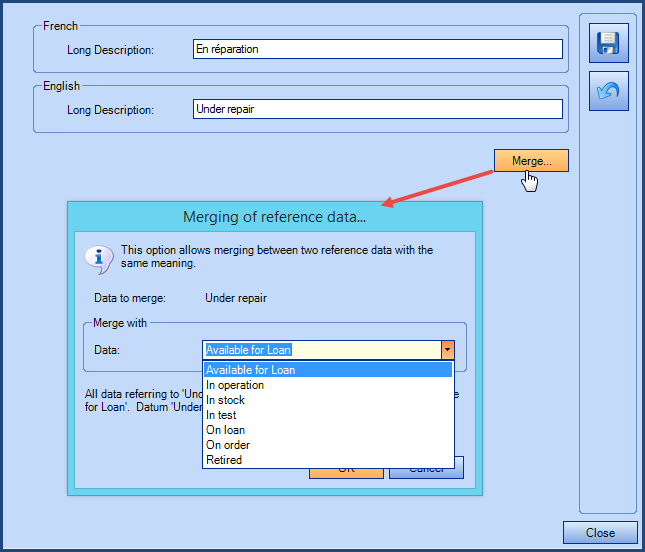
Retired CIs lose their relationships with other CIs and will no longer appear when selecting a CI in a request or in the quick search.
However, you can find them with an advanced search on the Retired status, if needed.
Time Range
The time range identifies the service range of a CI.
You can refer to Event Management - Octopus Module article, that explains how to configure a CI service range.
Relationship Types
Relationship Types define the bidirectional relationships that exist between two CI types. Then, each CI type can be associated with the authorized relationships to other CI types. The Types section below explains the configuration.
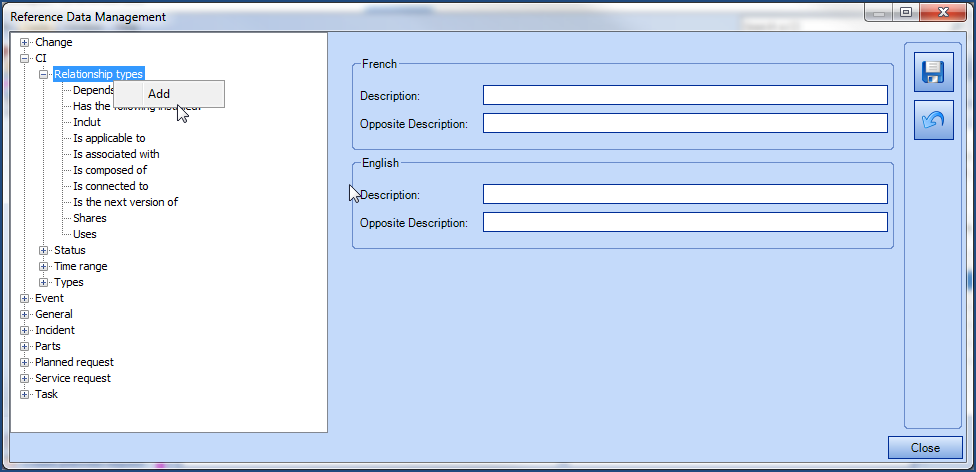
To add a relationship type:
- Right click on Relationship Types and then click on Add
- Enter the description and the opposite description, in French and in English; for example, Includes and Is included in
- Save and Close
Types
In Octopus, several CI types are preconfigured to facilitate the initial configuration of the module.
According to the CI type the configuration can be simple, as with a module or a lot more complex, as with an information system; authorized relationships, attributes and categories bring the flexibility to determine the right level of complexity to apply to each CI type.
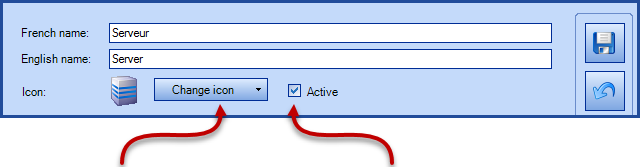
At the top of the CI Type window, you must make the following selections:
- French Name
- As this field cannot stay empty, in a unilingual context, add the same name as in English
- English Name
- You can pick the icon that will appear in lists for CIs of this type.
- And you can determine if the CI type is active or not
If a CI type has been used, it cannot be deleted, but it can be deactivated.
It will no longer appear in CI types when creating new CIs or in quick searches. In advanced search, it will appear in a light gray.
Note that disabling a CI type in no way changes the status of existing CIs of this type. If there are still CIs of this type in service, they will keep their status until their life cycle is completed.
The configuration of a CI type uses several tabs, as described below.
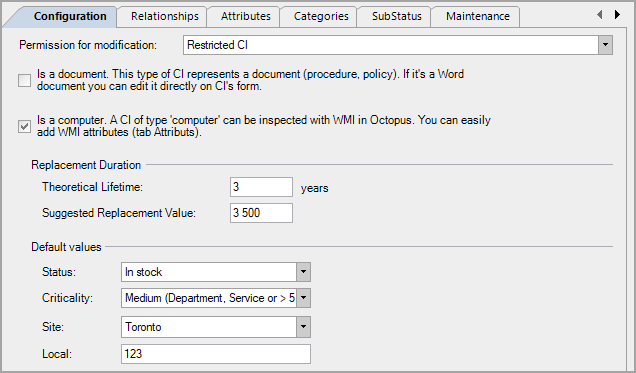
Configuration Tab
- Permission for modification: Apply a custom permission for a CI type.
- For example, the modification of a Server CI type can be restricted to assignees that have this permission in their role.
- This allows increased security when necessary. See the Customize permissions for a CI type section in Role Management
- Is a document: Adds a Document tab un the CI record when this CI type is designated as a document.
- These CIs represent procedures, user guides, infrastructure documentation, processes, etc.
- Is a computer: Means this CI type can be inspected with WMI
- Replacement Duration: By indicating a theoretical lifetime, in years, and the suggested replacement value, Octopus is able to calculate, based on the purchase date, the replacement year and the replacement value of a CI.
- This data is useful in asset replacement initiatives. This information will show up in the Maintenance tab of each CI and will be specific to this CI type.
- For example, a Workstation CI type could have a theoretical lifetime of three years, with a suggested replacement value of $1,200.00.
- Default values: Apply default values depending on the CI type for Status, Site, Criticality and Local field.
- The default values will appear when creating a new CI specific to this type of CI.

Relationships Tab
The Relationships tab shows the authorized relationships between CI types.
This avoids unwanted or technically impossible relationships between CIs. So when adding a relationship from a source CI to a destination CI, only the authorized relationships will be presented.

Relationship dependencies can be added.
There are three:
- Required for operating
- Identifies the CIs whose operation depends on the operation of another.
- For example, if an application is insalled on a server; the availability of the application depends on the operation of the server.
- Cost Distribution
- Reports the total cost of ownership (TCO) to the total cost of ownership of another CI.
- Total cost of ownership = purchase cost + maintenance cost.
- For example, if a module is related to an application, The TCO is calculated for the module will be reported on the application's TCO.
- Composition
- Associates a CI to another CI in a exclusive hierarchical relationship similar to a parent-child relationship.
- Hence, when creating a request, you will see the children CIs connected below the parent CI.
- In Octopus, sucha composition relationship exists between workstations and softwares.
Attributes Tab
An attribute is an important information about a CI that needs to be recorded and followed. Some attributes are automatic (inspected by WMI), others can be entered manually or imported.
You can also determine the type of an attribute, for example date, numeric, combo-box, user list, etc.
It is important to identify the necessary attributes used in the IT service delivery, no more no less, otherwise, the CI maintenance becomes too complex and costly.
The Attributes Tab is used for creating, adding, editing and deleting attributes.
For more information see the xxx article.
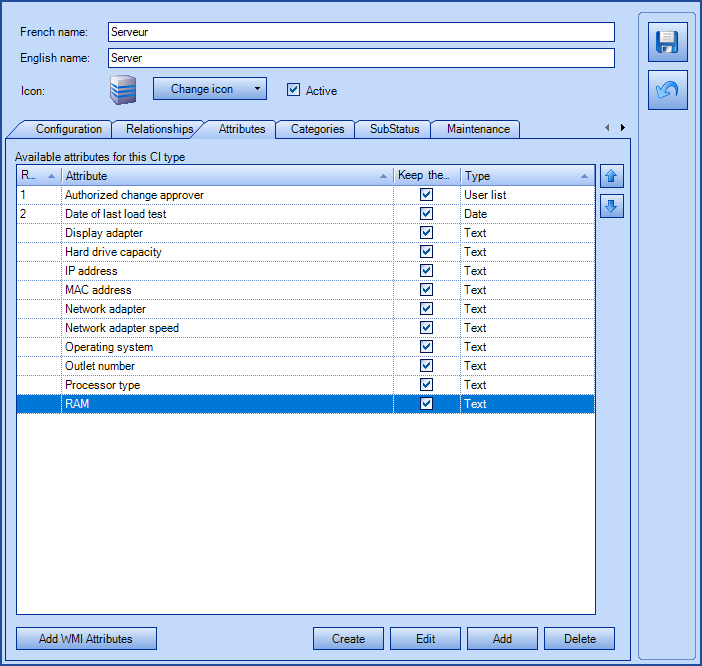
It is possible to manage the display order of CI attributes using the rank. This makes it possible to group them without having to assign a prefix to each one.
By default, any changes to an attribute by an Octopus user or an automated system, such as WMIUpdater or DataImporter, are logged in the CI's history. Because the Keep the change history option is checked by default.
But if it is not selected then the value of the CI attribute will be the last value entered, but no history entry will be added during the modification.
Typically this option is used for very volatile fields where there is no value in knowing by whom and when the change was made.
Categories Tab
The Categories Tab categorizes certain types of CI.
The example below shows printer categories.
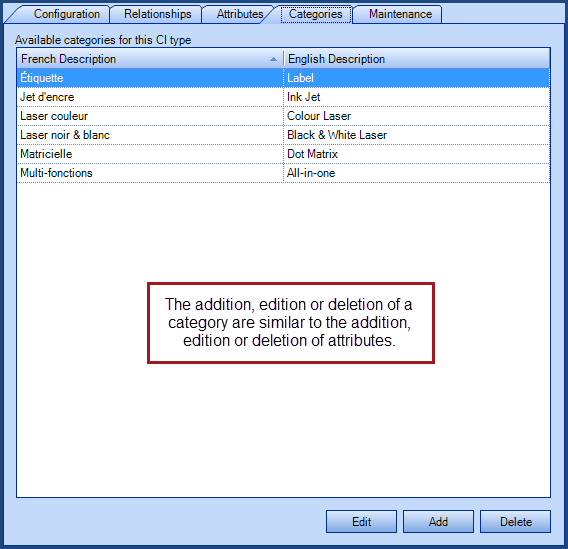
Another example could be the different server categories: physical, virtual, clusters.
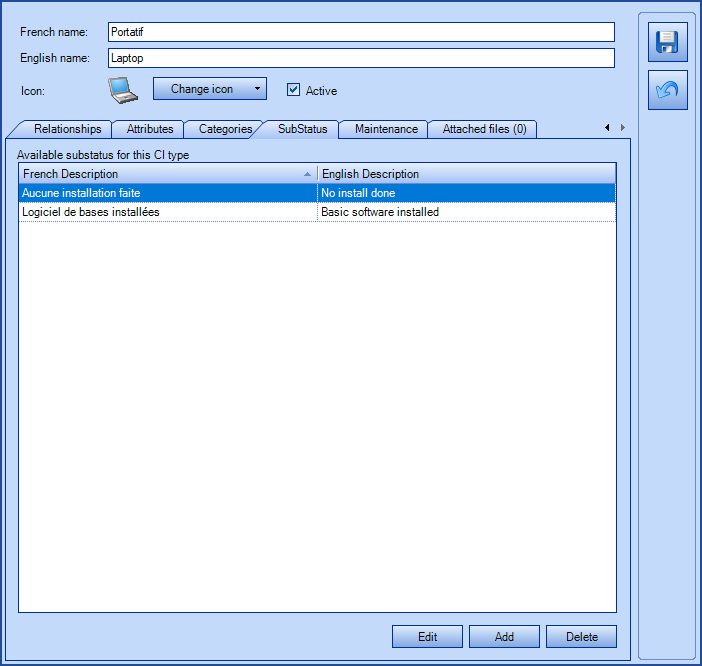
SubStatus Tab
The SubStatus tab allows to add elements to better specify the status of a CI.
This information, visible in the CI record, can also be used in advanced search and lists.
Since the SubStatus is not mandatory, it is possible to delete an item from the list. A warning message will advise that any CI with this substatus will lose its value.
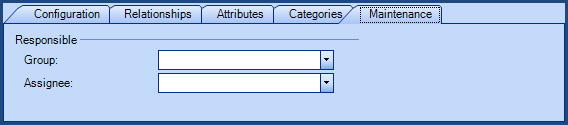
Maintenance Tab
The Maintenance tab specifies the group / assignee responsible for the CI type.
This information is used in the configuration of the Planned Request Management Module.
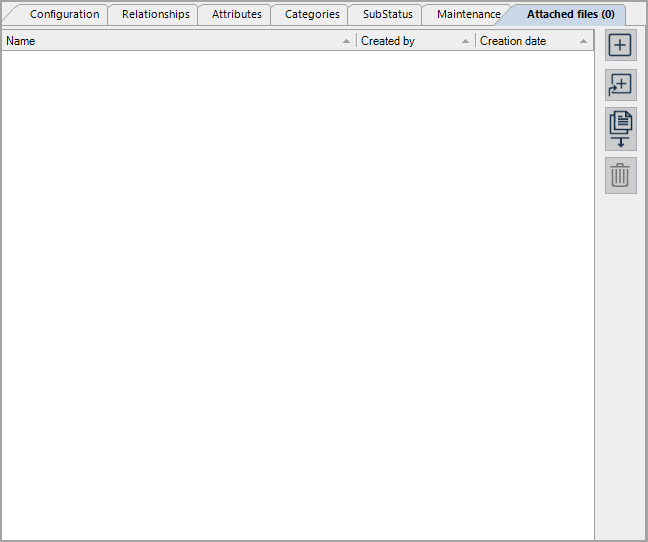
Attached files Tab
The Attached files tab allows to add one or more files to a CI type.
When creating a CI of this type, the attached file(s) are automatically added to the new CI.
The option also works when duplicating a CI, importing a CI or modifying a CI type.
For more information, see the How the Automated Addition of Attached Files to CIs Work article.
CI Record
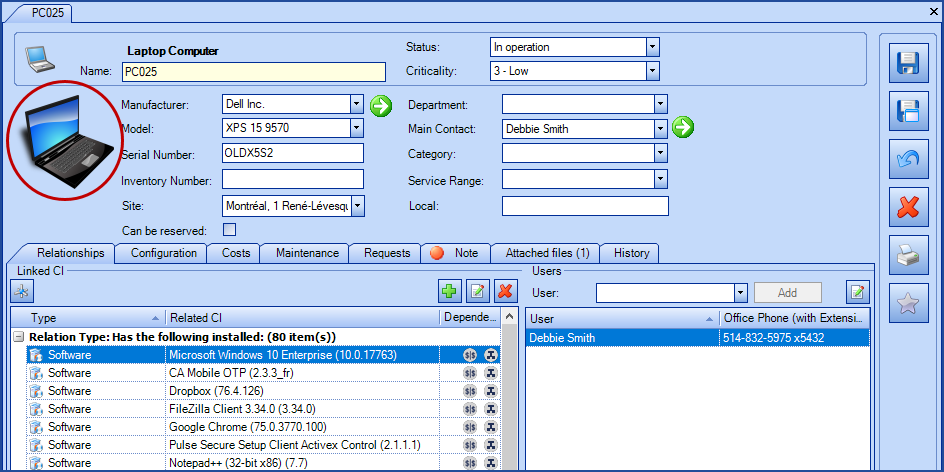
The CI record contains a set of fields that are organized to quickly find the information about about it.
The top part shows the name, status, substatus, criticality, manufacturer, model, serial and inventory numbers, service range, the department, main contact, site, local , category and can show a photo of the equipment.
Note that list of Manufacturer and Model fields can be configured, in the Reference Data Management.The Criticality also comes from the reference data, but it is configured from the Impacts field of the Incident node. Like State and Site, Criticality can be configured by default in each CI type, Configuration tab.
There are options to make sure that the serial and inventory numbers are unique throughout the CIs. See the Interesting Options section for more details.
The lower section contains several tabs that are explained below.
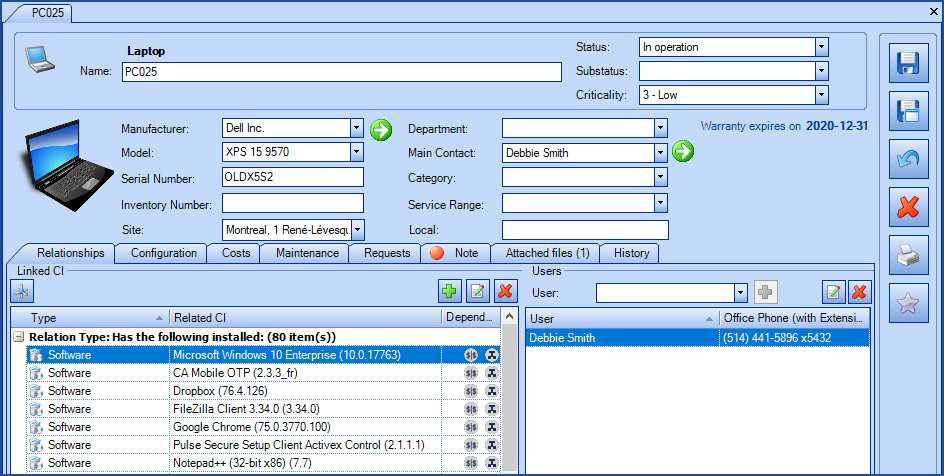
Relationships Tab
The Relationships tab shows the relationships of a CI with one or several other CIs.
When you add a relationship, the system presents the authorized relationships, defined in the CI type configuration, in Reference Data Management.
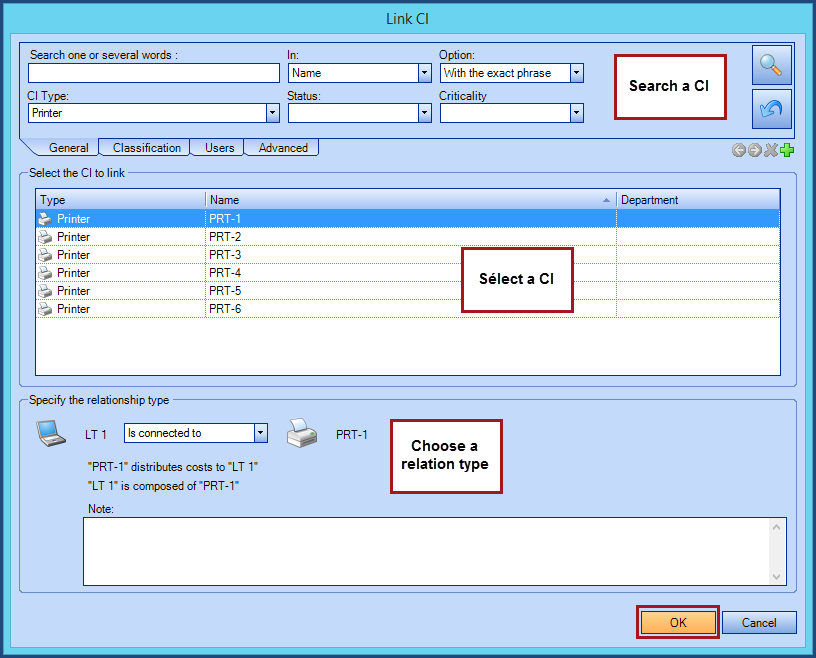
To add a relationship:
- Click the
 button to add a relationship
 - From the Link CI window, search for the CI to link and select it
- Specify the relationship type - only the authorized relationships configured for that CI type will be available
- Click OK
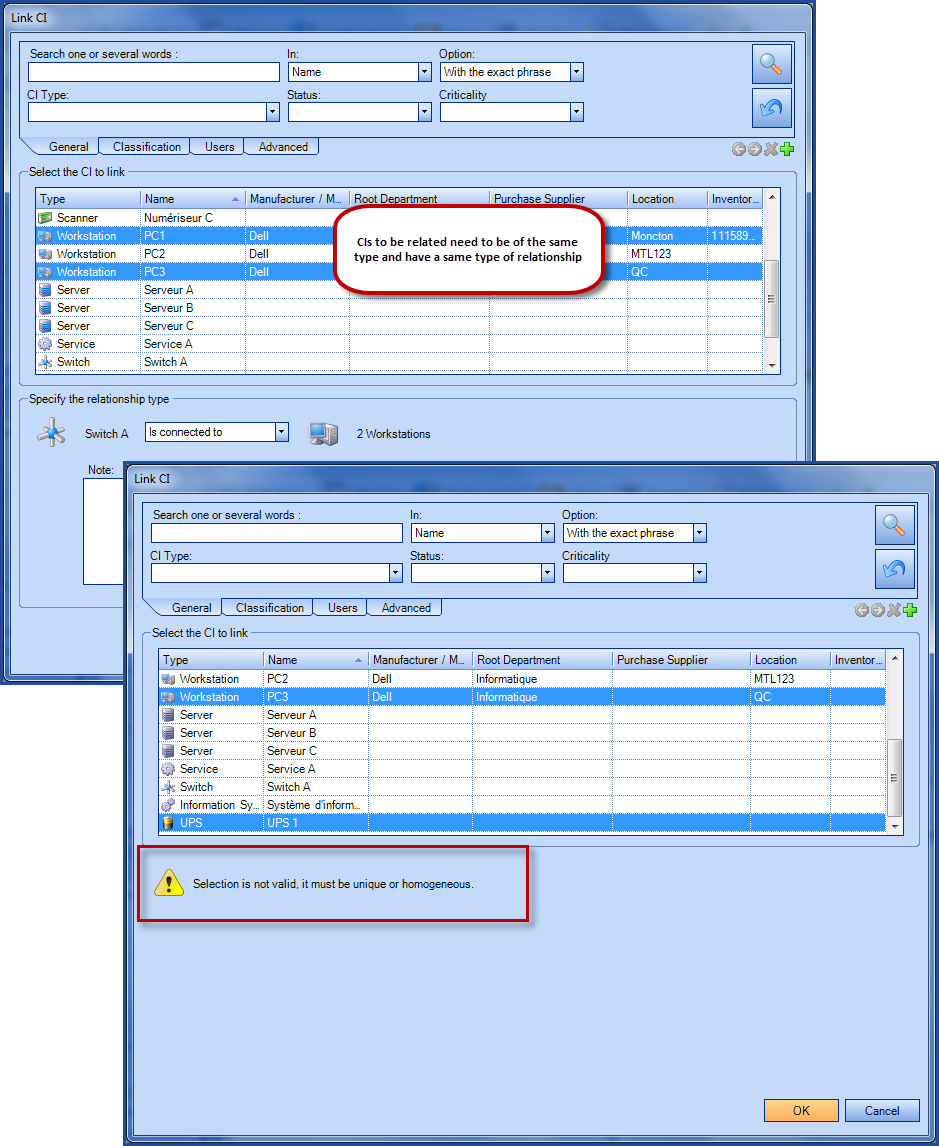
What you need to know:
It is possible to add more than one relationship to a CI at a time, provided that the CI's type and relationship type are of the same type.
Search for the CIs to link to the target and make the choice using CRTL + click or SHIFT + click.
WARNING - If a large number of CIs need to be related, it will be better to do this outside of regular hours to avoid slowing the system down.
Creating a CI by the Duplicate / Batch duplicate action does not replicate existing relationships from the source CI to the new CI.
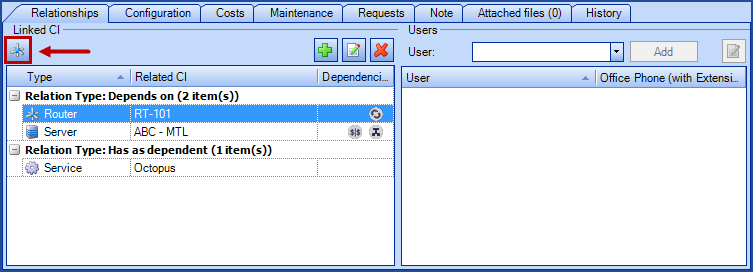
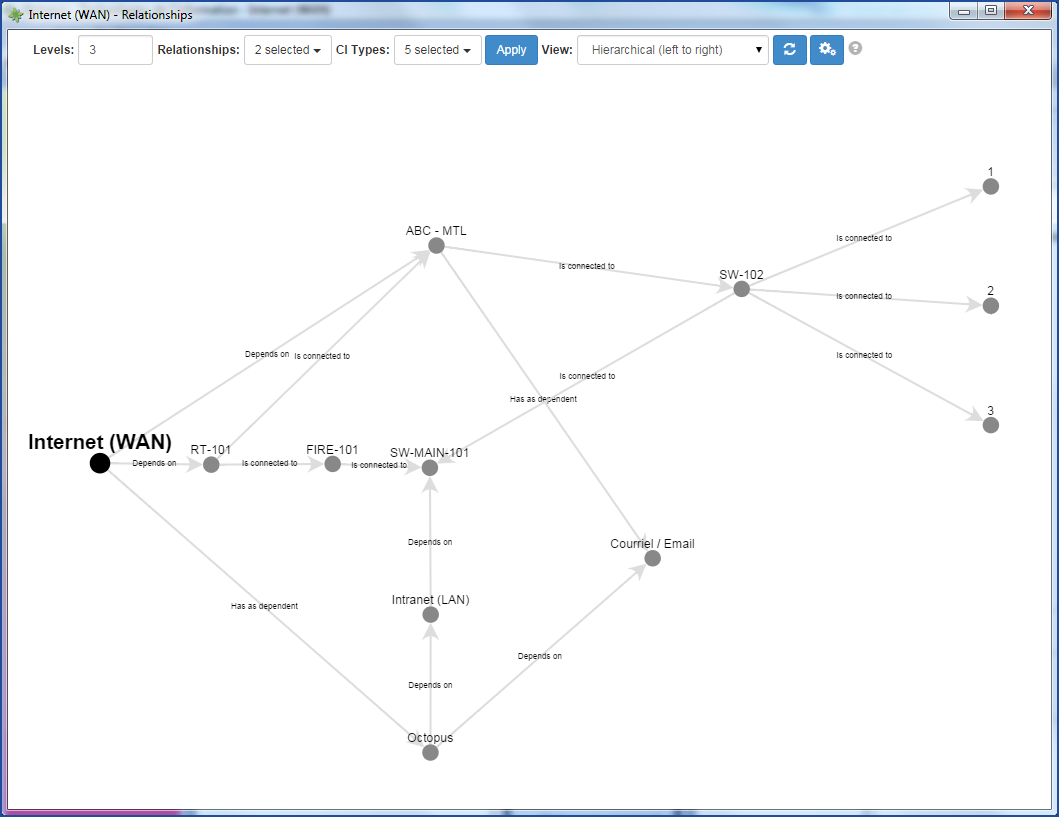
If you want to view a diagram of all relationships for this CI, click on the  icon located above the list of relationships.
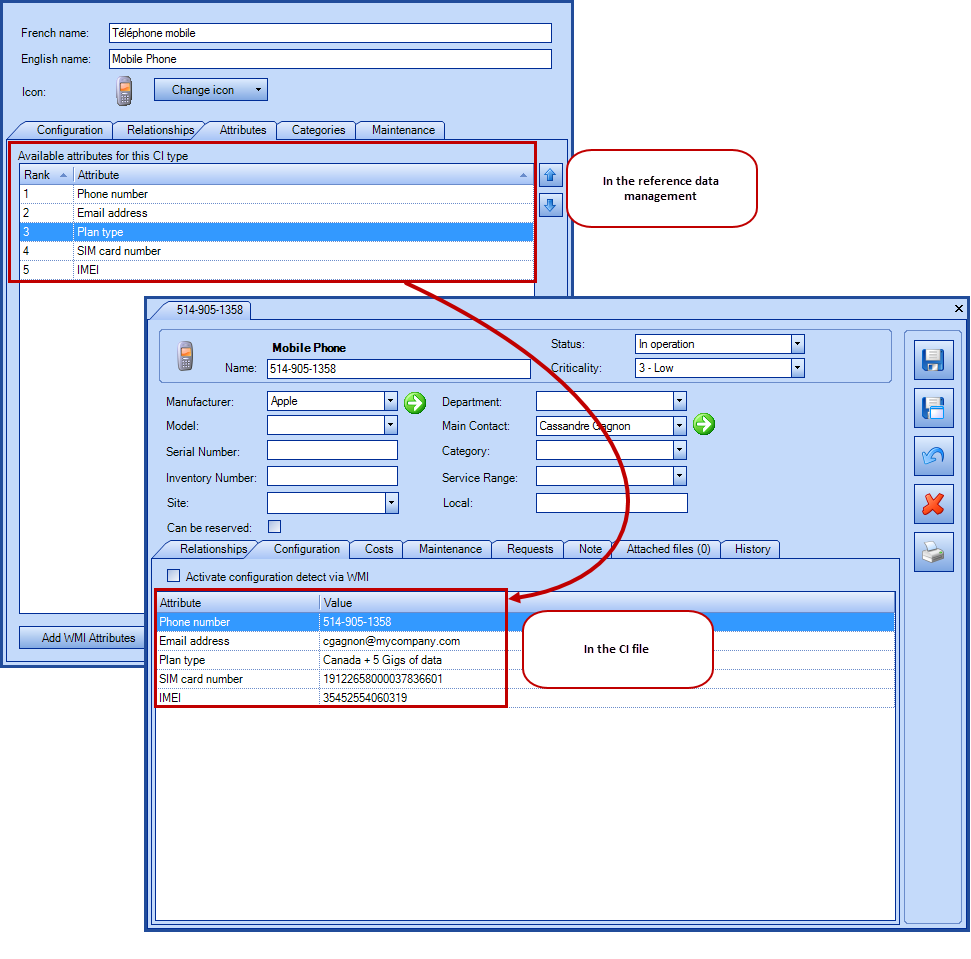
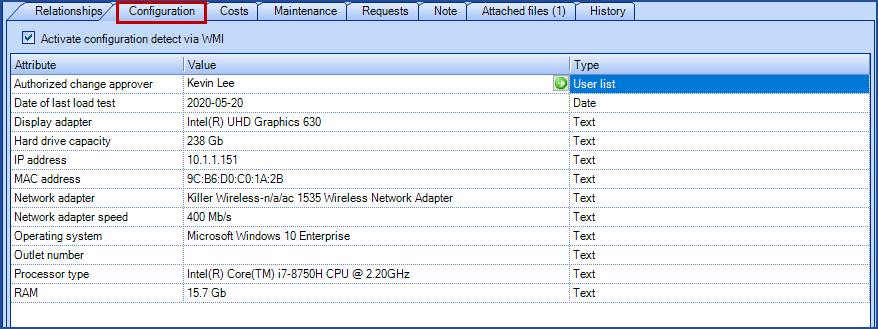
Configuration Tab
The Configuration tab contains all the related attributes of a CI record, that need be entered manually or imported.
For example, for computers you can find attributes that are automatically detected when WMI is activated.
Adding the Type column can help determine what kind of information should be added when updating the CI.
It is recommended that the CI be updated as soon as changes are made.
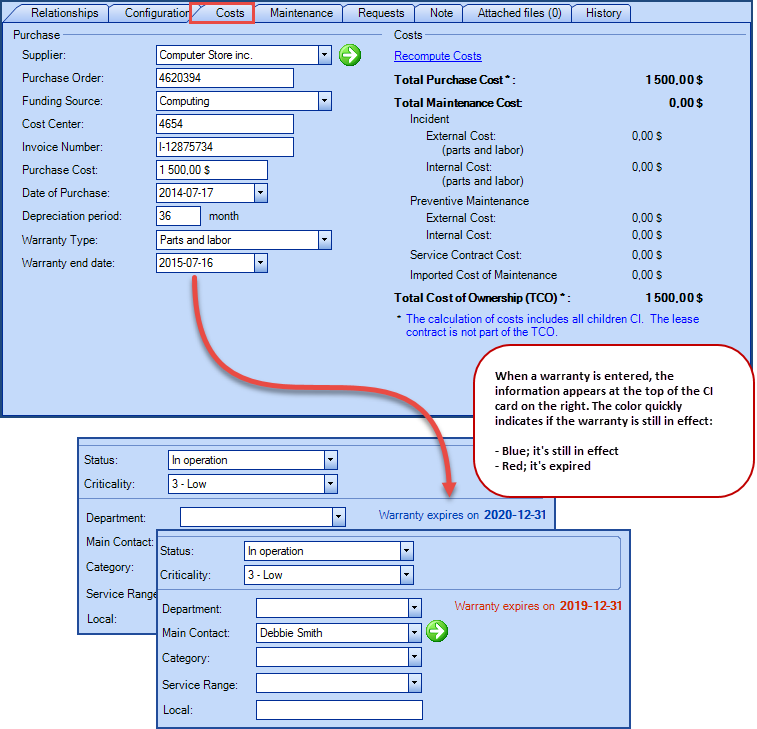
Costs Tab
The Costs tab contains the financial information of the CI record.
This is where you can recompute the CI cost; this action calculates the total cost of ownership (TCO), which includes Total Purchase Cost + Total Maintenance Cost.
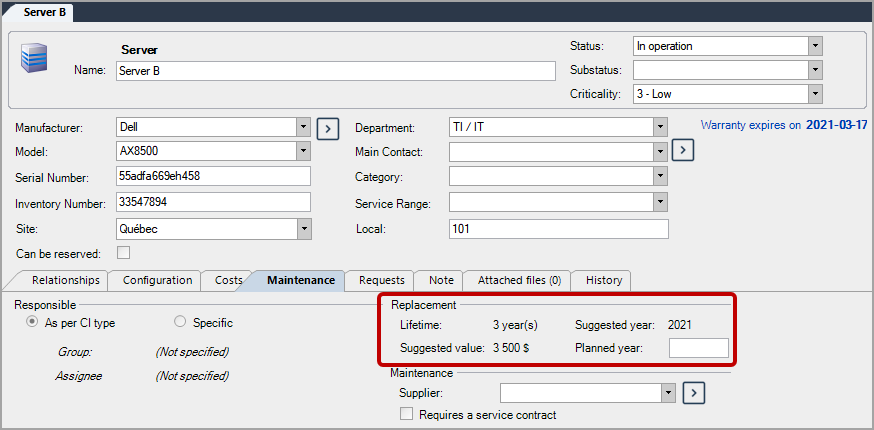
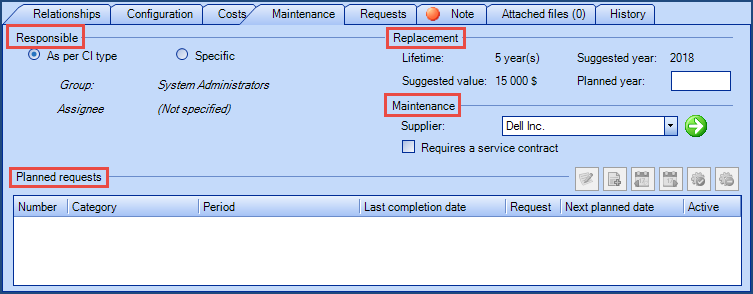
Maintenance Tab
The Maintenance tab details the CI maintenance like the responsible group or assignee for the CI, the replacement information, if the maintenance is done by an external supplier and the planned request for this CI.
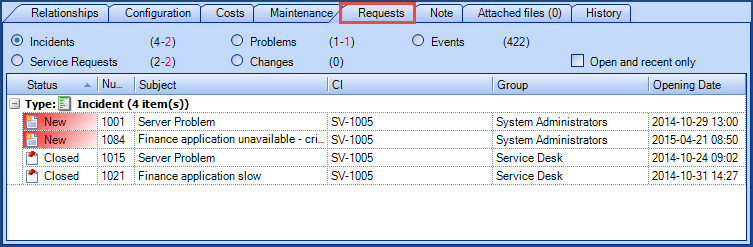
Requests Tab
The Requests tab contains requests linked with the CI.
These include all request types: incidents, service requests, problems, changes, and events.
Note Tab
The Note tab allows you to enter a particular note about the CI. This field is free text, and a red dot appears when information is written in the tab.

Attached Files Tab
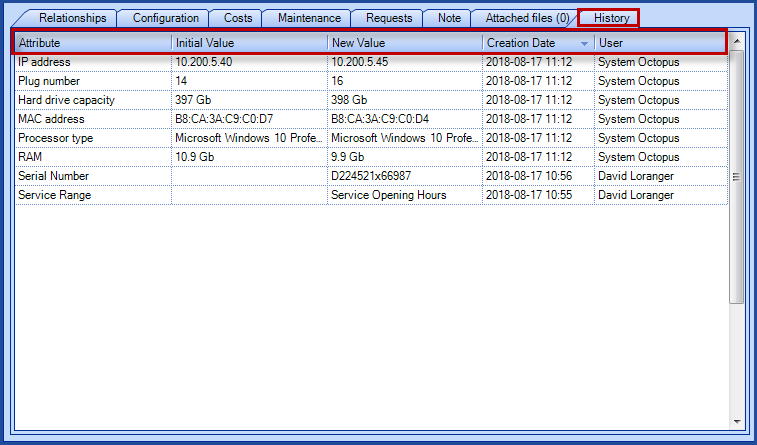
History Tab
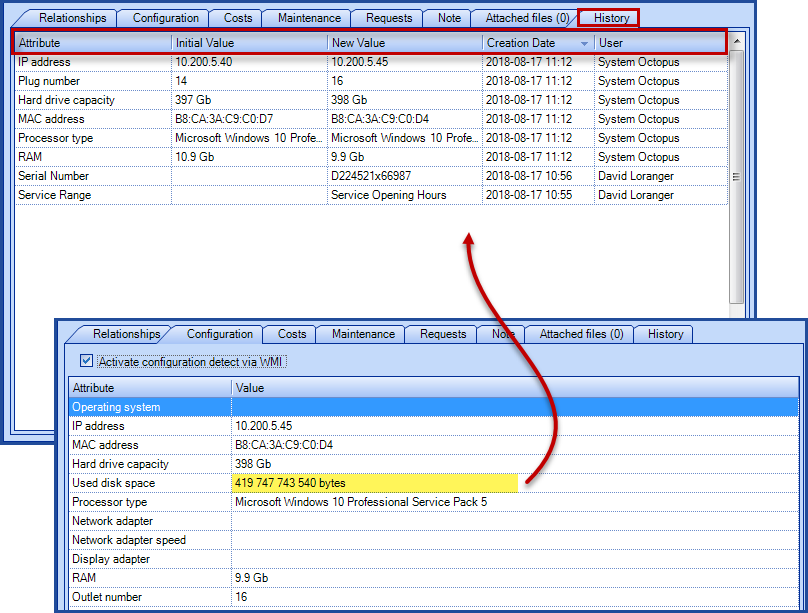
The History tab contains all the modifications done to a CI record by an Octopus user. It keeps track of the modified attribute, its initial and new value,the date and time and the name of the person who made the change.
Keep the Change History Option - ICIT
This option, which is available in the attributes of a CI, has a direct impact on CI's history, since it can prevent the history from being updated. The value of the attribute is updated, but when an attribute does not have this box checked, the changes made will not be saved in the history.
Create a CI
A CI can be created manually, with an AD synchronization or with an import. The CI name constitutes the unique key of the Configurations Module; thus two CIs cannot have the same CI name.
With the exception of a retired CI; a retired CI can have the same name as a CI in service.
For more details on the creation or update of a CI via an import, you can refer to the following articles:
- ADSIReader -Integration to Active Directory
- Can create computers and printers based on what is in AD.
- WMIUpdater - Updating the computer configuration
- Can update the computer configuration of the PCs it connects to.
- DataImporter - Import CI
- Can create and/or update CIs.
Manual Creation of a CI record
The manual creation of a CI record is done in 2 steps:
Step 1 : Record the CI
- Go to the Configurations Module.
- Click the Create a CI action.
- From the Create CI window, enter the information; by default, note that the Type and Name fields are mandatory.
- The type is chosen from a drop down list, but the name is a text field that must be unique.
- Click OK to complete de creation.
Step 2 : Documentation of the CI
- Once the CI record is created, document the rest of the information from the top section and the tabs of this CI.
- We refer you to the CI Record section for a more complete description.
Delete a CI
A CI can be deleted by clicking on the red X icon. Note that if a CI is already linked to a request, the system prevents deletion.
Automated Creation and Update of CIs
Automated CI creation and/or update can be done by importing data with the Octopus DataImporter program. Consult the DataImporter - Import CIs article for details on the import possibilities for CIs.
Specific Actions in Configurations Module
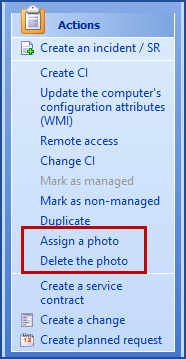
Assign a Photo
It is possible to add a photo to a CI from Octopus with the Assign a photo action.
A thumbnail-size image will be added to the left of the Manufacturer/Model fields. Click on it to open in a larger format.
- Accepted file types are, PNG and JPEG.
- The maximum size of the photo is 10 MB.
When a photo is already visible, the Assign a photo action allows you to change the photo.
When a photo is already visible, the Delete the photo action erases the photo.
The photo of the CI in the Octopus application is linked to that of the Mobile Octopus, provided that the attachments are hosted.
This means that the photo will be visible in both places and any changes will be synchronized.
Change CI
This action makes it possible to modify simultaneously one or more CIs. You can keep the value, empty it, unless the field is mandatory, or change the value.
The following items can be modified:
- Type
- When changing a type a checkbox allows to keep the same manufacturer and model.
- Category
- Status
- SubStatus
- Service Range
- Main Contact
- Site
- Local
- Manufacturer
- Model
- Activate configuration detect via WMI
Start by the selection of one or more CIs with SHIFT+click, CRTL+click or ALT+A and then select Change CI.
A window will open to offer the available choices.
Select the items to change, and empty or pick the new value.
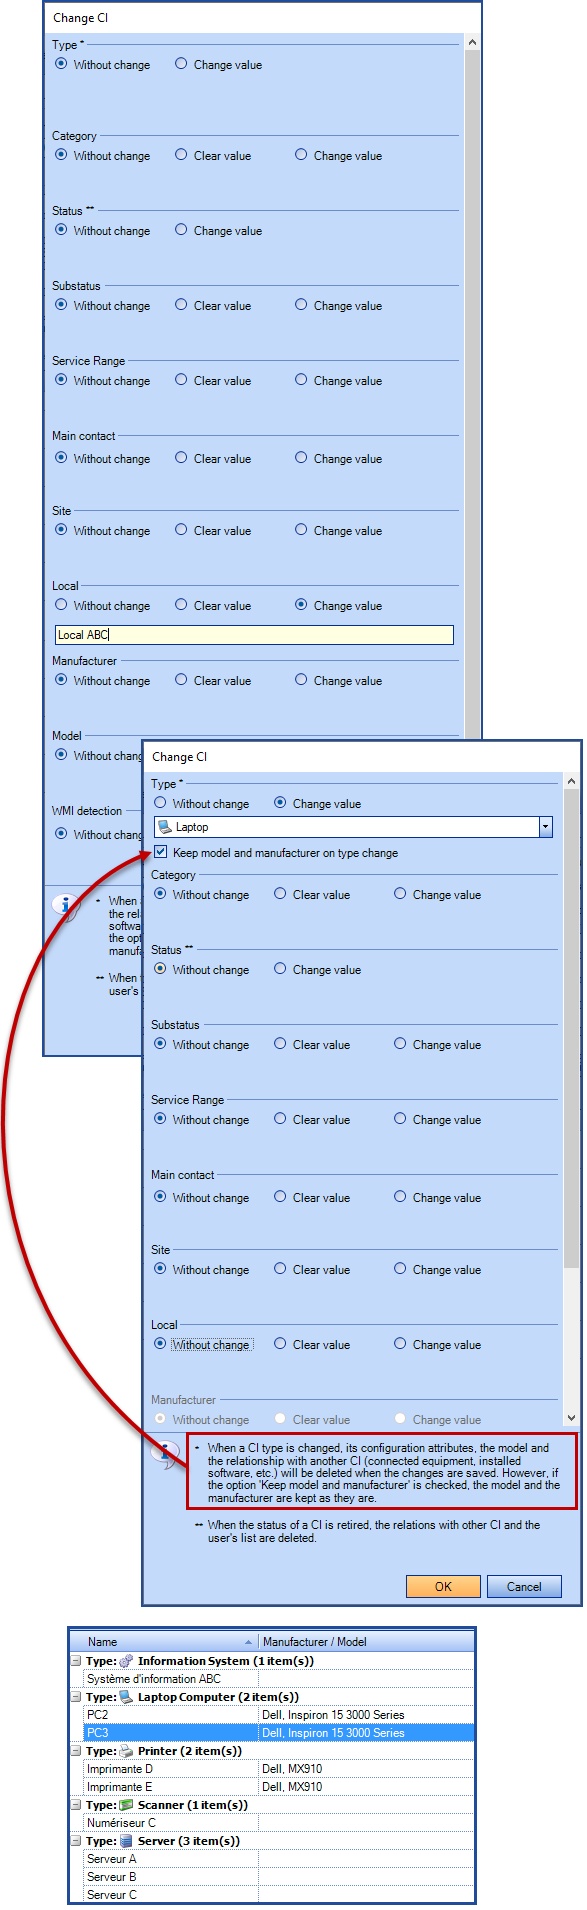
When a CI is modified, it is possible that some of the information could be lost, a warning explains the situation:
- When a Cl type is changed, its configuration attributes are deleted.
- When a CI type is changed, the model is deleted, unless the Keep model and manufacturer on type change option is checked.
- When a CI is changed, it will lose its relations to other CIs unless the same relationships exist in the new CI type.
- When a Cl is retired the relations with other Cls and the user's list are deleted.
It is important to make this kind of modification wisely, as modifying a small number of CI's can be done quickly, but if too many modifications on too many CIs are done at once, the performance of Octopus could be affected.
Permissions
The Default permissions for the Configurations Module are the following:
- Access the configuration management module
- Create a CI
- Delete a CI
- Modify a CI
- Modify CI status
- Modify Location, Main Contact and Category
- Recompute all CI costs
It is possible to create custom permissions for increased security,see the Customize permissions for a CI type section of the Role Management article.
Interesting Options
It is possible to ensure that the serial and inventory numbers are unique across the team's CIs in Octopus.
To activate these two options go to Tools > Options > 4 - Facultative general options.
- Serial number of a CI must be unique
- Inventory number of a CI must be unique
Behaviour of the Unique Serial Number
- Only the CIs created or modified after activation of the option are validated.
- CIs that are Retired are ignored from this validation.
- Validation is also done when importing with DataImporter.
Behaviour of the Unique Inventory Number
- If Octopus detects that more than one CI has the same inventory number, the activation button is not active and a tooltip warns that this option cannot be activated because there are duplicate inventory numbers.
- Validation is done on CIs of all statuses.
- Validation is also done when importing with DataImporter.
Reports
As the Configurations Module is directly related to other Octopus modules, it is possible to extract multiple information that will be used to analyze a particular situation or the impacts of a change.
Statistics Module
There are three reports in the Statistics Module, in the Problem Statistics section:
- Problems > Most problematic CI : displays CIs with the highest number of incidents or problems
- Problems > Most problematic CI models
- Problems > Most problematic CI types
Lists
Many lists are available in the Configurations Module. Each list displays in brackets the amount of items contained in it. The default lists are:
- Computers never reached by WMI and Computers with WMI error.
- See the WMI Error Report section of the WMIUpdater - Updating the computer configuration article
- CI recently created (last 30 days): displays the list of CIs manually or automatically created in the last 30 days; note that the period can be adjusted by modifying list criteria.
- CI covered by a service contract
- CI under warranty
- CI with expired warranty
- CI under lease
- Non-managed software: this is a filter of software installed on equipment connected to the network; by designating softwares that do not need to be managed on a daily basis, we restrict the view to only see softwares useful for operational management of CIs.
- The WMI detection will remain, but those CIs will be automatically classified in the non-managed software list.
- License control: see the License Management article for more information.
Other lists concerning CIs can be interesting. The possibilities are endless. For example, we may want to consult regularly, within the Service Asset and Configuration Management process:
- CIs grouped by status
- Retired CIs
- CIs affected by incidents, problems, changes, events
- Etc.
See the List Customization article to optimize your use of lists.
Exporting Lists to Excel
See the How to export data to Excel article. Once data is exported, it can be manipulated with Excel charts.
Other applications
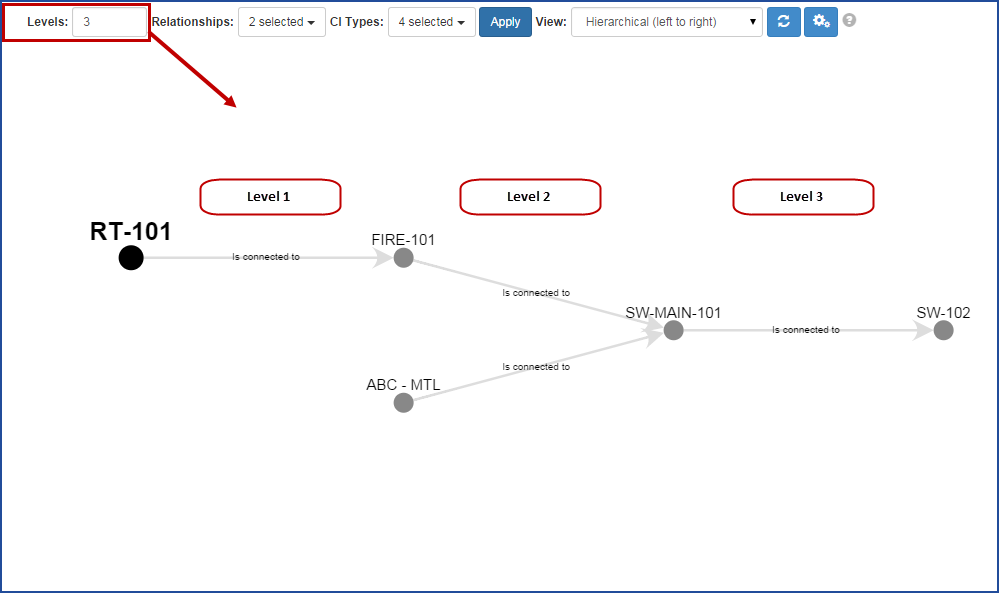
How to use the graphic CMDB
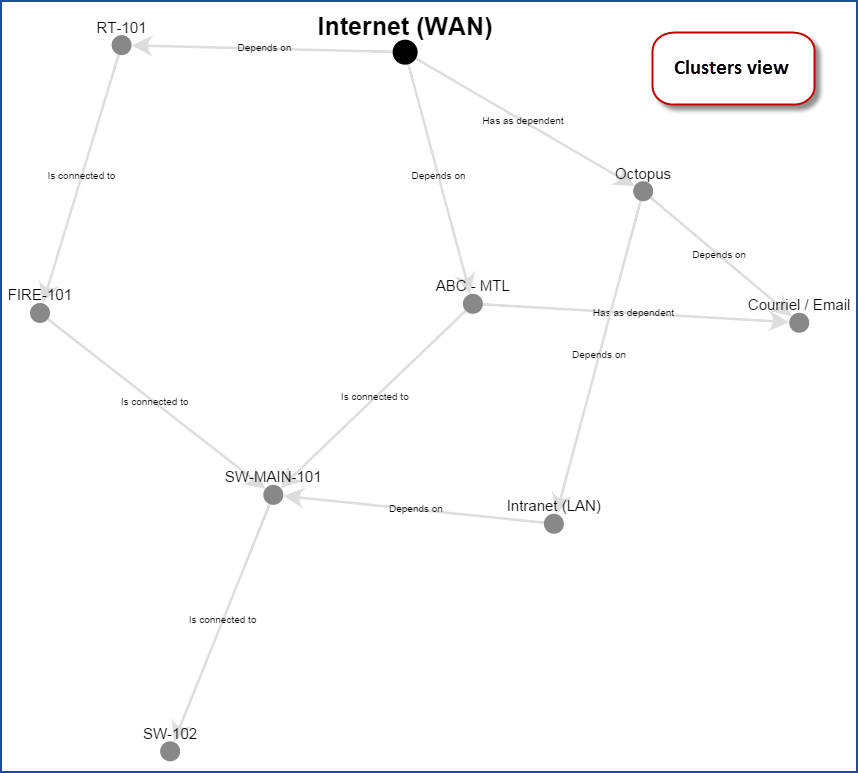
The CI visual mode aims to show all relationships in a graph based on one CI. This is a very useful tool, specifically for troubleshooting or to do impact analysis when planning a change.
Use the View relationships  button to access it.
Once in graphic mode, some operations allow viewing information from different angles. The available options are:

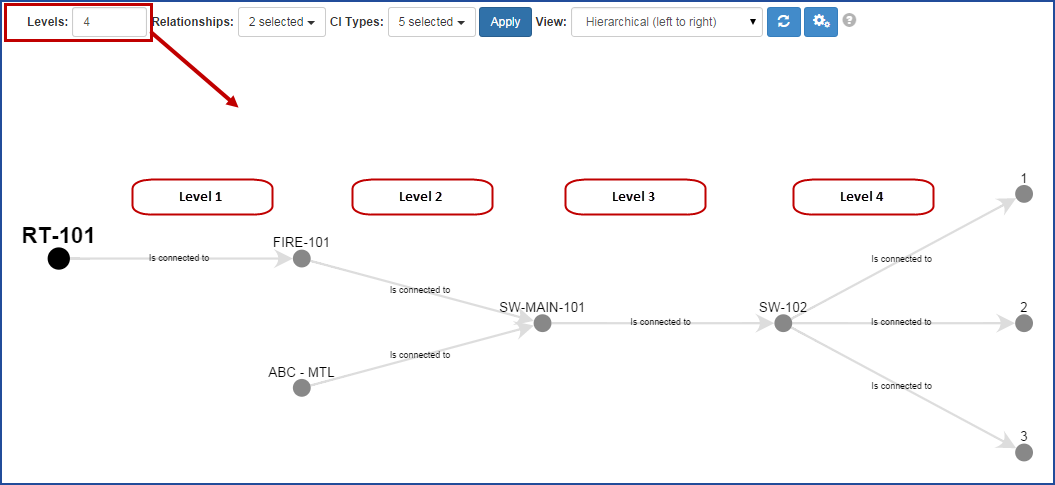
- Levels : By default the graph will display 3 relationship levels from the selected CI. This amount can be changed using the up and down arrows or edited directly in the field. Use the Apply button to confirm and see the modifications.
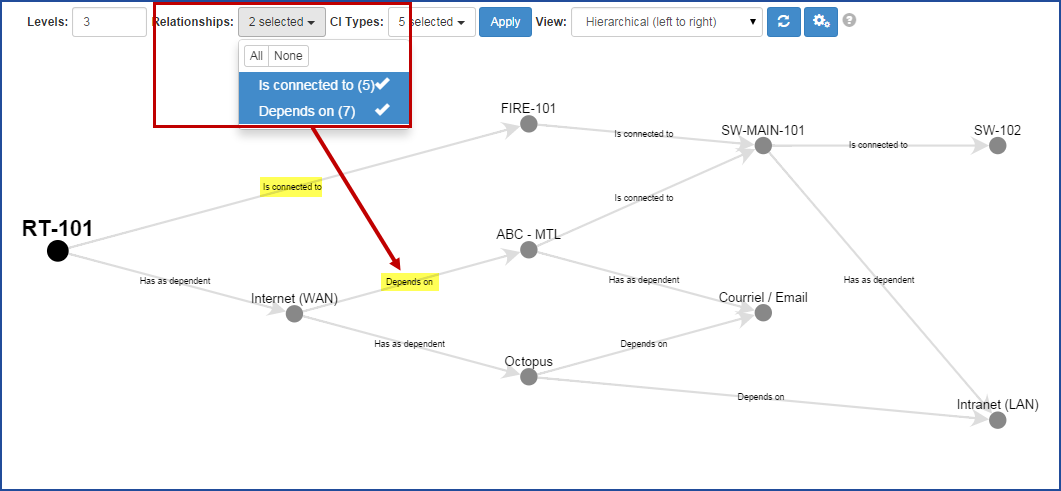
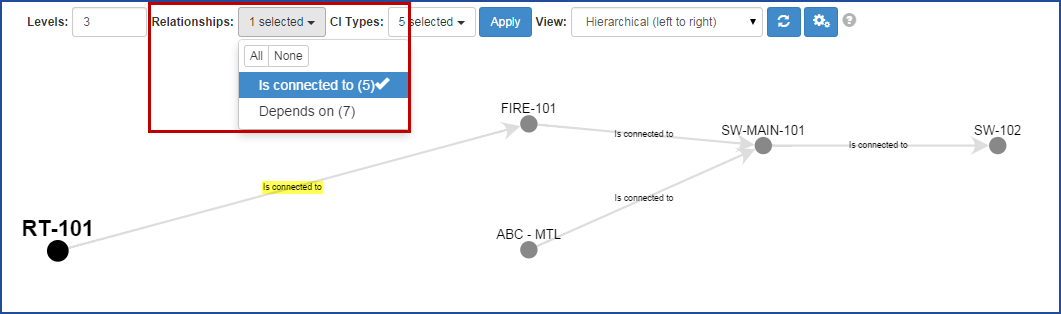
The default value (CIRelationshipsGraphView.Default.Levels), can be changed by our Service Desk , contact us if necessary. - Relationships : Allows to select the displayed relationship types. For example: Is connected to, Depends on, Has for dependent, etc. Use the Apply button to confirm and see the modifications.
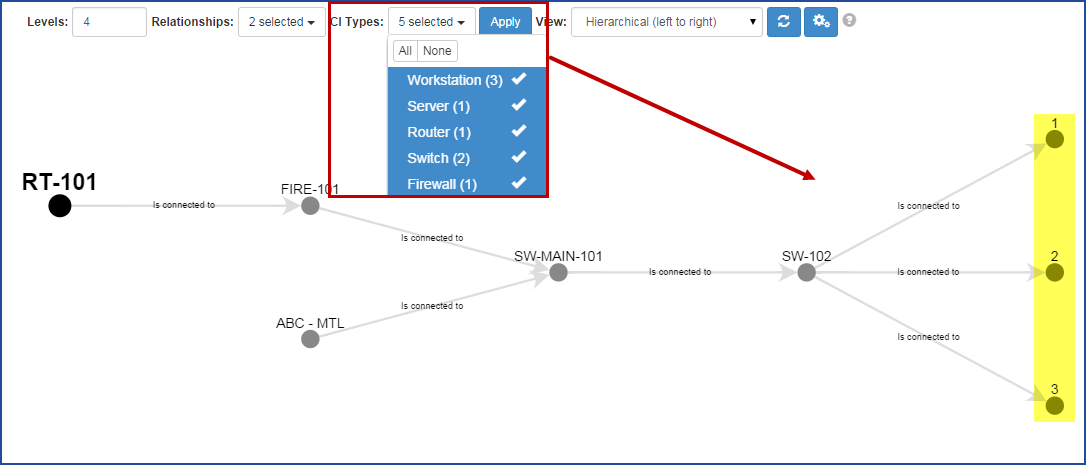
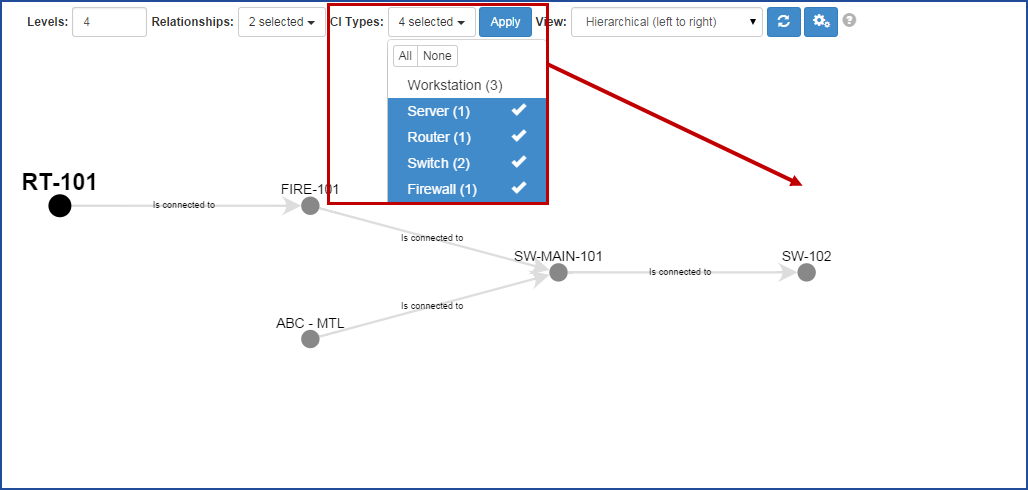
- CI Types : Allows to select the displayed CI types: Server, Workstation, etc. Use the Apply button to confirm and see the modifications.
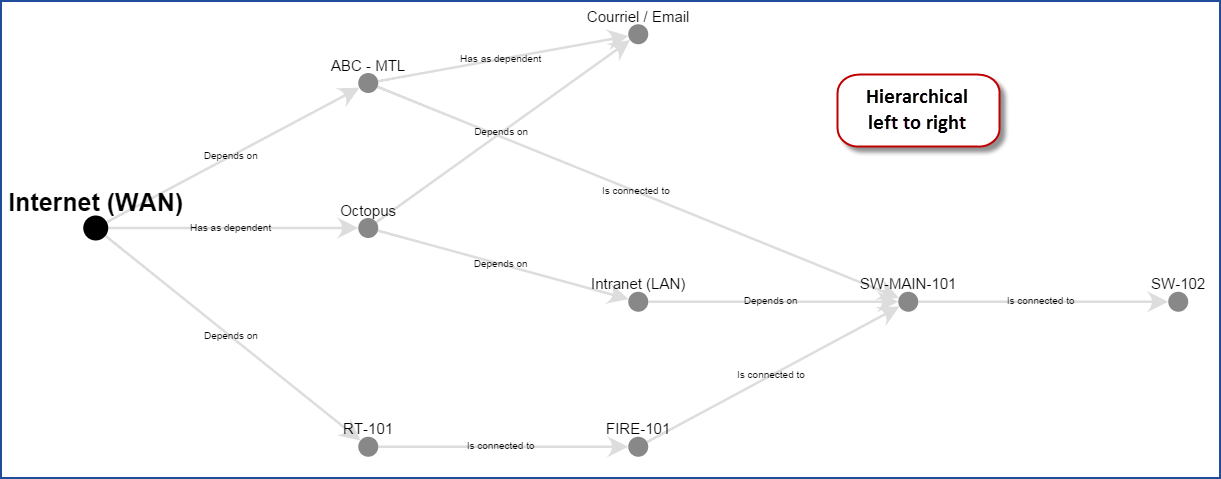
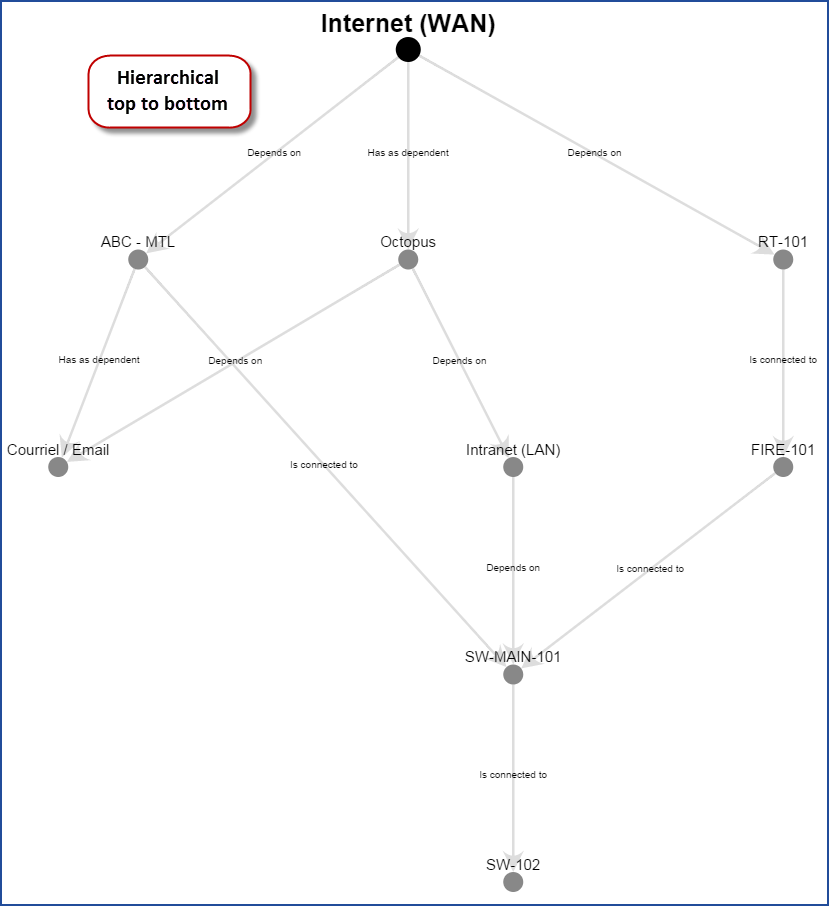
- View
- Clusters
- Hierarchical (left to right)
- Hierarchical (top to bottom)
- Options
- CI Label : Allows to change what needs to be displayed to represent the CI. By default, the CI name is displayed, but other attributes can be added, for example; the IP address, the CI type, the site, etc.
- Relationship Label : Allows to change what needs to be displayed to represent the relationship. By default, the relationship name is displayed, but other options are available.
Using a barcode reader
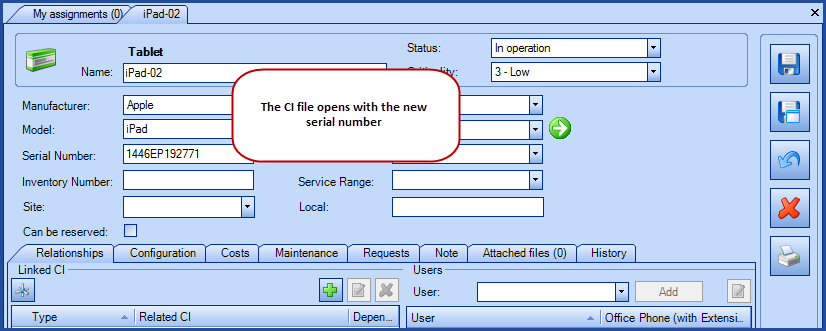
You can use a barcode reader to search a CI from a serial number. You can also use it to create a CI or update an existing one.
Here is how to use a barcode reader in Octopus:
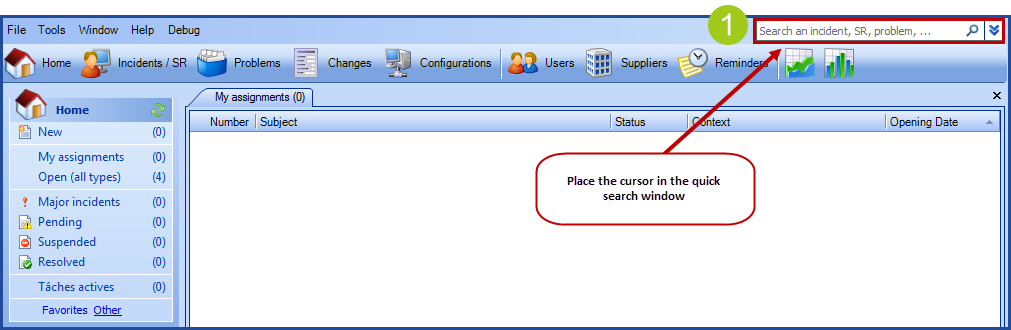
- Click the quick search zone of any module.
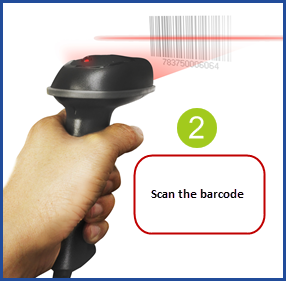
- Scan the barcode.
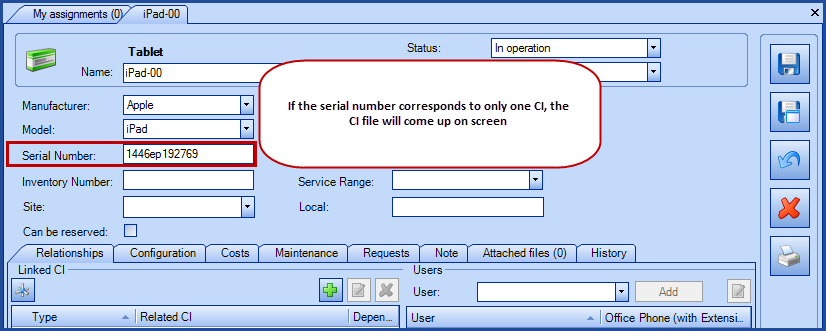
- If only one serial number corresponds to the number scanned, it will come up.
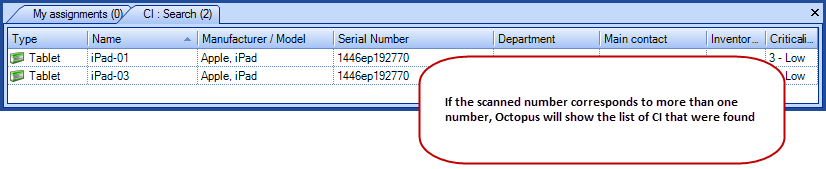
- If more than one serial number corresponds to the number scanned, Octopus will show the list of CIs found.
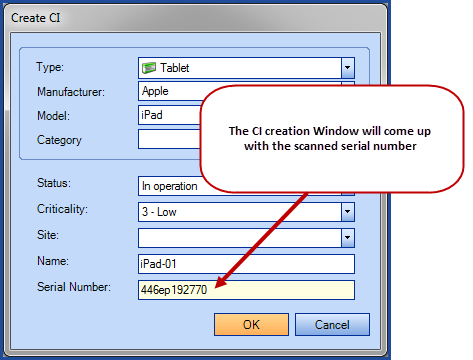
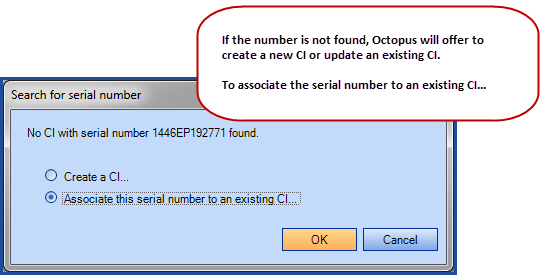
- If no CIs correspond to the number scanned, Octopus will offer a choice between creating a new CI or adding the serial number to an existing one.
In order for this barcode to be read correctly, the scanner has to be configured to make a return
 after each item scanned.
 Also, only serial numbers are currently recognized and the code must be alphanumeric.
By default, the barcode reader is activated. Contact us if you need to have it deactivated option: BarCodeIntegration.Enabled.
Barcode search
A CI is found
More than one CI found
No CI found - Create a new CI
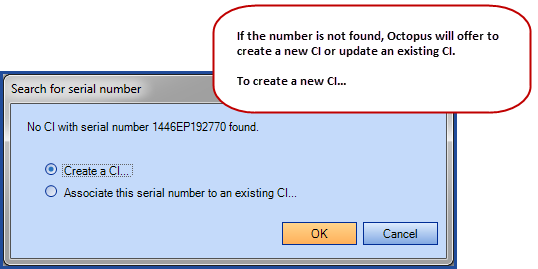
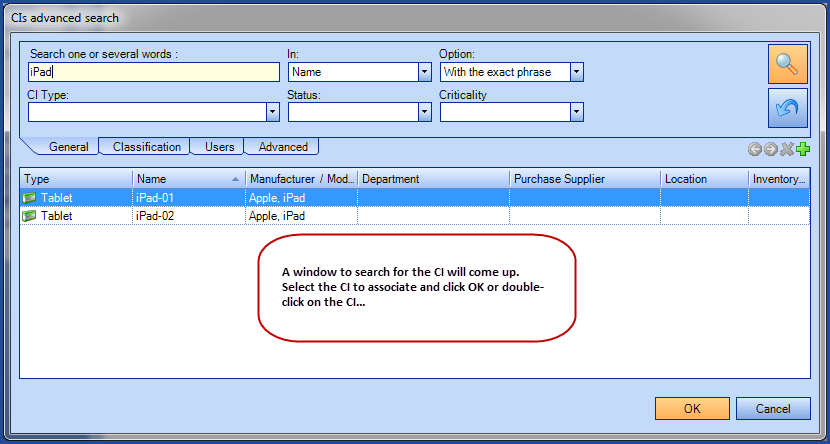
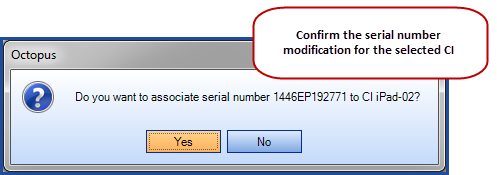
No CI found - Modify an existing CI
Definitive Media Library
In ITIL®, there is a concept called Definitive Media Library (DML). The DML groups approved versions of all software CIs. This library can also contain related CIs such as licenses and documentation. The DML is controlled by the Service Asset and Configuration Management process.
Thus, in the Octopus context, each approved software version can be recorded as a DML CI type, in which we identify a link to the authorized installation file. It is then easy to group all those CIs and get a list of the DML content.
Software Development Management
If you have an internal software development team, you can exploit the flexibility given by the CI status configuration. For example, you create a CI record for a new application and you follow its development through specific status: designing, building, testing, QA, in deployment, until it is in operation.
Thank you, your message has been sent.