Table of contents
Related Articles
Introduction
The task concept is applied in Octopus for service, change and problem requests. Tasks are created in order to represent the workflow or a service request, the preparation and implementation steps of a change and the tasks required in the analysis of a problem; in every case, they can be assigned to a group / assignee and it provides a certain order in their execution.
Even if tasks can be used in the Changes and Problems modules, they are most frequently used in Service requests. In this Wiki, we will concentrate on their use in Service requests.
How it Works
A task is an element of a request, which allows to divide the work in steps performed simultaneously or consecutively.
Task Types
- Approval: Task that initiates an approval request. Approval tasks can be added manually in a Service request in progress or preconfigured in a SR type. They can be accomplished during the initial phase or during the execution. A Wiki article is available to help you manage this type of task, see Automated Approvals - Reference Document.
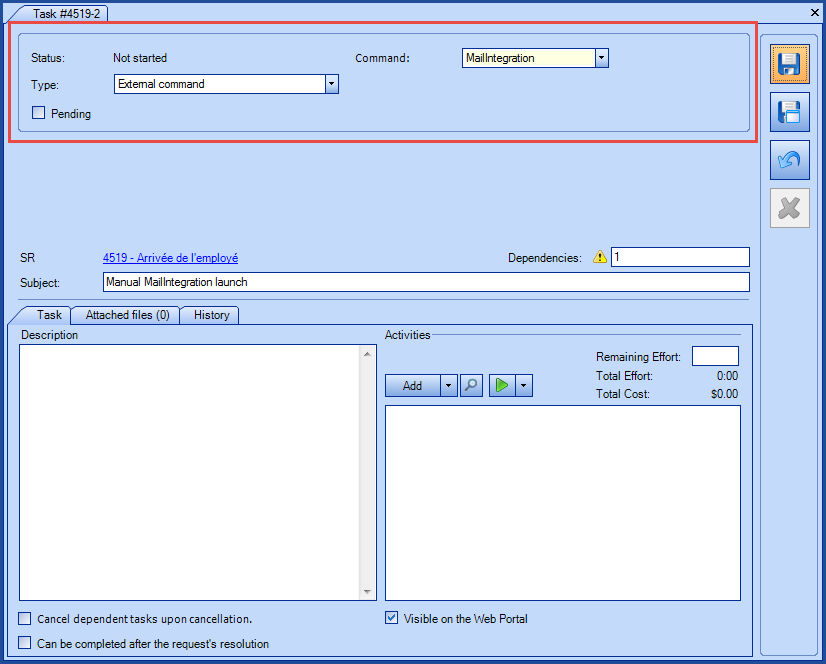
- External command: Task to be used with an External Command and the ExternalCommandRunner tool to automate a command alone or inside a workflow. For more details, see the Wiki article ExternalCommandRunner - Execution of external tasks.
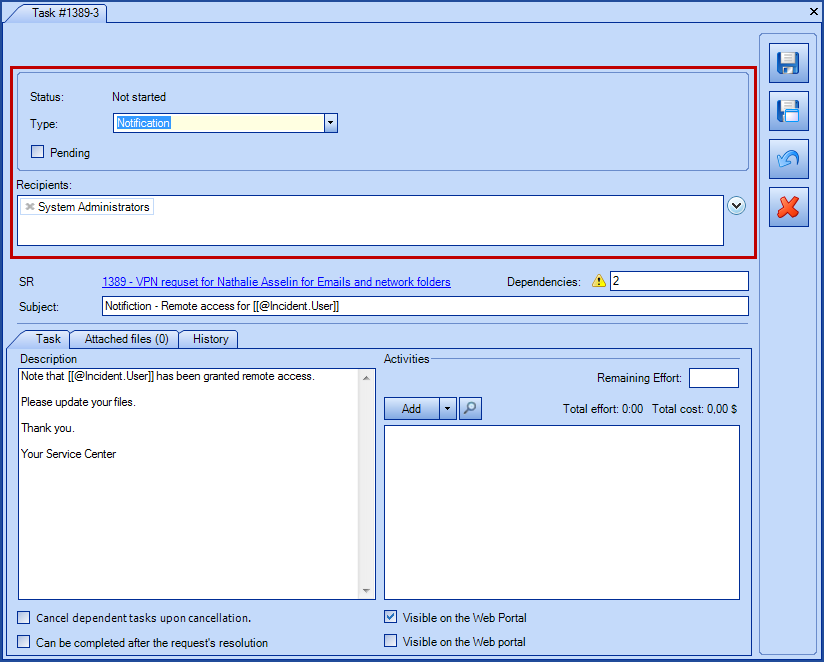
- Notification: Task used to send an automated message to a person or a group as part of a workflow of a request.
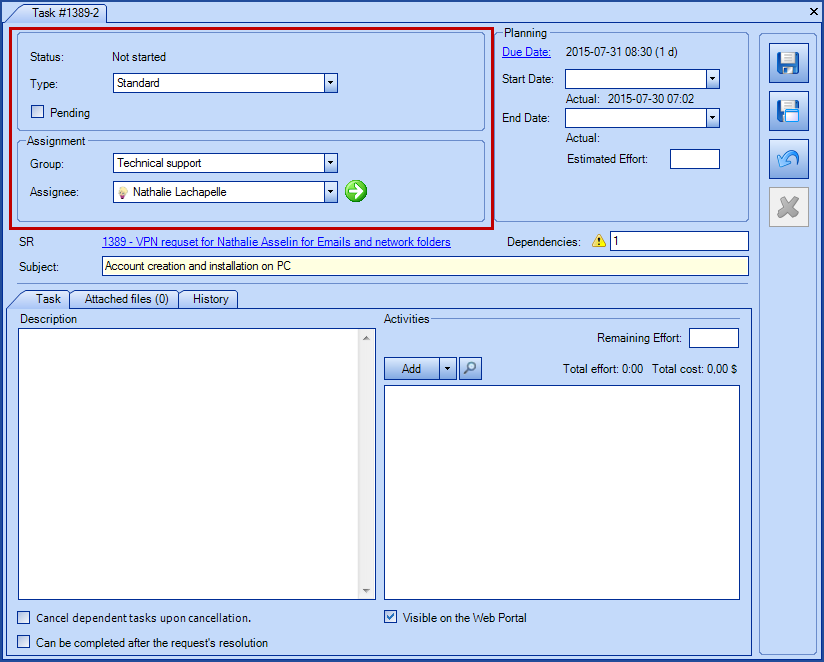
- Standard: Task performed by an Octopus group used in the delivery of a service request. This type of task is used in the execution phase.

Task Status
- Not started
- Inactive: This task is still inactive and cannot be processed. A warning will appear at the top of the screen.
- Active: Once activated, the tasks stays as Not Started until an Octopus user takes the assignment.
- In progress: An Octopus user has taken ownership of the assignment and is now executing the task.
- Completed: The task has been marked completed by an Octopus user; If other tasks were dependent on this one, they will activate automatically.
- Cancel: This status is normally usually accompanied by a reason.
Actions Affecting Task Processing
- Activate
- Take assignment
- Mark completed
- Cancel
- Reopen
Configuration
There are two ways to add a task:
- Manually from an existing request.
- With the configuration of an SR type or change template.
The task configuration is done in Tools > Reference data management. Then you add the tasks that will constitute the workflow of the service request or the change template.
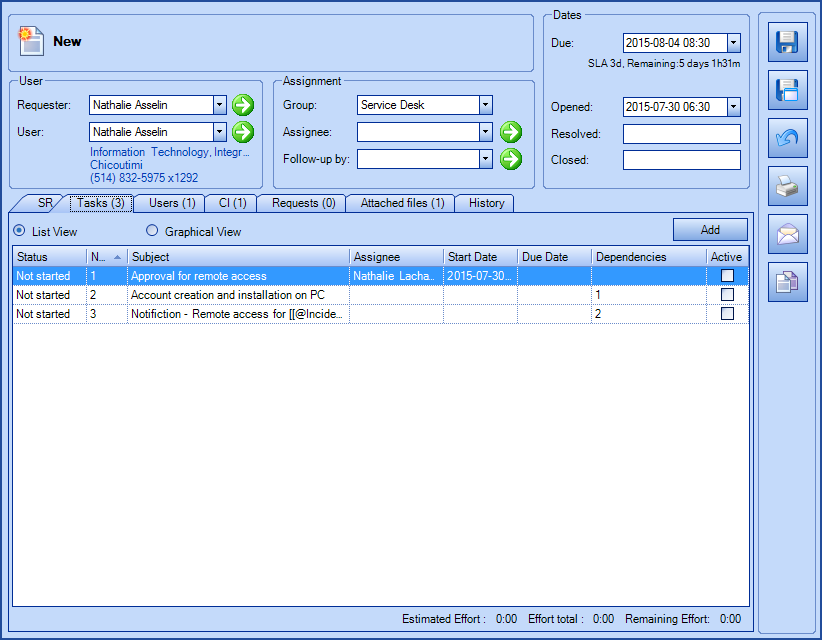
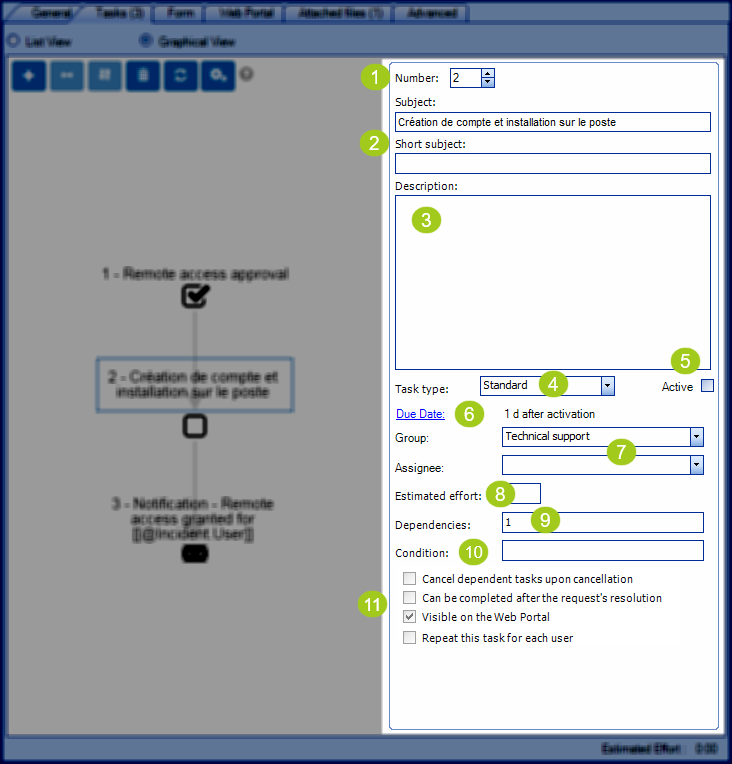
Task Window Description
You can look at the tasks in list or graphic mode. By default adding and configuring a task is done in the graphic mode.
The task configuration window is divided in two sections, in the right one you find the task information, on the left we can see the tasks in a graph along with their dependency links:
- Number: Represents the task number. If you have multiple tasks, you can change the order with the arrows to go up or down. Or you can write the task number directly in the field.
- Subject: Indicates the subject of the task. The subject can contain variables that will be replaced with the real values at their activation. For example, a task could have a subject like "Creation of a Windows account for " will become " Creation of a Windows account for username001". For more information on this option, consult the Alternate Subject Wiki.
Short subject: This field is optional and allows to present a short name for tasks whose name contains many variables. Octopus uses the short subject each time it shows a task with unresolved variables. So, instead of having a task named "Purchase of$licence.purchase for $purchase.softwarename to install on $purchase.ci", we can see, for example, "Software acquisition". - Description : Write the instructions for the Octopus user that will process the task or write the notification message that will be sent.
- Task type: Determines the behavior of the task according to the type - Approval, External Command, Notification, Standard.
- Active: Checkbox that determines if the task will be immediately activated or not. If the task has a dependency, do not check it, it will activate automatically when the task it depends on is completed.
- Due date: The calculation on the due date starts at the tasks activation, it takes into account a fixed date or a period depending on the case.
- Group: Indicates the name of the group responsible for the delivery of the task. By default, if no group is specified, the task will be assigned to the Service center at it's activation.
Assignee: Indicate the name of the one responsible for the task. - Estimated effort: This field allows to write the time estimated to execute the task. The estimated effort is different from the due date; for example, the creation of a network account can be estimated at 15 minutes, but the due date to complete the work by an Octopus user can be one day.
- Dependencies: Allows to indicate what other task needs to be completed before the automatic activation of this one. If more then one task must be completed prior, indicate their number separated by a coma.
- Condition: Allows to add one or more conditions to the task creation. For more information on the configuration of conditions, see the Advanced Task Configuration Wiki.
- Cancel dependent tasks upon cancelation: Allows to cancel dependent tasks if this one is canceled.
May be completed after the request's resolution: Indicates that a task must be processed, but does not have an effect on the delivery of the request. The SR will be completed, but this task will remain open until it is completed. Often used for administrative tasks: billing, file update, verifications, etc. Note that, if the option to resolve the SR automatically upon all tasks completion is enabled (via Tools / Options), this option will have no effect.
Visible on the Web Portal: Indicates that the subject of the task is visible on the Web Portal and an image will show it's status.
Repeat this task for each user: Combined with a Multi-user type field in a Web form, this option creates a task for each user of the request. For more information, see the Create customized forms in Octopus article. - Graphical task control section:
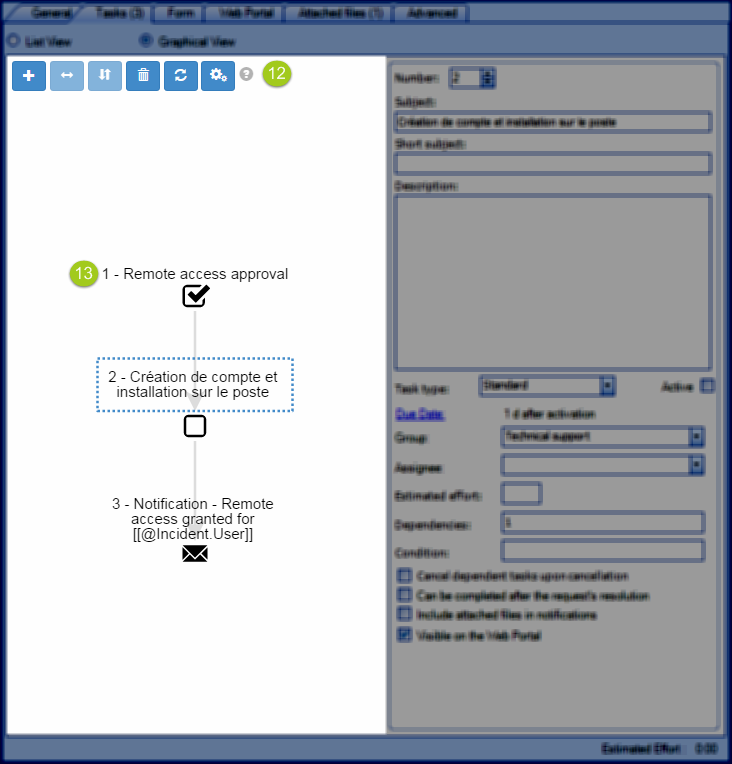
 Add a new task next to the selected task: Allows to add a task with a relationship to the task selected. To avoid having a dependancy with the task to add, make sure not to select a task before clicking on the Add button.
 Add a dependency between two selected tasks: Add a relationship between two selected tasks using CRTL+click or SHIFT+click. This action can also be done using the Insert key
 Swap the direction of a dependency: Changes the direction of the dependence between two tasks after having selected the arrow. This action can be done using the Page Up or Page Down keys.
 Open the selected task: Opens the edit window of a task. Task can also be opened by double-clicking on it.
 Delete the selected elements: Deletes the elements selected using CRTL+click, SHIFT+click or even by holding CRTL down and selecting a zone with the mouse. The Delete key can also be used.
 Extended selection: Allows selecting multiple tasks without using CTRL or SHIFT keys.
 Forces layout of view (useful after moving nodes): Resets the default layout after you move items in the window.
 Show options: Allows to pick the elements of the graphic task label. By default you can see the number of the task as well as the subject (@TemplateTask.Number - @TemplateTask.SmartSubject). But you could for example add the name of the group assigned to the task with F3 (@TemplateTask.Number - @TemplateTask.SmartSubject - @TemplateTask.GroupID).
 Help: Shows the help for this section.
 - List of tasks in graphical mode: Shows if there is a dependency and its direction with an arrow. An image will indicate the task type.
 Approval task
 Notification task
 Standard task
- Right section, fields configuration
- Left section, graphical task mode
- The first task of a set must be activated; otherwise, the flow will be blocked.
- Never activate a task containing one or more dependencies; it will activate by itself once the dependencies are completed.
- If multiple consecutive tasks concern the the same group or assignee, keep only one task and write the execution steps in the instructions to reduce the quantity of tasks.
- It is not necessary to make ALL tasks visible; only show the ones that are meaningful to the user in following the request.
- Only configure typical and regular tasks as part of an SR. Occasional tasks should be added manually.
- Adding a manual task or removing/modifying existing tasks as part of an active SR will have no impact on the actual SR type.
- Cancelling an SR will automatically cancel all associated tasks.
- The variables used in a task will be resolved only after the task is activated.
- The Show activity attached files option in a task's Attachments tab displays the files in the parent query. This makes it easier to consult all the files present in the same query and its tasks.
Using Tasks in the Problems and Changes Modules
Tasks can be used in Problem and Change requests as well to create workflows, they can be added manually to requests.
Members of a group assigned to a task in a module where they have no access are considered as contributors and they have some control over the task.
All members of the group:
- Can see the task
- Can add an activity
- Can modify the status and complete the task
- Can reassign the task
- Can do other modifications based on their permissions
See the Change Management - Octopus Module article for more information.
Using Notification Tasks
Notification tasks are generally used in workflows to send automated messages to a user or a group. For example, they can be used in the new hire workflow to advise specific people of the arrival of a new employee.
Follow these steps to create a notification task:
- Add a new task from the Tasks tab
- Select the Notification type
- Add the Recipients, many possible choices make this option flexible
- Fill in the rest of the task as usual
 Trick: An SR can be resolved automatically after notifications are sent if the following criteria are met:
- The automatic resolution option is active for this type.
- There is only notification tasks in the SR and they are all active or they will be activated in a chain.
In this case, the notifications will be sent immediately following the request creation and the request will resolve itself after. This option is very useful when a process only requires to send information.
Notification tasks are available everywhere tasks are used, so they can be used in the Problems and Changes modules.
Here is a list of cases where they could be used:
Examples in the Problems module
- Notification to key users to advise them that a root cause has been found
- Notification to key users to advise them that a change has been created to implement a solution
Examples in the Changes module
- Notification to key users to advise them of a CAB meeting
- Notification to key users to advise them of the implementation of a change
- Notification to key users to advise them of a post-implementation meeting
- To add an attached file to a notification task, the attached file must be added to the notifcation task after the request is created and before the notification task is completed.
Tasks Displayed on the Web Portal
When the Visibility of task progress via the Web Portal option is activated, the user can monitor the status of his requests, for tasks with where the option Visible on the Web Portal has been checked.
- A green check mark indicates that the task was completed.

- A blue arrow indicates that the task is in progress.

- A grey arrow indicates that work has not yet started.

- A red button indicates a refusal in an approval task.


Deployment Tasks
A standard task can be configured as a deployment task from the Changes module.
And in some contexts they can also be activated for SRs.
For more information about deployment tasks and the deployment calendar see the Deployment Calendar article.
Thank you, your message has been sent.