3.8.170
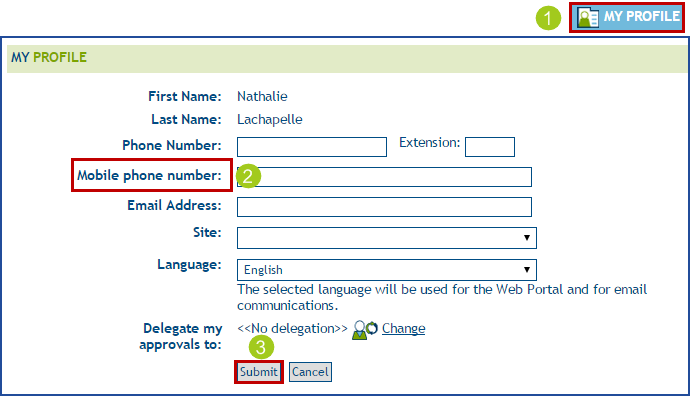
Web Portal - Cell phone number update possible
A user can now add or modify his cell number from the Web Portal:
- Go to the MY PROFILE section
- Add or modify the Mobile phone number field
- Save changes with the Submit button
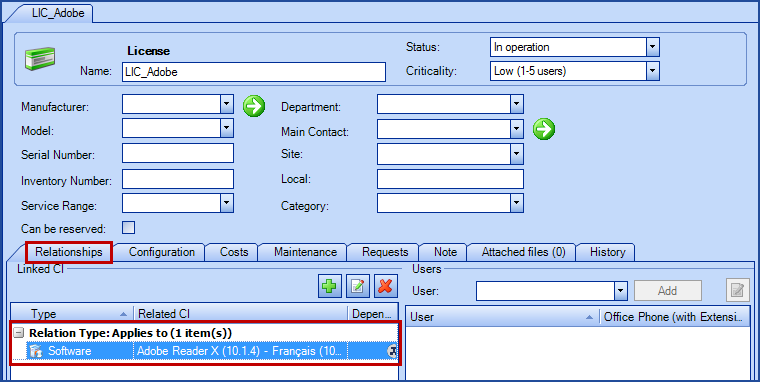
Change to the calculation of the number of licenses
Calculations for the number of available licenses have been modified. In addition to calculating the licenses entered in the Product name attribute, Octopus will also add the licenses from the other CIs in relation with the Software type CI. The calculation is based on the amount entered in the License count field.
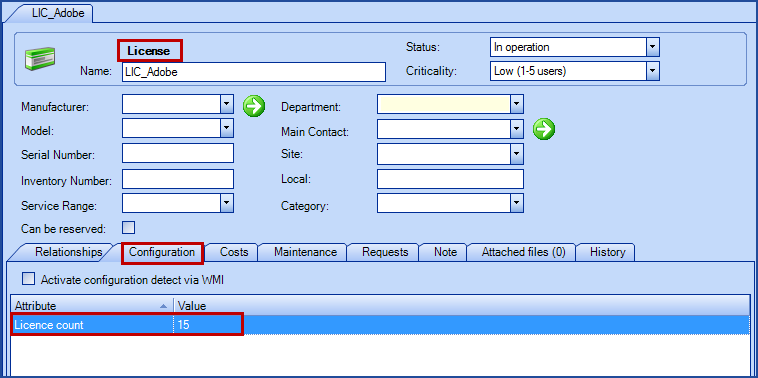
For more information, refer to the license management wiki article.
3.8.160
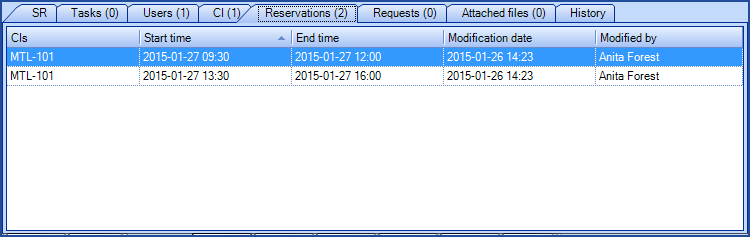
Reservation Requests - New tab to see occurrences
- Reserved CI
- Start time of each occurrence
- End time of each occurrence
- Modification date
- Modified by
3.8.130
Relationship between a user and a CI
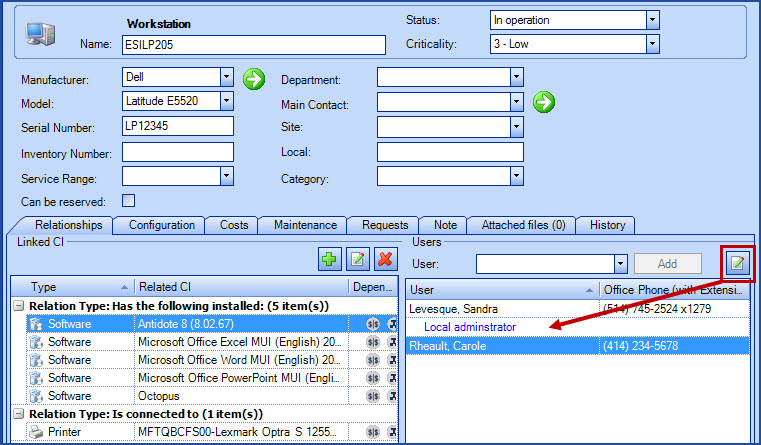
Edit the relationship between a user and a CI
It is now possible to add a comment to the relationship between a user and a CI.
To do this, you must click on the edit the relationship button,enter the comment and click on OK.
The comment will appear in blue underneath the user's name.
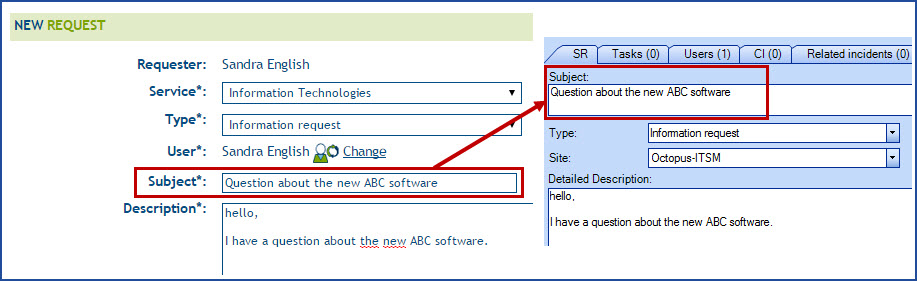
Custom Web fields linked to the request subject
It is now possible to link the subject field of a request with a subject field on the Web portal. When a text field is named Subject (or Sujet), the field value will be transferred into the subject field of the incident or the SR and will not be written into the Description field, like the other custom web fields. Also, when the field is present in the Web portal, it is always required.
If various fields labeled Subject (or Sujet) exist in the same form, the first one is taken into account to become the main subject request and the others will be considered as standard Web fields, transferred into the request Description. Only the Text fields with the right label (Subject or Sujet) will be taken into account.

Improvements to planned requests
3.8.110
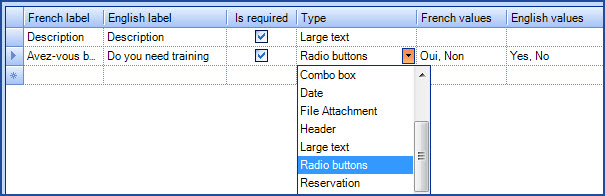
Radio buttons available in the Web forms
Radio buttons are now available in the Web forms. To use them, simply select Radio buttons in the Web portal field type and enter the various choices in the fields called French values and English values. The radio buttons are configured like the Dropdown list field.
To modify the Web forms :
- Tools > Reference Data Management... > Service Request > Types > select the SR type to modify and go to the Web portal tab
OR
- Tools > Reference Data Management... > Incident > Templates > select the incident template to modify and go to the Web portal tab
You will get the following result in the Web portal :
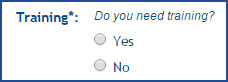
To modify Web forms, you must have the permission to administer Octopus.
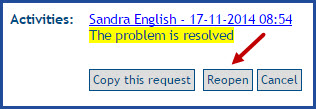
Allowing the reopening of a request from the Web portal
A new option is now available from the Web portal to reopen a resolved request. To use this option, you must view the request and click on the Reopen button located at the bottom of the request.
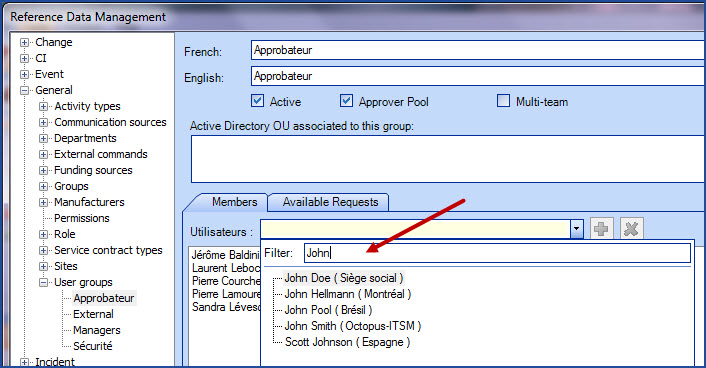
Users Search upgraded in the Groups tab
In the Groups form (or User groups), the left list containing potential members and managers have been replaced by a list field allowing a user search like the one used in requests.
To modify groups, you must have the permission to administer Octopus.
To access it, go to Tools > Reference Data Management... > General > Groups (or User Groups)
Possibility to see managers all department requests
The option His department for requests visible on the Web portal (Octopus tab of a user file) has by modified to His departments. When the option is selected, all requests of a manager's departments are now visible on the Web. Once on the Web portal, when the user unchecks the option See my requests only, he will gain access to the requests of the department in his file and also to the departments for which he is the manager.
To modify or view the manager of a department : Tools > Reference Data Management... > General > Department, select the department and the information is displayed in the Manager field.
To modify or view departments, you must have the permission to modify Octopus.
Octopus user groups can refer to multiple Active Directory groups
The configuration of an Octopus users group can now refer to multiple Active Directory groups.
Each Active Directory group must be specified by its distinguished name, one per line.
You can also use the button to explore and select the desired group from the visible groups list of your domain.
ADSIReader - Added parameters to detect from another domain
Two new parameters were added to allow detection from a from the one from which the current machine is connected :
- /DomainUserName
- /DomainPassword
For more information see the ADSIReader -Integration to Active Directory page.
ADSIReader - exploring Active Directory sub groups
ADSIReader tool can now explore Active Directory groups interlinked with specified groups in the reference data management.
For example: if the AD group named "Parent" is associated to an Octopus users group and that this one contains the group "Child" that also contains users; therefore the Octopus group will be updated with members from both "Parent" and "Child" groups.
Interlinked groups must be part of the same domain to be correctly explored.
3.8.100
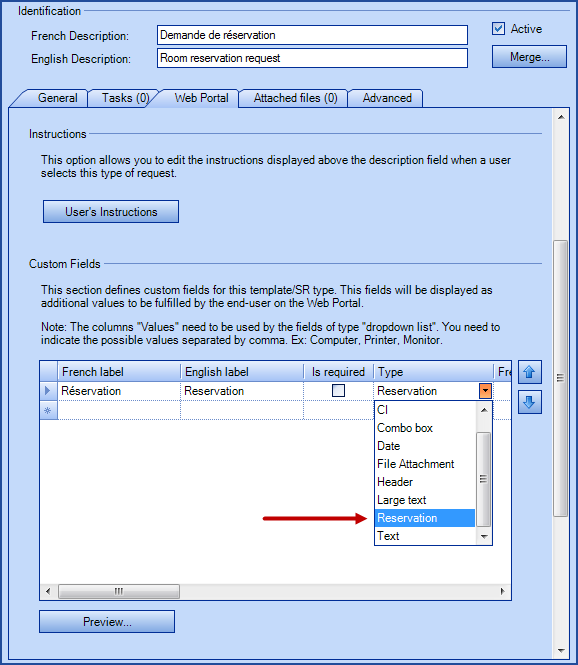
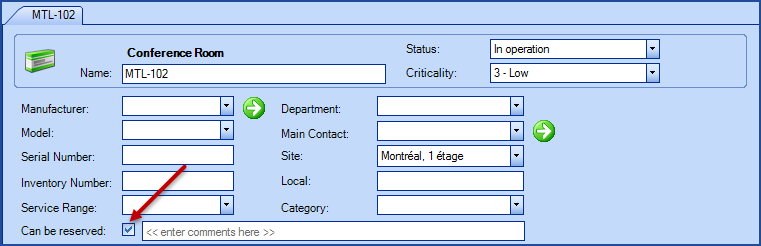
New reservation management option
In order to allow users to make room or equipment reservations from the Web Portal, we have created a new type of field to be used in Web forms and we have added the Can be reserved field in the CI file.The Reservation field links the reservation request to the CI representing the item being reserved. This new type of field can be used by itself or combined to other questions in the Web form, to add a task to prepare the room for example.
To manage this type of request you need to have the Octopus administrator permission and good knowledge of how to configure Web forms.
A document detailing the use of Reservation Management will be available shortly.
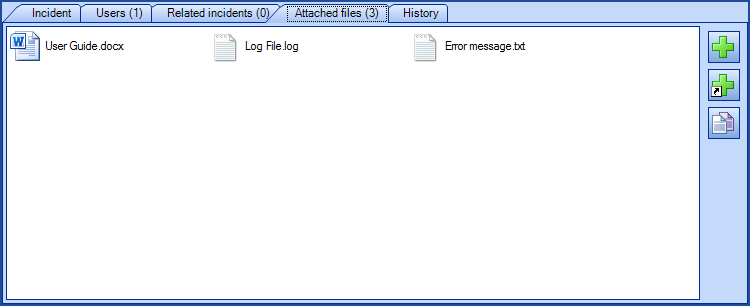
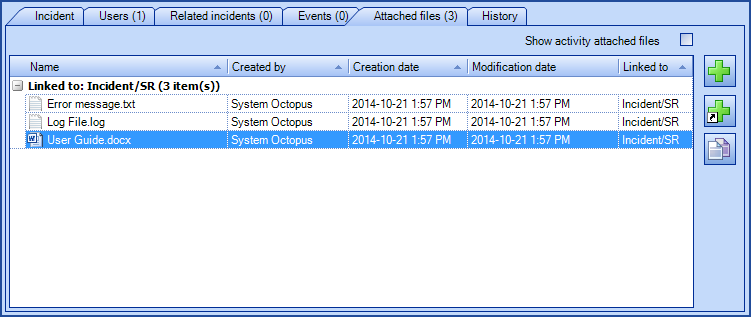
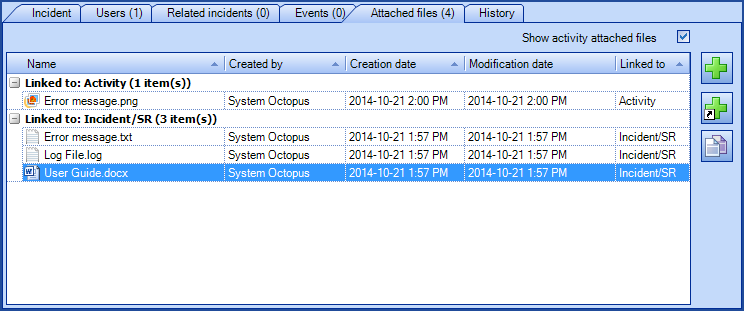
Changes to the display of attachments
- Name
- Created by
- Creation date
- Modification date
- Linked to
Before version 3.8.100
From version 3.8.100
3.8.90
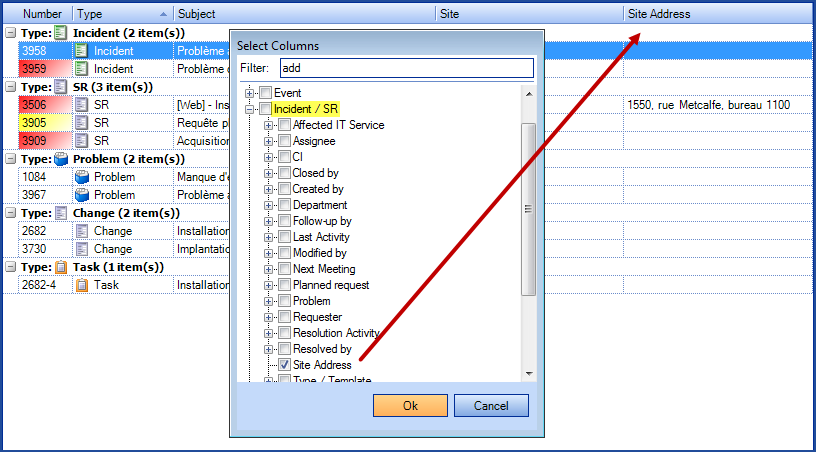
New site address column
The information in the Address field of your sites can now be displayed as a column and can also be searched. You can find this column the Incident / SR lists.
- Sites can be configures from the Tools > Reference Data Management > General > Sites menu.
3.8.80
It is now possible to copy the current tab title
Copying the current tab title
You can rapidly copy the request number or any other information related to the current tab
To do this, you must :
- Right click on the current tab
- Select "Copy the tab title"
- Paste the copied information where you want
The pasted information will be different based on the copied data. For example, you will get the following results when you will copy :
- a request number : SR #3909, Incident #3955, Problem #1084 or Change #2682
- a task number : Task #3909-1
- a list : My assignments (12)
- a CI : PC-1234567
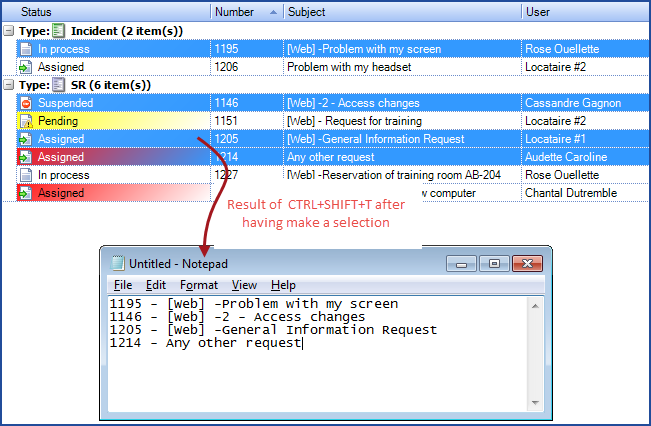
Copying a selection in a list
Furthermore, it is possible to rapidly copy requests number and their title from a multiple selection.
What you must do :
- Open the desired list or do a search
- Select the desired items
- Press the CTRL+SHIFT+T keys
-
Paste the copied information where you want to
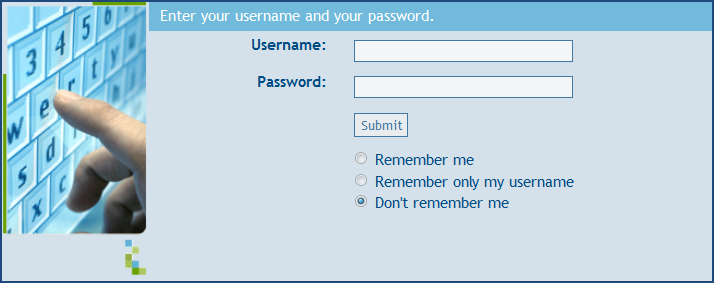
Change to the Web portal password reset
To request a password reset , you must:
- Click on the "Forgotten password" link on the web portal
- Enter your email address
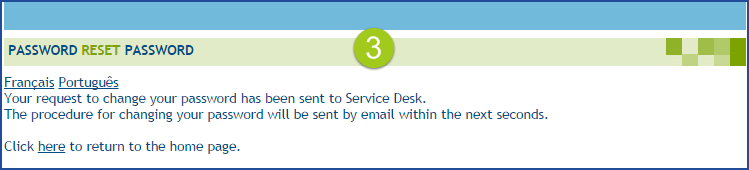
- A confirmation message will appear on the screen, mentioning that your request will be delivered to the service center and that the password request procedure will be sent to you by email
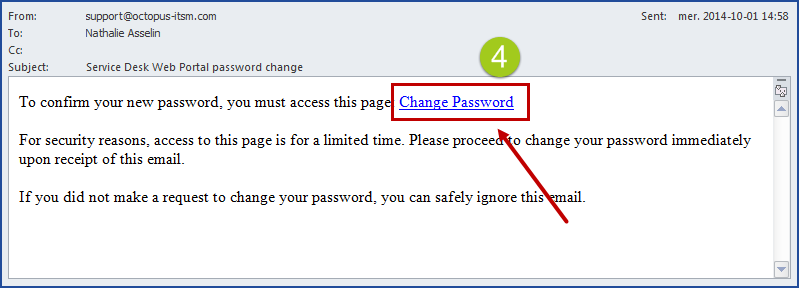
- An email will be sent to the provided address. Click on the "Password reset" link from the message
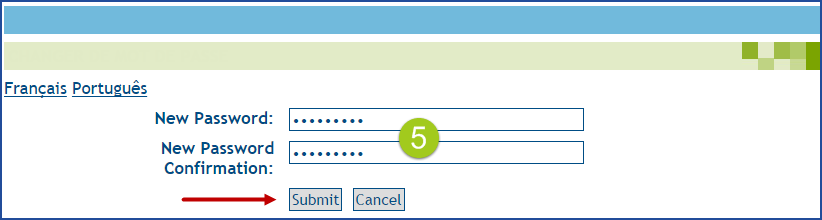
- The password reset page will open. Enter a new password, submit it, then the web portal will open
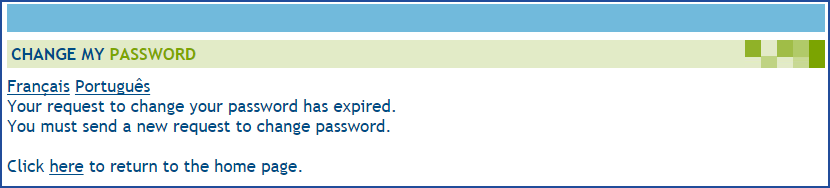
The reset link inside the email is valid for 4 hours only.
If you take more than 4 hours to click on it, the system will provide the following message "Your request to change your password has expired. You must send a new request to change password" and you will have to restart the process. This delay can be changed if required by our Octopus service center.
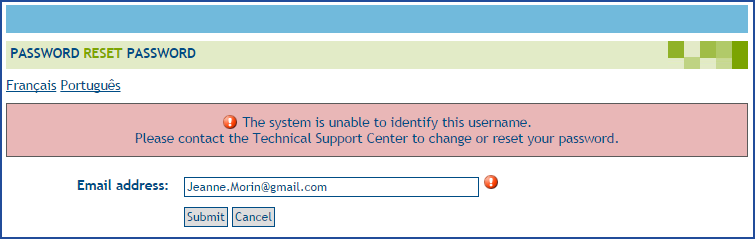
IMPORTANT : You must use your Octopus account email address. If you try to do a password reset with another email account, you will get the following error message "Unknown email address".

If you use another email address that is not related to your account, you will get the following message
If you wait more than 4 hours before using the provided link, you will receive the following message
Possibility to restrain the modification of some CI
To allow modifying some CI types while protecting other types, it is now possible to lock some CI types as "Read only".
This is being done through custom permissions in relations to restricted CI types.
Here are the steps to put a CI type in Read only mode :
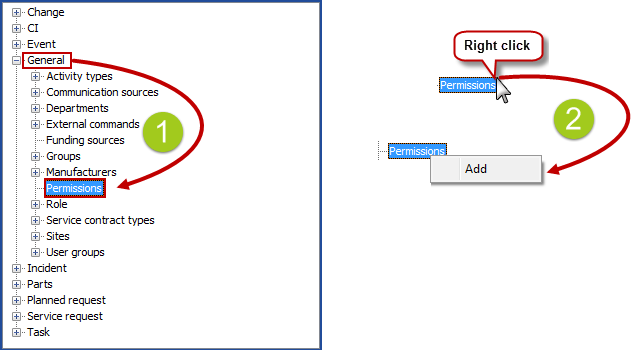
Creation of custom permissions
- From the reference data, go to "General", then "Permissions"
- To create a new permission, right click on "Permissions" and then click on "Add"
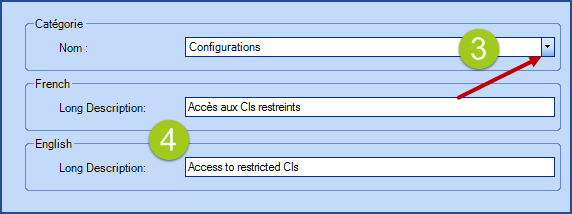
- Since this permission is part of all Octopus' permissions, you must select under which category it will be listed under
- Give it a name in both French and English under Long Description
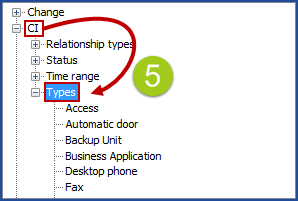
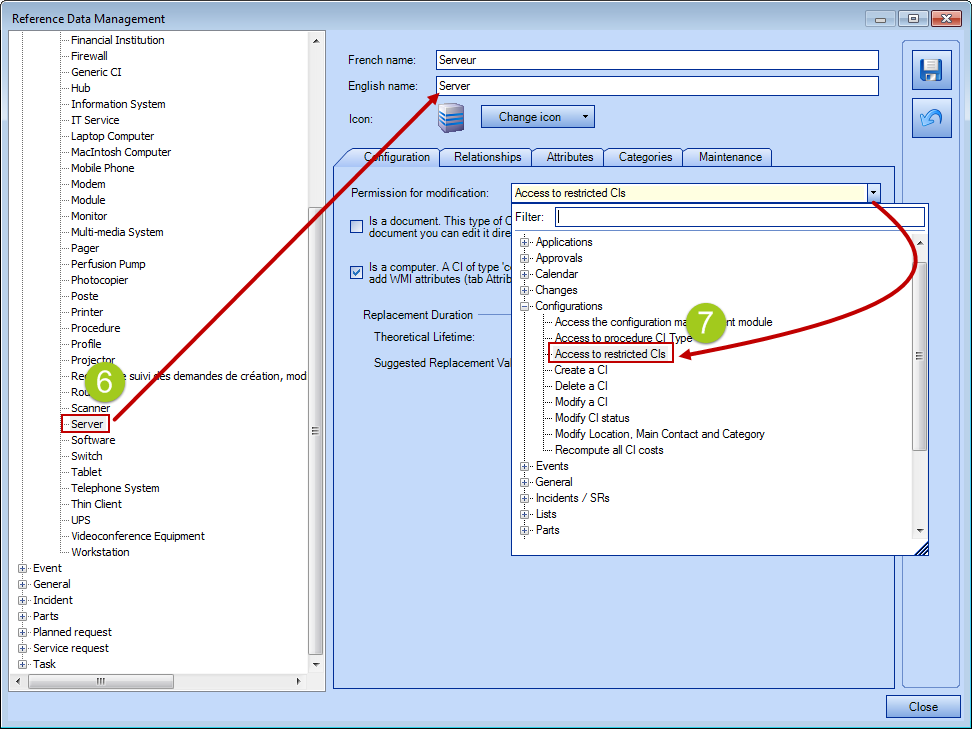
CI Type restriction
- From the reference data, go to the "CI" node, then "Types"
- Pick the CI type to be restricted
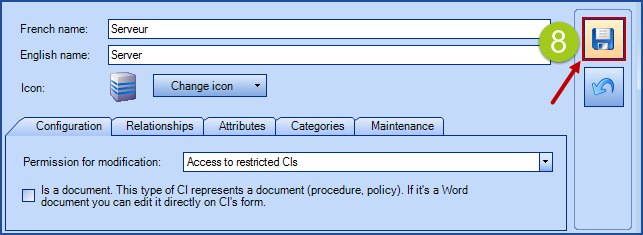
- In the field called "Permission for modification", select the custom permission previously created
- Save the changes. If more than one CI must be restricted, repeat the same steps
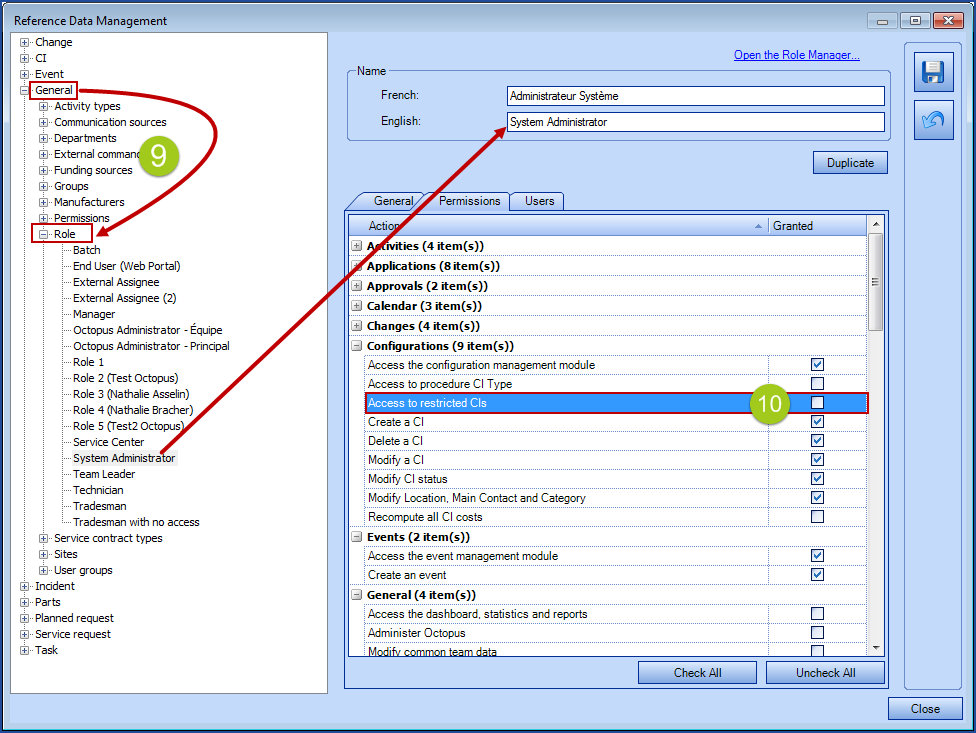
Manage the new permission in the roles
- From the reference data, go to the "General", then "Roles"
- Add the custom permission previously created to one or more roles given to assignees
To learn how to provide roles to assignees, please see the following Wiki on Role Management.
You must have the permission to administer Octopus to make the required modifications in the reference data.
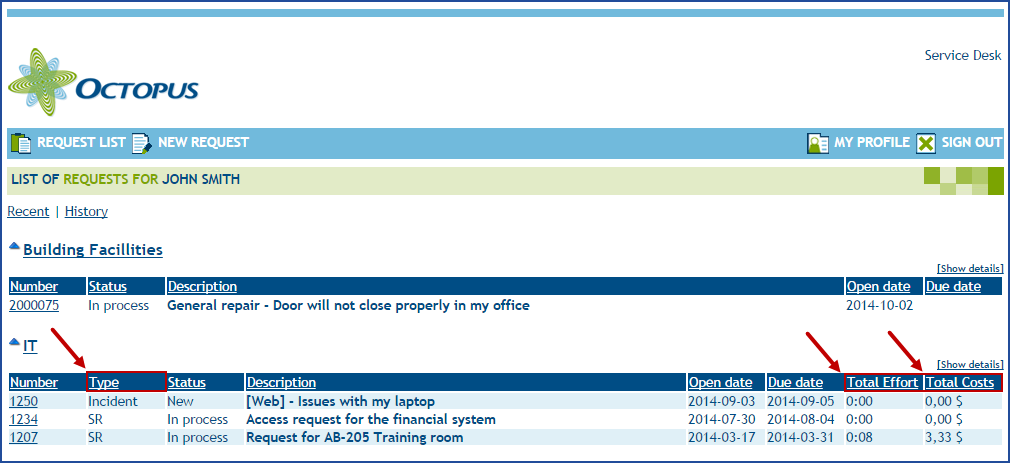
New columns available on the Web portal
For some companies, services provided can be charged back to departments. To allow users to know which types of requests can be billable, the required time to process them and their costs, it is now possible to add 3 new columns that will be visible to users on the web portal. These columns are configurable by team, if needed.
- Type
- indicates if the request is an incident or a service request
- Total effort
- indicates the effort put into activities of a request
- Total cost
- indicates the total cost of the request. Includes activities efforts and additional costs of external labor or parts used to resolved the request
If you would like those columns, please contact us to make a request via our Web portal. Two choices are available: the "Type" and/or "Total effort and cost".
3.8.70
Added categories to the the activity types
It is now possible to categorize activity types. This facilitates the use of activity types especially when there are many, it also speeds up data entry in requests. You can also search activity types from the advanced search.
You can add, modify or delete an activity type category from Tools > Reference data management > General > Activity types. For the details on how to add, modify or delete an activity type category, see the Activities in Octopus wiki.
To manage activity type categories, you need to have the permission to administer Octopus
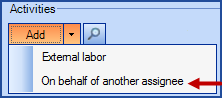
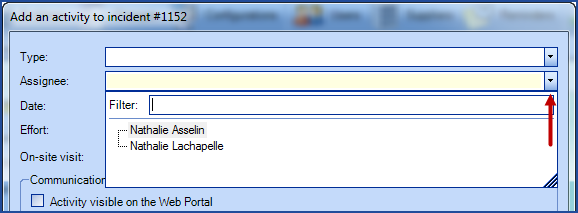
Add activities on behalf of another assignee
It is now possible to add an activity on behalf of another Octopus user.
To do this, you must:
- Click the down arrow to the right of the "Add" button
- Select "On behalf of another assignee"
- Select the name of the "Octopus user" from the top of the page
- Fill in the rest of the activity as usual
- Create an activity on behalf of another assignee
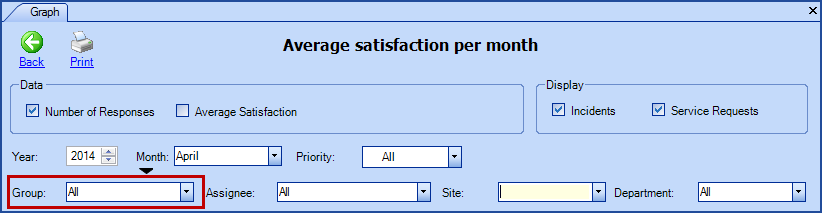
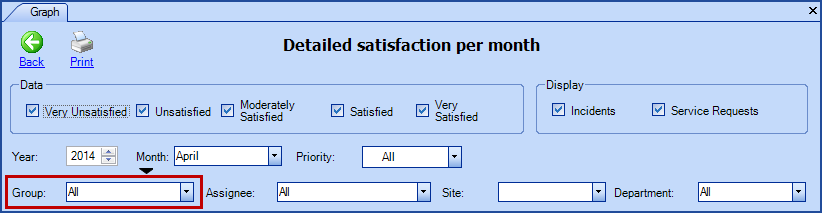
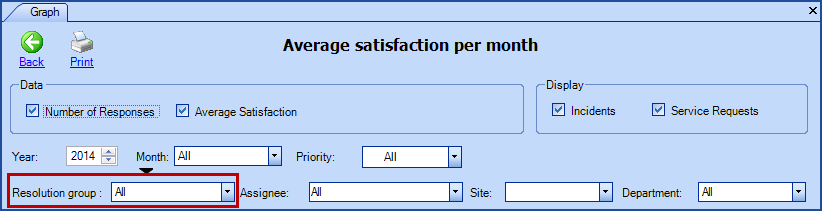
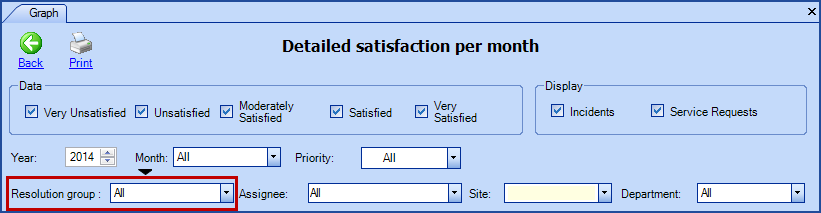
Changes to satisfaction statistics reports
In order to improve the data related to customer satisfaction, we have made changes to the satisfaction reports.
Before, the satisfaction rating was associated to the group assigned to the request, now the satisfaction rating is associated to the group who resolves the requests.
This information is found in the "Average satisfaction per month" and "Detailed satisfaction per month" reports. These reports are located at the bottom of the list of statistics.
- To access the statistics, you need to have the permission to "Access the dashboard, statistics and reports"
- To have satisfaction data, you need to have previously activated the satisfaction survey and users must have completed the survey
BEFORE
NOW
Web Tech - Allows to add parts
In earlier versions of Octopus, when a technician used a part to complete a request, he could not add the part to the request via Web Tech. This had the effect of maintaining the parts inventory difficult and distorted to actual cost of requests.
To overcome this issue, it is now possible for technicians using Web Tech to add parts to their requests.

For more details, please consult the Part Management wiki.
The avatar is available as a column
It is possible to add the "Picture" column to your lists. This field shows the avatar associated to the user. See the User Management (avatar) and List Customization wikis for more information.
3.8.60
Web Portal - Less interruptions when configuration changes
There is less interruptions when configuration changes are made by the Octopus Administrator.
When the Octopus administrator makes configuration changes, you will sometimes get this error message from the Web Portal:

In order to improve the user experience with the Web Portal, we reduced the number of possibilities that can cause this error message. The following changes will no longer trigger this message:
- Add, modify or delete the Web Portal announcement
- Add, modify or delete incident templates or types of service requests
3.8.40
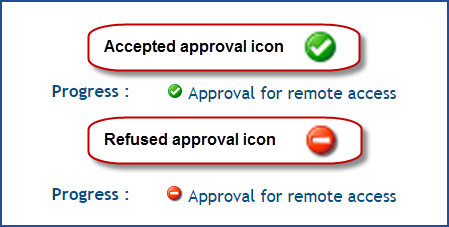
Web Portal - The icon for refused approvals has changed
It is now easier to see if an approval, visible from the Web, has been accepted or refused. The image in front of the approval clearly indicates acceptance or refusal.
For more information on the automated approvals, see the wiki for Automated Approval - Reference Document.
3.8.32
First login following the 3.8 update
Scenario 1
If you have a user account part of only one Octopus team: there are no changes for you.
Scenario 2
If you have user accounts in more than one Octopus team and that the "Windows username" field is different for each of them: there are no changes for you. But if you would like to benefit from the new multi-team feature, you must merge your accounts.
Scenario 3
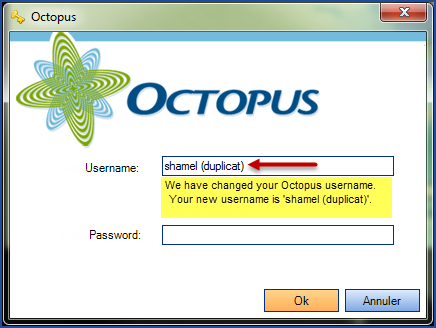
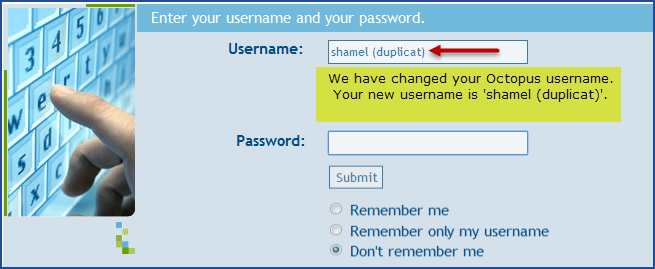
If you have user accounts in more than one Octopus team and that the "Windows username" field is the same for each of them, here is what will happen :
- Octopus will keep one account with its Windows username and put "(duplicate)" at the end of the others.
- example: shamelGBM becomes shamel (duplicate)
- The new username will only be given at first login. It is extremely important to take note of it.
- Same behavior applies to Web Tech.
Multi-team
In previous versions, if an assignee wanted to have access to more than one team, a user account in each of those teams was required.
With version 3.8, a user account in each team will not be necessary anymore.
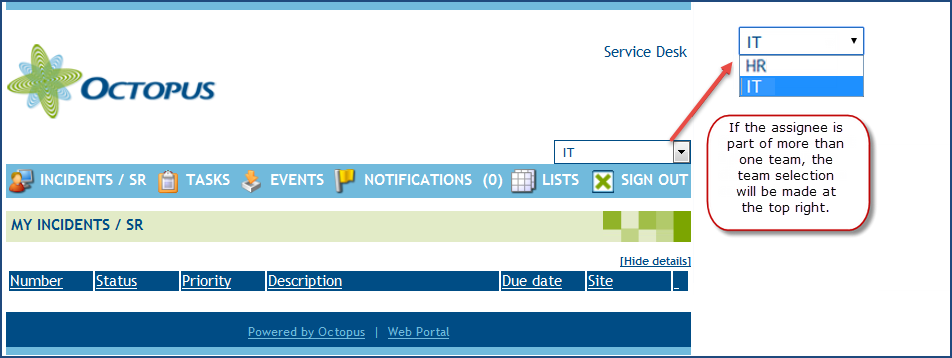
At Octopus startup, an authentication window will appear. The assignee who has an account in several teams will have to select which team he wants to connect to.
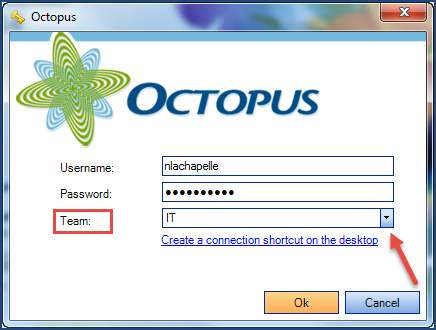
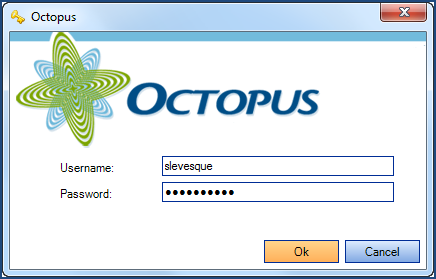
An assignee that has an Octopus account only in one team will get the standard authentication window.
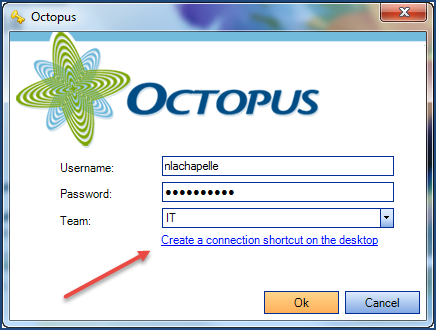
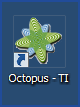
Shortcut creation
When you have access to more than one team, it is possible to create an Octopus shortcut for a specific team, on your desktop.
Web Tech
The Web Tech multi-team feature is a little different, it is applied only when connected. In the Web Tech login window, we will not ask in which team to connect, even if the assignee is part of several teams. It is only once connected that the assignee will select the team he wants to connect to, right upon the « logout » option.
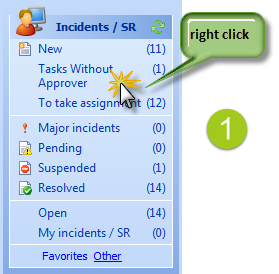
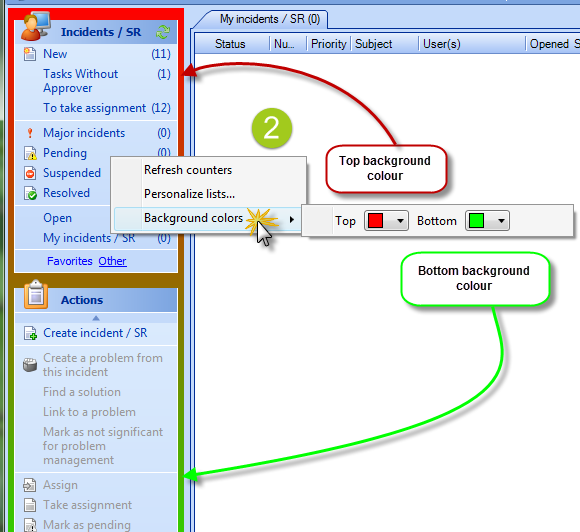
Customize the background colour of the left panel
There is an existing option that allows you to customize the background colour of the left panel. When you use an Octopus account existing in more than one team, the customization will help identify which Octopus team you are working in. Colour preferences are saved in the assignee profile, for each team.

- Right click on the left section.
- Go to Background colors and configure your colors as wanted.
List to add if you manage more than one team
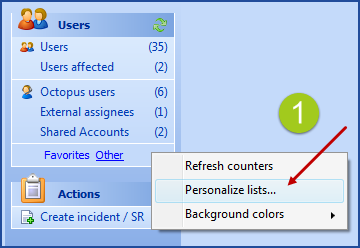
If you have more than one team, you may want to see the Octopus users of the other teams. Here is how to add a list for that:
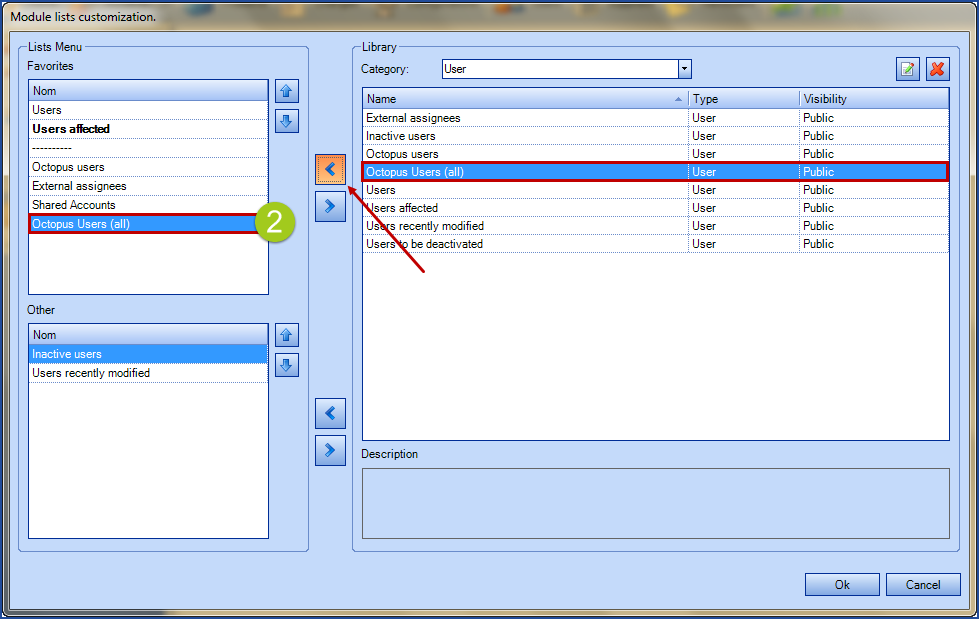
- Right click in the list section and select "Personalize list"
- From the "User" category, select the list named Octopus Users (All) and click OK
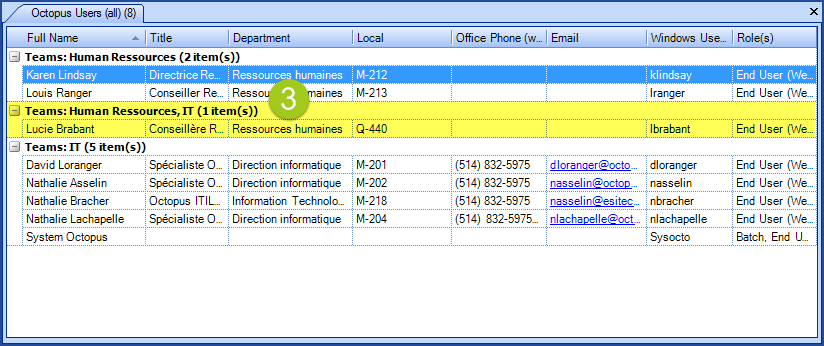
- Back in your lists, you can now see the Octopus users by teams and the ones that belong to more than one team
NOTE: You can only see the groups, roles and permissions of an Octopus user for the current team you are looking at. So in order to see the complete set of permissions that an Octopus user has, you would need to login to all the teams they are part of.
Visual explanation
For additional information, please see our wiki page: Role Management
Octopus licenses
In this version, Octopus added the user license notion. A license type is added to each user. The license type also determines roles and permissions available in Octopus.
Here are the available license types:
- Batch: License type used to execute recurring tasks, like ADSIReader, MailIntegration, WMIUpdater, etc.. This is a free license that can connect directly to Octopus.
- End User (Web portal): License type by default when adding a new user, allows users to connect to the Web portal. This is a free and unlimited license
- External assignee: Used by an assignee out of the basic team. This license type allows task completion only from the Web portal
- Tradesman (Building facilities): License type reserved to building facilities teams with assignees using only Web Tech
- Standard: License type used by an Octopus assignee. This license allows access to the whole Octopus client
Click on the following link to see our prices on our Web page Octopus-itsm.com, in our rates section. Or contact us to obtain additional information on the subject.
Role management and permissions
In past versions, the access level of an assignee was determined by a selection of available permissions. The modifications had to be done manually for each required assignee.
Starting from the 3.8 version, we are introducing the concept of roles that will not only ease the access management in Octopus but also assures a better security approach. Each role contains its own permissions, assignees are assigned roles and the corresponding permissions are automatically applied.
Here is an example: all technicians are associated to the role of Technician, which has been preconfigured with specific configurations.
Jack is a technician, but he must have access to the Statistics module to produce operations reports. This permission is not part of the Technician role, but another role with the required permission already exists: Reports. By adding Jake the report role, he will inherit permissions of both roles.
For more information on role management, please see our Wiki page: Role Management.
Users management
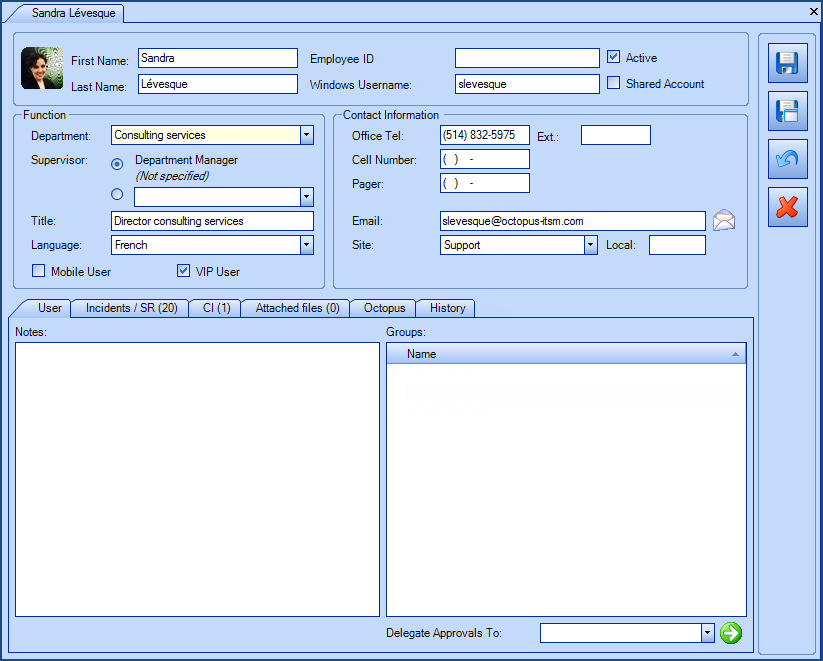
With the coming of role management, we are modified part of the user file. We have added a new button « Create an Octopus account » which will facilitate the creation of an assignee. We have also changed the order and name of some tabs. To see in details the changes made to the user file and the meaning of them, please see the following Wiki page: User Management.
Here is a preview of the new look of a user file:
Activity journal
It is now possible to change the appearance of the activity journal to a more modern look, which includes the addition of an avatar. This option is only available from the Octopus application, it will neither appear on the Web portal nor the Web Tech.
Here is what the modern journal looks like. We can also see an avatar (small icon) which identifies the assignee or the end user. For more information on avatar management, please see the avatar section on our Wiki page: Users management.
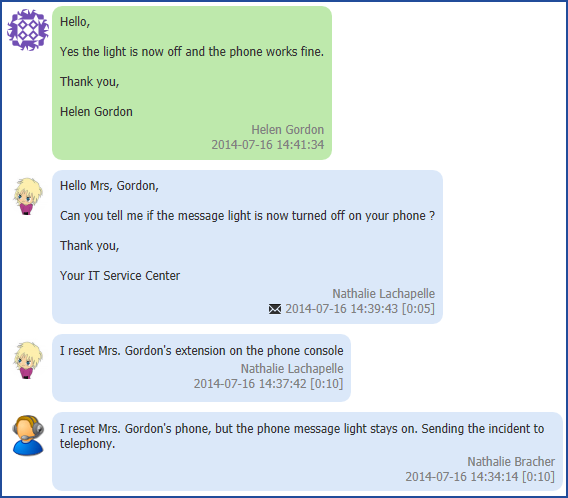
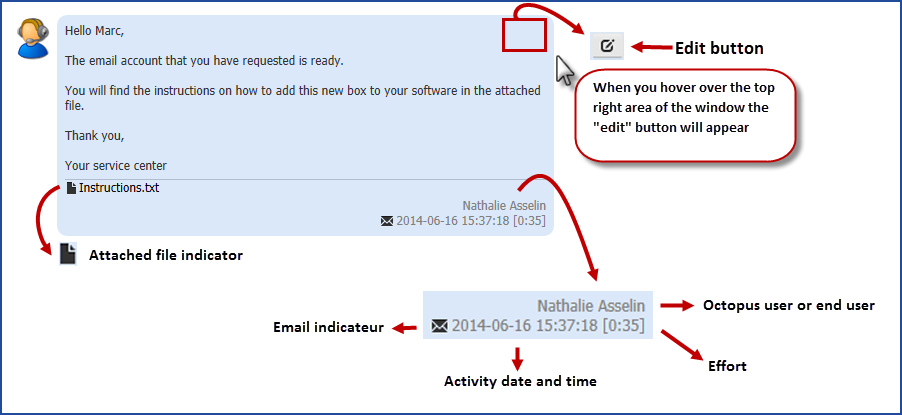
In the activity journal, a lot of information is displayed through various fields.
The following image gives an overview of the journal, using the new Modern view.
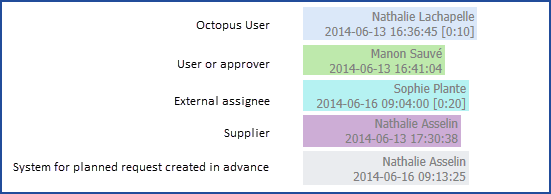
The activity colour shows who added the activity. This behavior allows a rapid distinction of whom made the activity, i.e. an assignee, a user, an external user, a supplier, etc.).
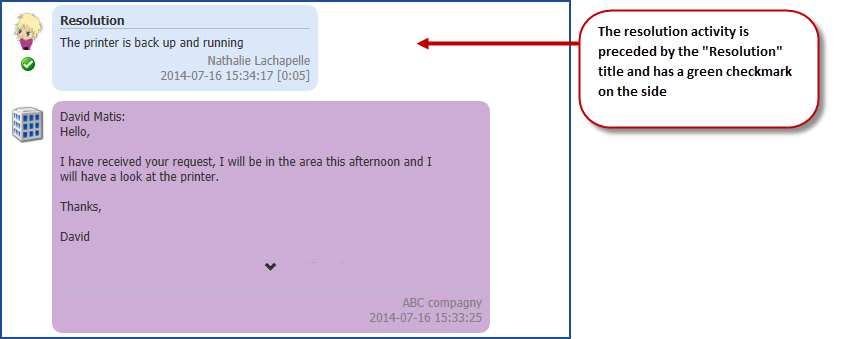
The resolution activity is handled differently in Octopus. Its appearance is different to make it easily noticeable. In the Modern view, it is preceded by a « Resolution » title and a green checkmark on its side.
For those who would prefer to keep the classic journal appearance, please see our wiki: Octopus Activities
Event management
Event management has been completely redesigned. We have worked the module to make it more flexible and to facilitate the compatibility between events and incidents. The module now provides more detailed and complete options.
The complete article will be ready soon.
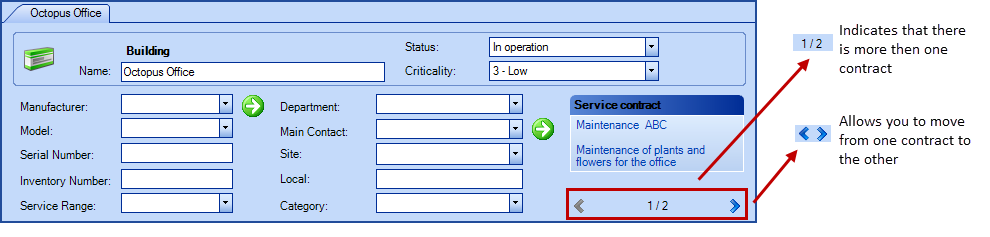
Multiple service contracts for a single CI
It is now possible to add more then one contract to a CI. If more then one contract is active, only the first one will be visible, but a numeric indication will appear in the CI file in this format 1/1 or 1/2, etc.
- Left and right arrows are available to go from one contract to the next
 and
and 
- Before version 3.8, only one contract could be related to a CI
Other changes
Other less important changes have been applied to the 3.8 version. You will find an overview of these modifications in this section.
Tools
Octopus tools (importing or other) now require team precision when the account launching the tool is part of more than one team.
You must now specify not only the username and password, but also the number of the selected team you are launching the tool for.
It is done using the /Team parameter:, followed by the Octopus team number. ex: /Team:1 for the IT team
Task cancelation
Task configuration now contains a new option for the standard tasks. An option allowing the automatic cancelling of dependent tasks when the main one gets canceled is now available for both Standard and Approval type of tasks.
For more information, please consult our wiki Task Management
Reopen a canceled or completed task
It is now possible to reopen a canceled or completed task simply by clicking on the Reopen action.
- Reopen a canceled / completed task
Back button in the Web navigator
The Back button from the Web navigator now works on both the Web portal and the Web Tech portal
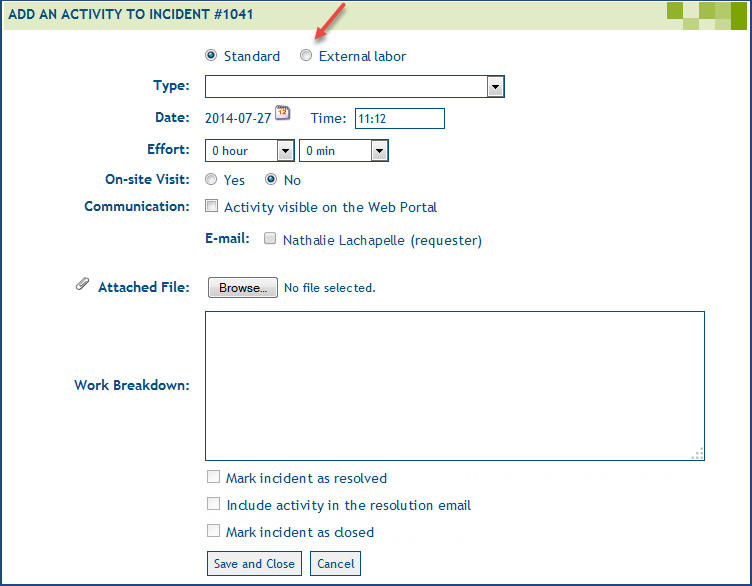
Add an External labor activity from the Web Tech portal
The new activity window on the Web Tech now allows adding a standard activity (default choice) or an external labor activity. For an external labor activity, you must simply select the option at the top.
Additional variables customization
From now on, you can apply to your email templates (and to all other sections using variables) additional formatting to the text.
The possibilities are; text in upper case, text in lower case and hyperlink format.
For additional information in regards to the new customization, please read our wiki page: Configuring and improving email templates
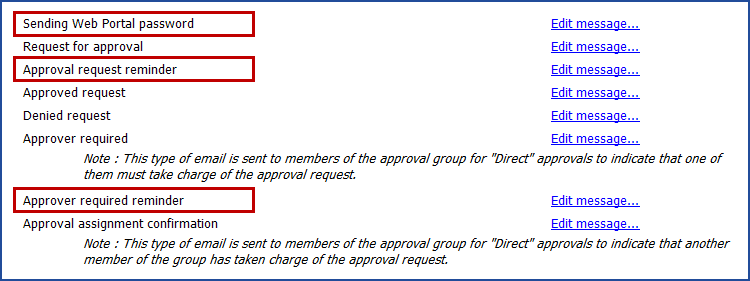
Additional email templates
It is now possible to modify several new email templates directly from the Options menu. The moved templates are; approval request reminder, Approver required reminder and Sending Web portal password.
Thank you, your message has been sent.