Table of contents
Active synchronization of your users between your domain and OctopusIntroduction
Octopus can connect to Microsoft Entra ID (formerly Azure AD) to facilitate access to the application.
Using an identity federator provides an integrated login experience to your Octopus environment. Your users and technicians won't need to create a new password to use Octopus applications.
Octopus can connect to a federated identity manager to ease access to the application in a hosted environment.
Single sign-on can be used independently for the following components, depending on what your federation provider supports:
- Web Portals for end users.
- Applications meant for assignees (Windows client (WinUI), WebTech).
Prerequisites
-
An Active Directory domain (on site, i.e. installed on a Windows server in your infrastructure)
-
A Microsoft Azure subscription
- A hybrid clould domain (updated via AD Connect)
- Active synchronization of your users between your domain and Octopus
- Via ADSIReader from your Active Directory domain to Octopus
- A good knowledge of Microsoft Entra ID Enterprise Applications (Microsoft Entra ID)
Implementing this authentication mode requires having resources available in your environment to configure and support the components to be deployed in your Microsoft Entra ID..
Octopus staff do not have access to your Microsoft Entra ID and cannot help you configure this part.
Authentication mode with Azure AD is not currently available for the Octopus Web application (Octopus 5). It would be inaccessible if authentication with Azure AD was enabled. We are in the process of completing the necessary work and will inform you when you are able to use them.
How it works
Web portal
When your end-users arrive on your web portal for the first time, they will be automatically redirected to your Microsoft Entra ID authentication page, as configured by you. They will be invited to authenticate to your domain. The experience will be very similar to that experienced when users try to access Microsoft resources in your environment (such as Outlook or Sharepoint).
Once they have completed the authentication process, they will be automatically redirected to the Octopus web portal and automatically authenticated..
Windows Applications
Windows Client for Technicians (WinUI)
When the Windows application is launched, a Microsoft Entra ID login window will appear. The user will be prompted to authenticate with the user they wish to use to log into Octopus. Once authentication is complete, the Windows application will be launched and authenticated with the selected user..
Batch applications (MailIntegration, DataImporter, ADSIReader, etc.)
It is important to understand that the unique authentication of a batch application, launched by a Windows task, takes place in the context of the Windows user configured in the Windows task..
There are two ways of configuring authentication for these applications:
- Via standard authentification settings (/login - /password)
- You will need to provide the username/password of the user's Microsoft Entra ID account.
- The authentication information will then be in plain text in your configuration (batch file or command line).
- The password can be encrypted (see Tools | Generate encrypted password for Azure Active Directory).
- Via user name setting d'utilisateur (/login)
- Log in to your Windows session and launch the batch application
- You will then be able to authenticate the user correctly in Microsoft Entra ID, and subsequent authentications will be carried out automatically.
- All you need to do is specify the user name as a parameter to ensure that the application authenticates correctly
In order for both systems (Octopus & Microsoft Entra ID) to uniquely identify a user, there must be a unique key known between the two systems. Octopus uses the user's UPN (User Principal Name) to identify users who are going to connect. A user's UPN takes the form of an e-mail address: nomutilisateur@domaine.com. In most cases, the UPN corresponds to the user's e-mail address.
It is also important not to activate multi-factor authentication (MFA) on accounts that will be used by batch applications.
User UPN synchronization
Octopus allows users' UPNs to be synchronized automatically, making it easier to manage these identifiers. This synchronization can be done automatically via the ADSIReader application. .
Once UPN synchronization is up and running, you'll find a new Windows username in each user file, corresponding to each user's UPN. Note that an Octopus user can have multiple Windows usernames. The semicolon (;) is the character that delimits each user name.
ADSIReader configuration
- Identify where ADSIReader is running
- Open the folder where the executable is located
- Make a copy of the ADSIReaderLDAPMappings.xml file and put this copy in a other folder than the Octopus folder.
- Modify this file to add the following XML element::
- <attribute LDAPAttribute="userPrincipalName" OctopusAttribute="UPN"/>
- This new element must be under the <mapping Name="User"> element, at the same level as the objectGUID, sAMAccountName, etc. attributes.
- Save file
- Note the path to this modified file
- Modify the existing ADSIReader command line to add the following setting: :
- /ConfigFilePath:"[Path of modified file ADSIReaderLDAPMappings.xml]"
- For further information : ADSIReader - Importation à partir d'Active Directory
Alternative
If using ADSIReader isn't possible, there's an alternative that uses DataImporter. The general idea here is to export all your users present in Microsoft Entra ID and prepare an Excel file.
Once the Excel file is ready, you can use DataImporter to upload this information to Octopus.
Exporting users from Microsoft Entra ID
You will need to set up a script (probably Powershell) that will obtain the list of your users and prepare an Excel file with at least the following columns: :
- First name
- Last name
- UPN
Importing users into Octopus
Once you've obtained the Excel file in the previous step, you'll need to import this information using DataImporter..
For more detail : DataImporter - Importating users
UPN authentification test
Once you have synchronized your users' UPNs, test that you are able to authenticate in Octopus using your UPN..
- Launch Octopus
- Enter a UPN as user name
- This should look like an e-mail address: : username@domaine.com
- Set current Octopus password
Alternative authentification for emergency
Octopus allows users with "Can administer Octopus" permission to authenticate directly in Octopus, bypassing the built-in authentication. This allows an administrator to access Octopus in the event of a problem with the identity federator configuration.
When this alternative authentication method is used, the password saved in Octopus must be used. This password is the one you currently use to authenticate yourself..
Please refer to the previous step (Testing authentication via UPN) for your emergency credentials.
Steps for using alternative authentication as a emergency
- Press the SHIFT key (MAJUSCULE) on your keyboard
- While the SHIFT key (MAJUSCULE) is pressed, launch the Windows Octopus client (WinUI).
- Hold down the SHIFT key until the Octopus authentication window appears.
- Release SHIFT key (MAJUSCULE)
- Enter your username (probably your UPN if synchronization has been set up correctly) and the Octopus password you were using before.
* This password is not the same as your domain password.
Configuring Microsoft Entra ID
To connect Octopus and Microsoft Entra ID, an Enterprise Application must be properly configured for integrated authentication..
Creating an enterprise application
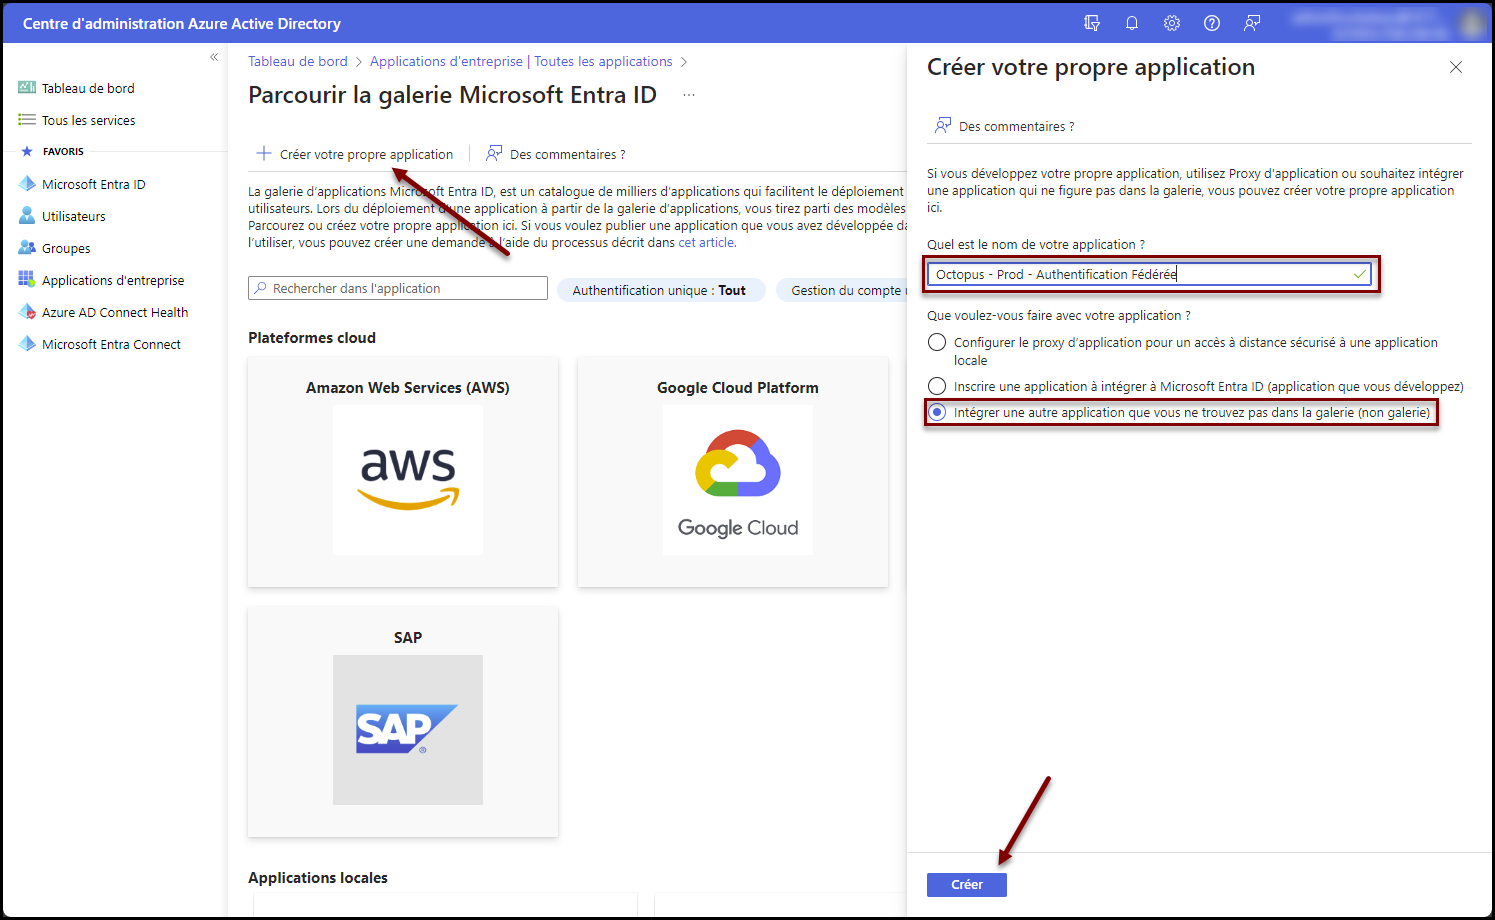
- Open the Microsoft Entra ID administration portal and navigate to the Enterprise Applications panel.
- Click on + New Application
- Click on + Create your own application
- Enter a suitable name
- Select the option Integrate another application not found in the gallery (non-gallery)
- Press the CREATE butoon sur le bouton Créer
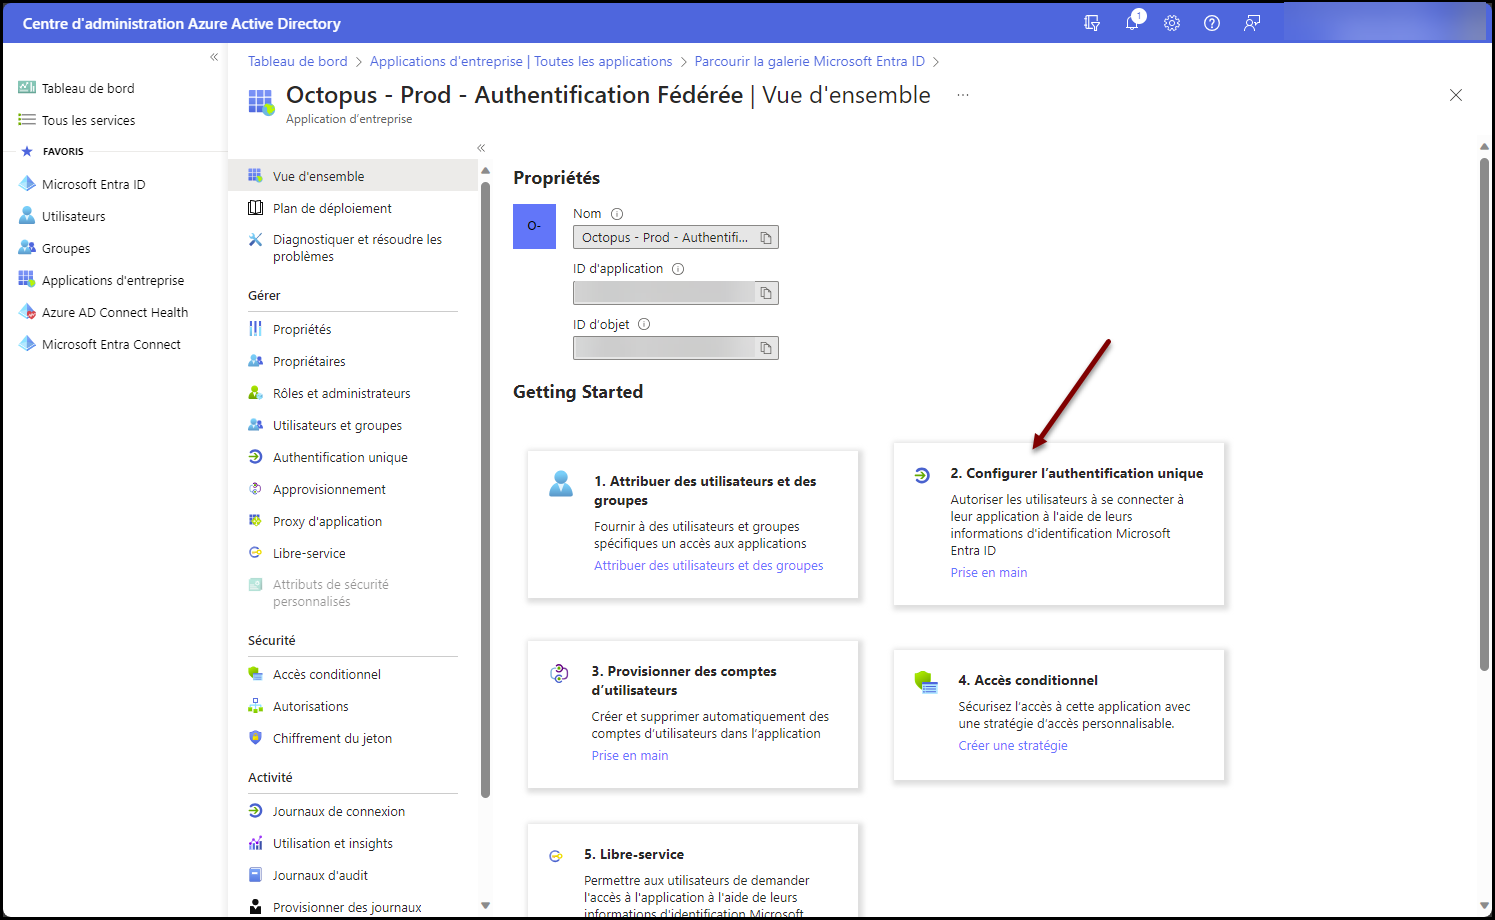
Single sign-on configuration
Single sign-on for the web portal uses the SAML method..
From the main page of the enterprise application created in the previous step :
- Click on button 2. Configure single sign-on
- Click on the SAML button
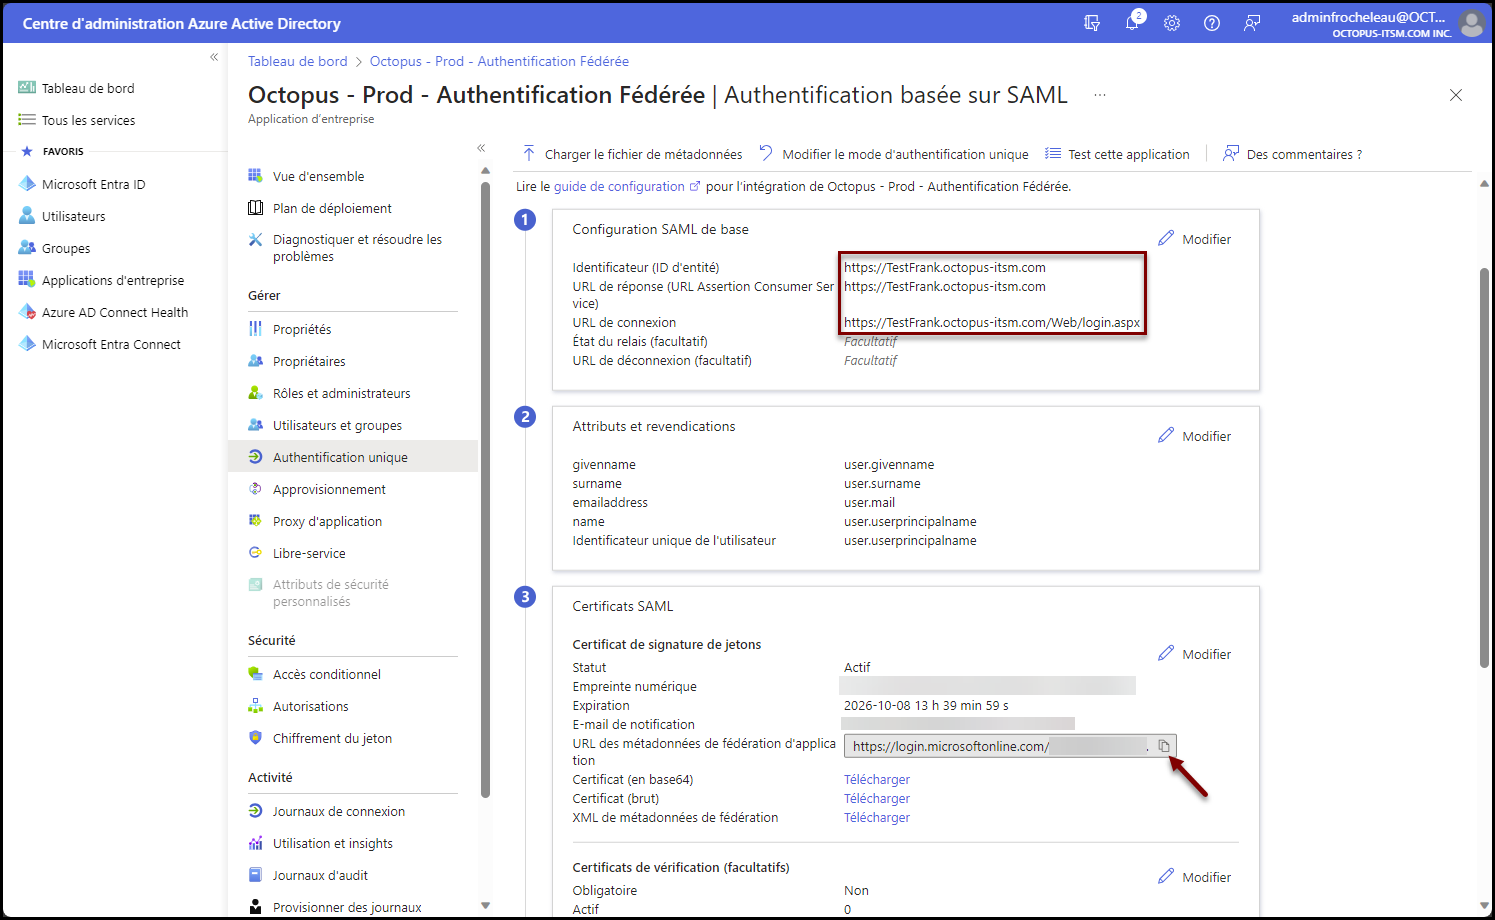
- In the SAML basic configuration section, complete the following fields:
- Identification (entity ID) :
- https://[nomdevotreenvironnement].octopus-itsm.com
-
Response URL (URL Assertion Consumer Service) :
-
https://[nomdevotreenvironnement].octopus-itsm.com
-
-
Login URL :
- https://[nomdevotreenvironnement].octopus-itsm.com/web/login.aspx
- Identification (entity ID) :
- In the attributes and claims section
- The following claims are required:
- givenName
- surname
- emailaddress
- name
- The default values shown here are the correct ones.
- The following claims are required:
- In the SAML Certificates section
- Note the URL of the application federation metadata.
- This one has the format https://login.microsoftonline.com/xxxxxxxx-xxxx-xxxx-xxxx-xxxxxxxxxxxx/federationmetadata/2007-06/federationmetadata.xml?appid=yyyyyyyy-yyyy-yyyy-yyyy-yyyyyyyyyyyy

Entreprise application configuration
These configurations are necessary for Octopus applications to work properly..
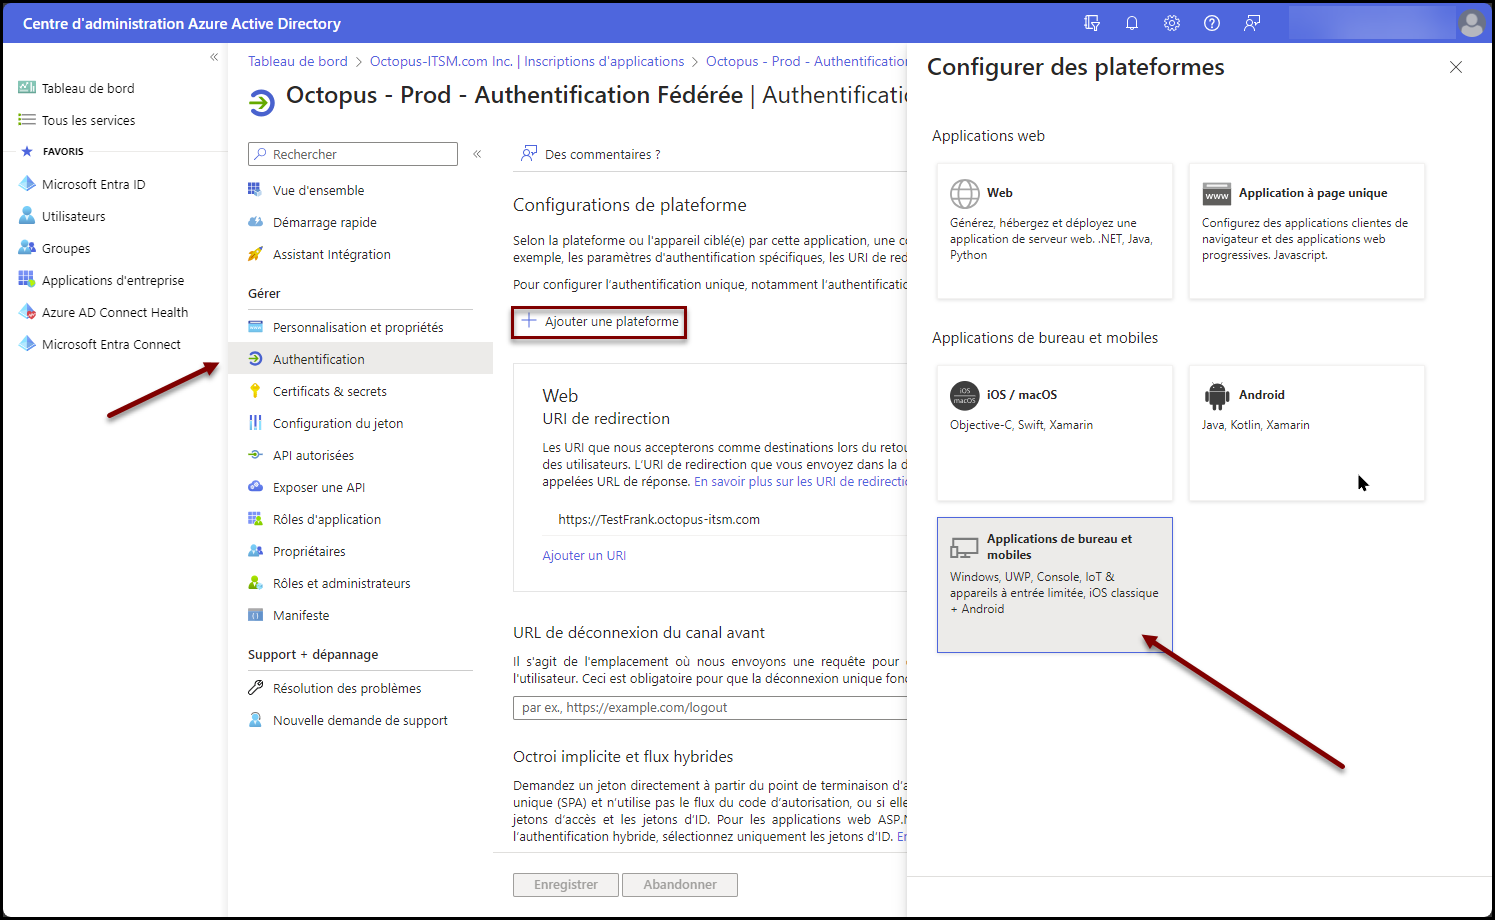
Addition of the Desktop and Mobile Applications platform
- Go to application registration application (Voir la procédure en Annexe)
- Click on Authentication in the Manage section
- Click on + Add a platform
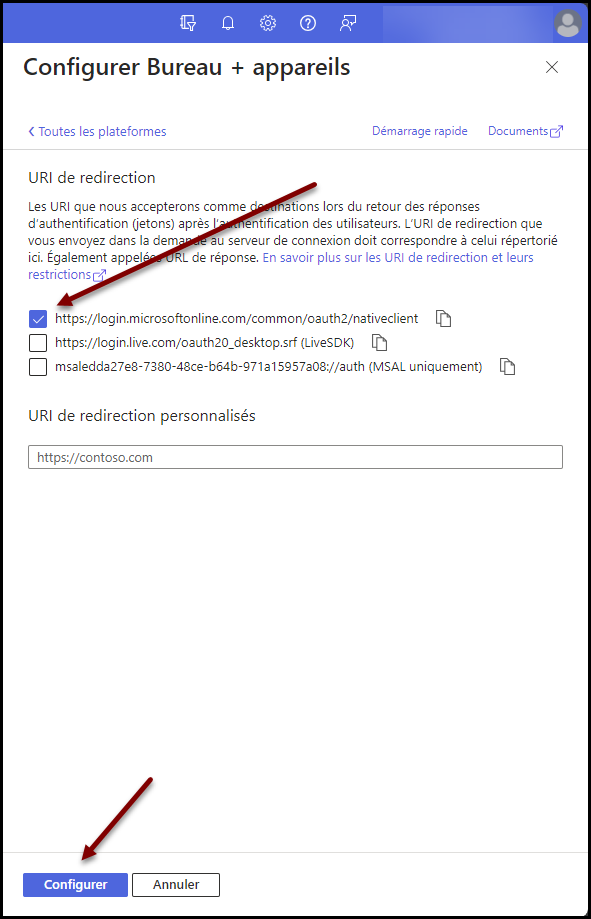
- Click on Applications of Desktop and Mobile
- Check https://login.microsoftonline.com/common/oauth2/nativeclient
- Click on Configure to save changes
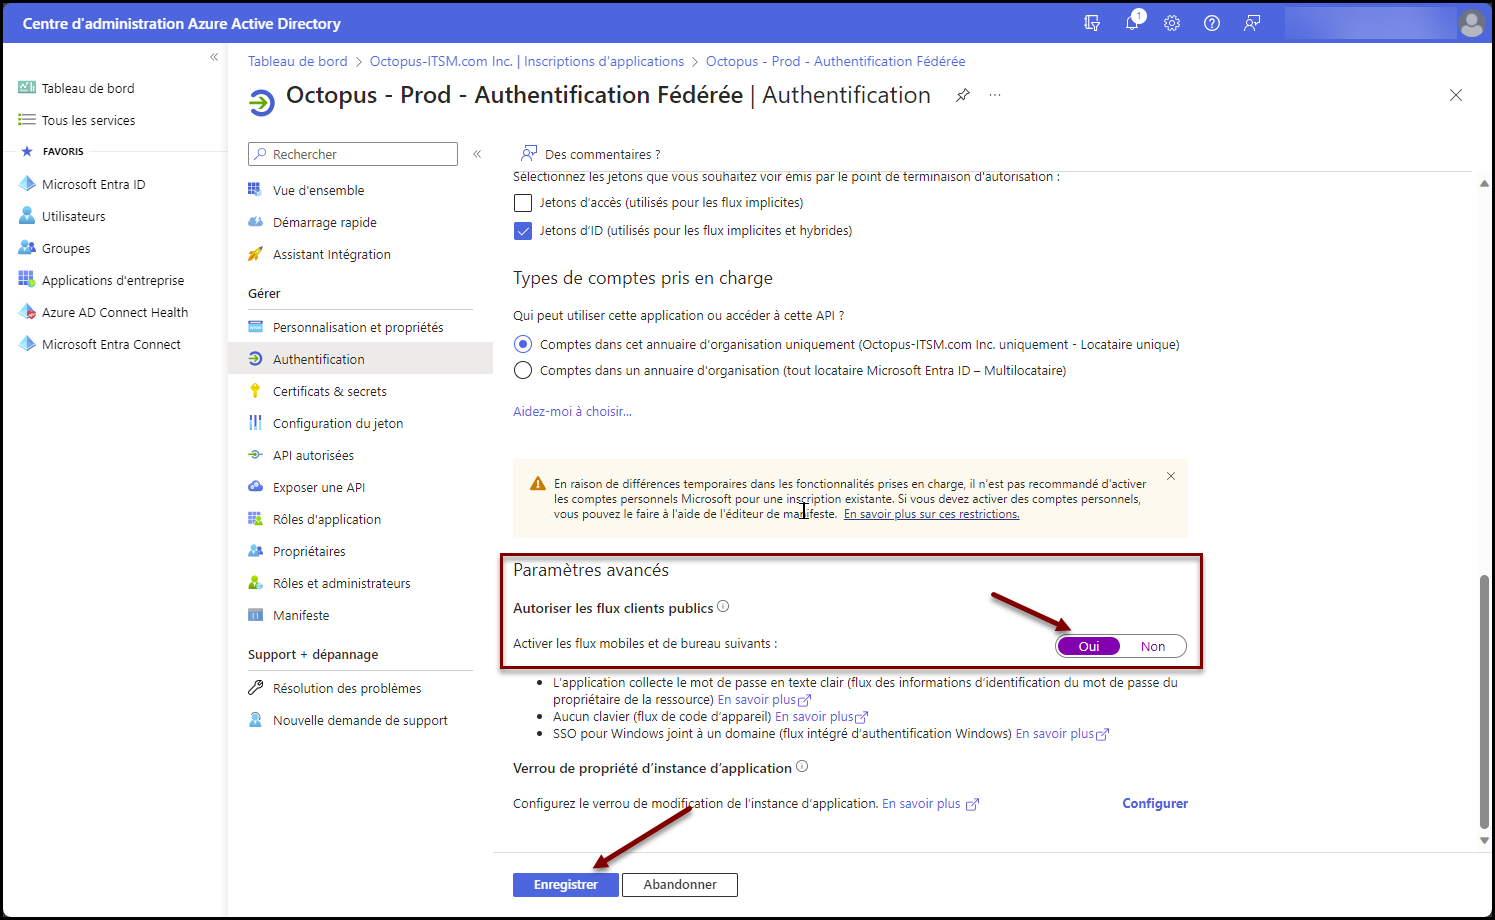
- Scroll down to Advanced settings
- Set Enable the following mobile and desktop feeds to Yes
- Click on the Save button at the bottom of the page
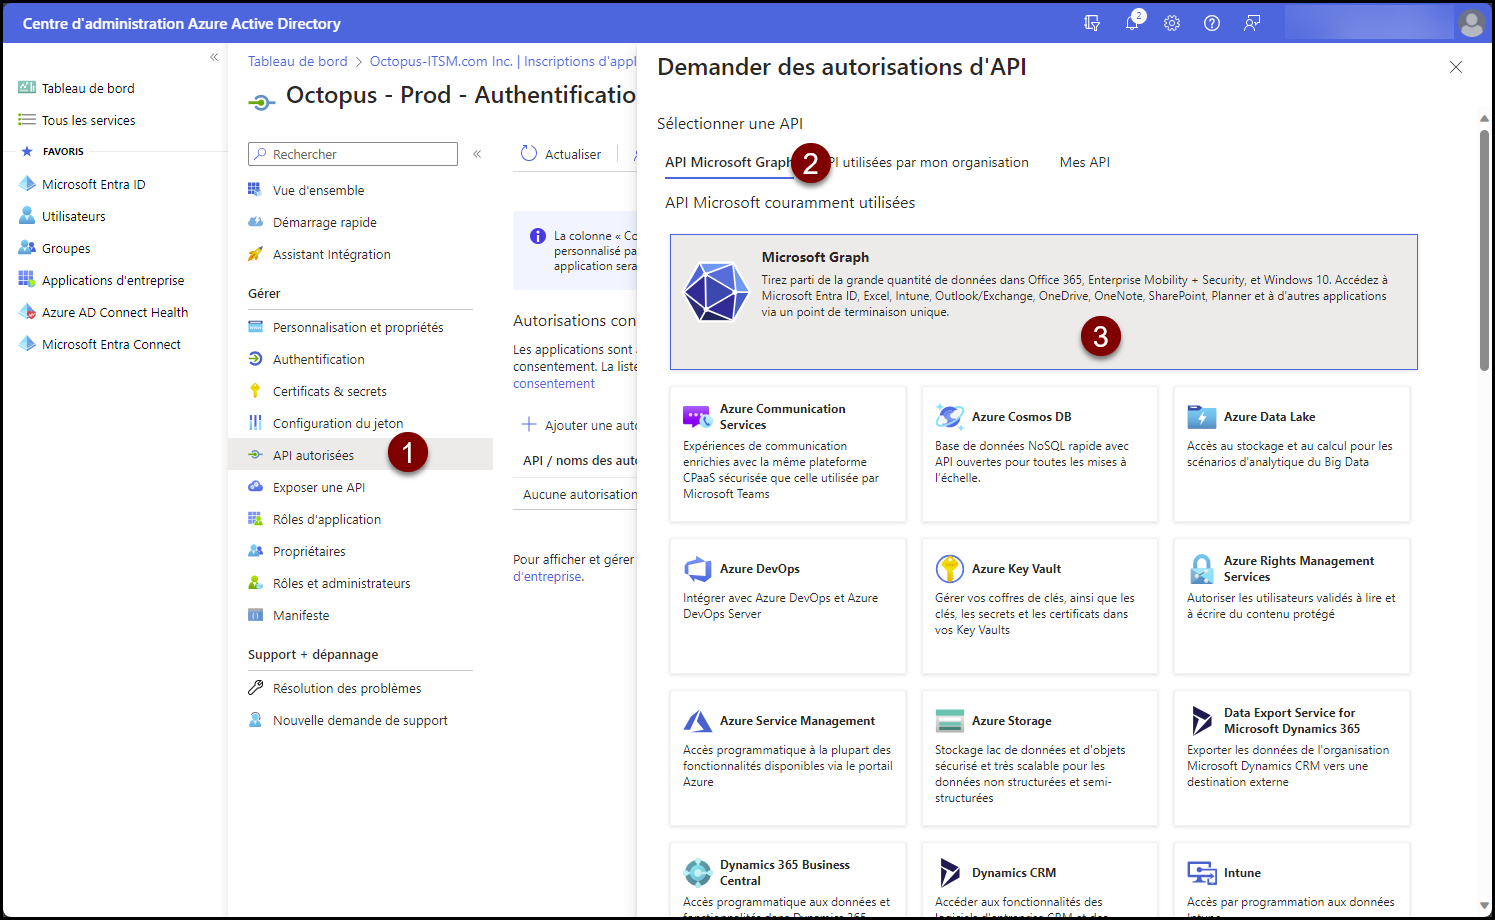
Authorization configuration
- Go to application registration (see Annexe)
- Click on Click on the Authorized APIs item in the Manage section
- Click on API Microsoft Graph
- Click in Microsoft Graph
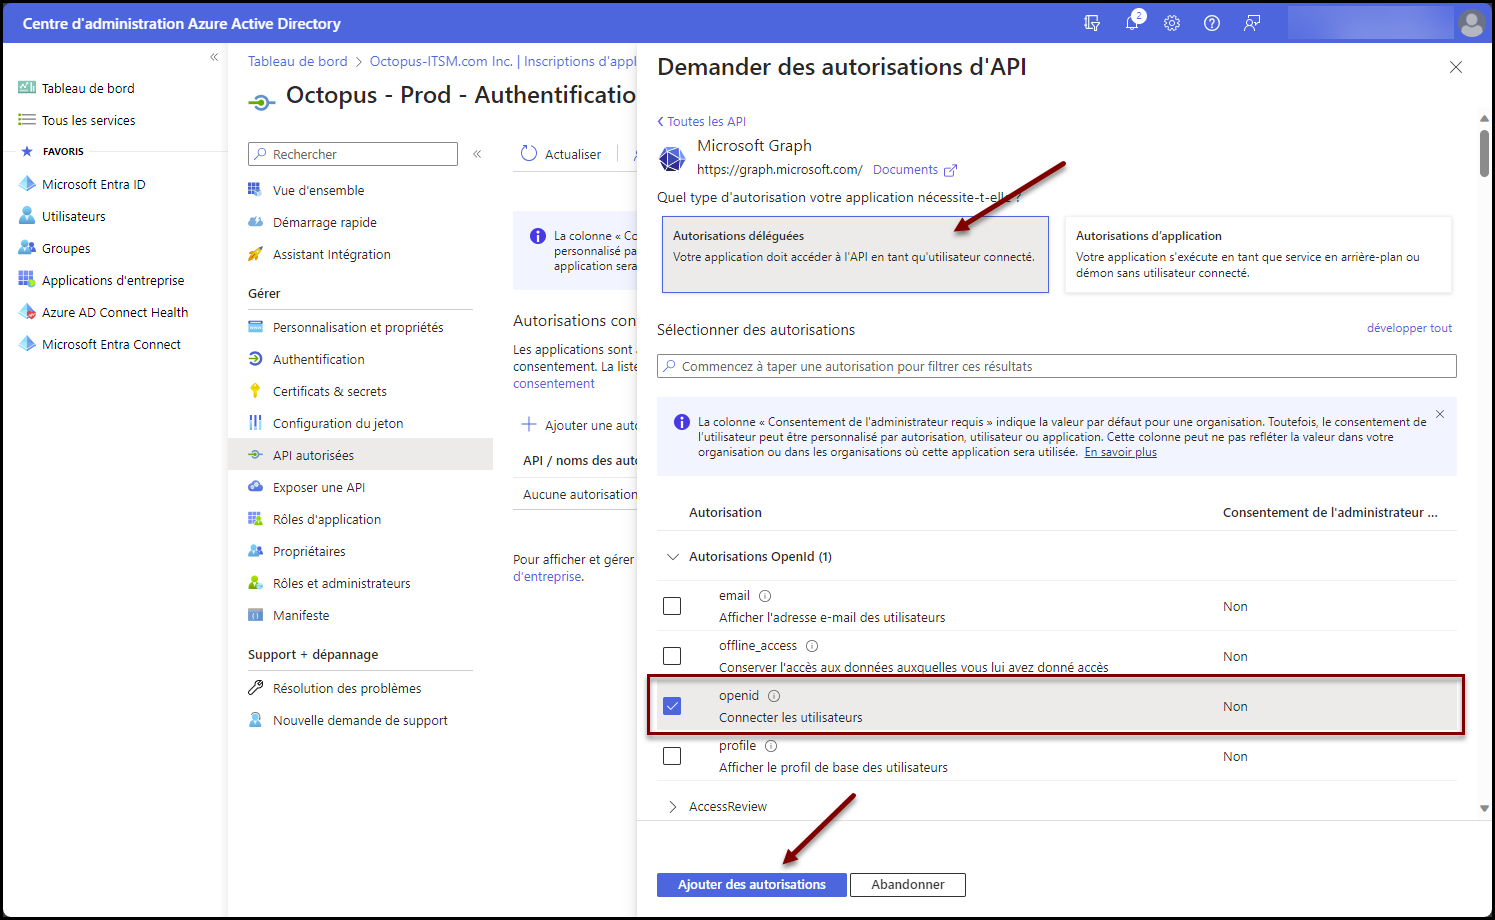
- Click on Delegates Authorization
- In the "OpenId authorizations" section, "Autorisations OpenId",
- click on openid Connect users
- Click on ADD authorizations
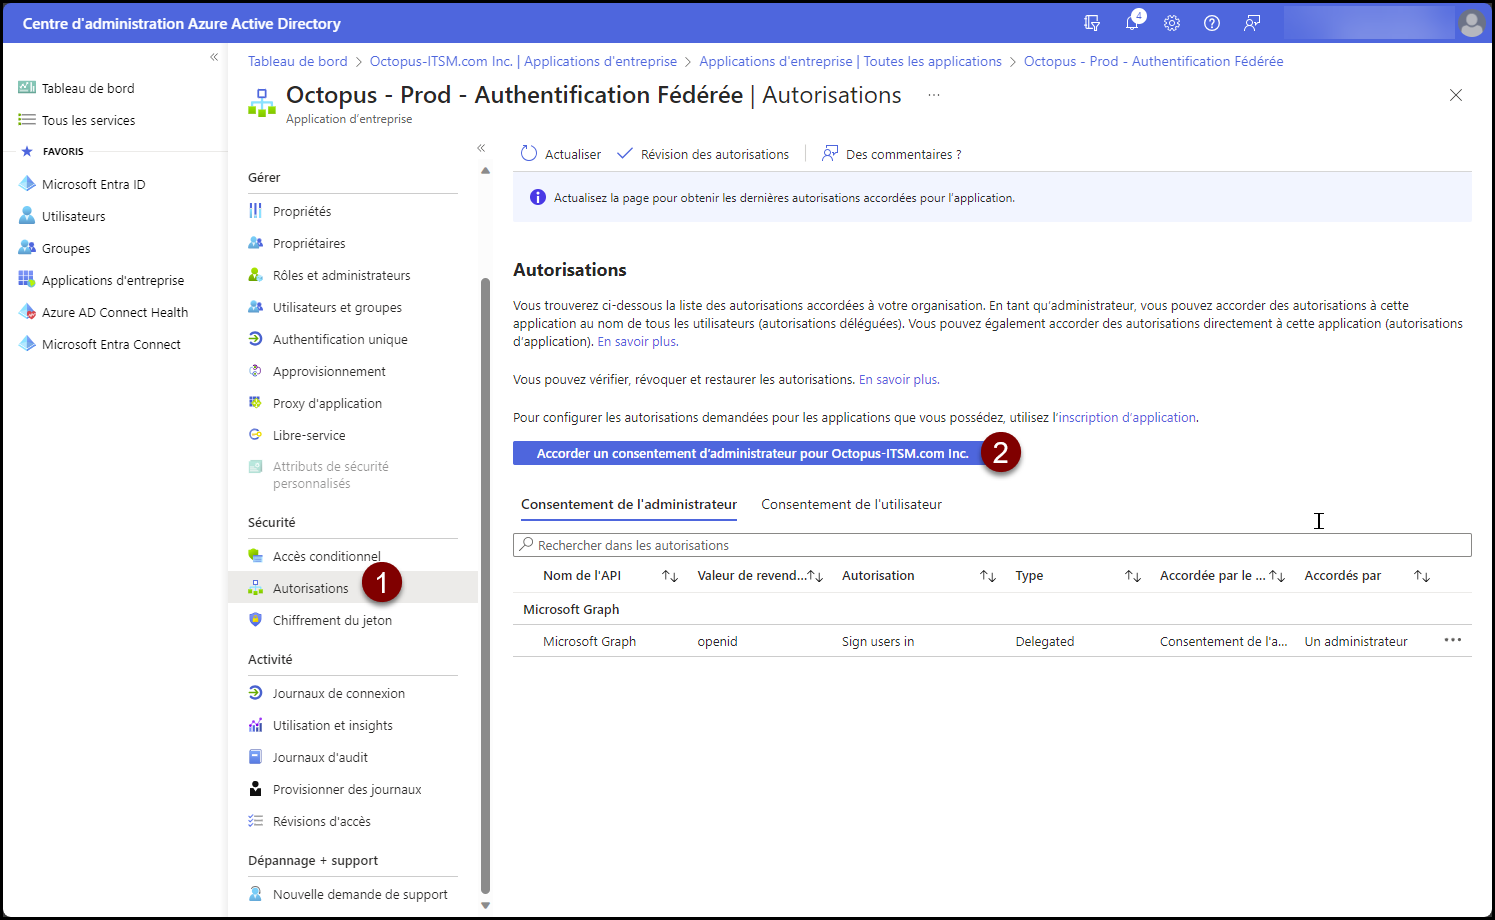
Administrator'sDirector's consent
- Access enterprise application configuration (see procedure in Appendix)
- Click on the Authorizations item in the Security
- Click on Grant administrator rights for [Your Azure tenant name].
- Confirm consent
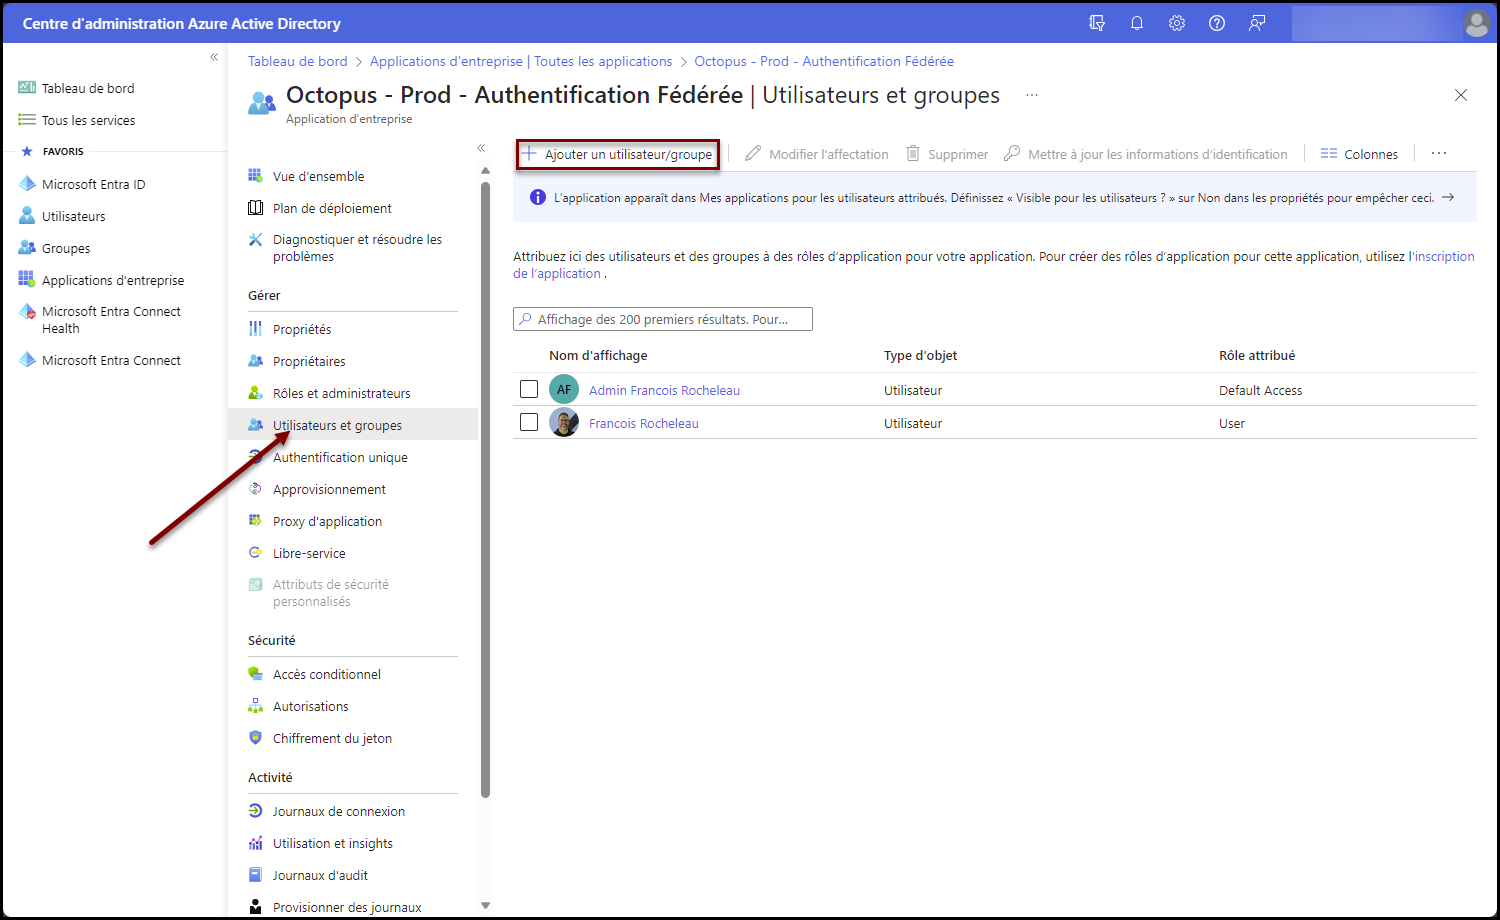
Users authorization
Each user of your Microsoft Entra ID must be added to the newly created enterprise application. There are two possible choices:
- Autorisation Authorization for all users in your company
- Manual user selection
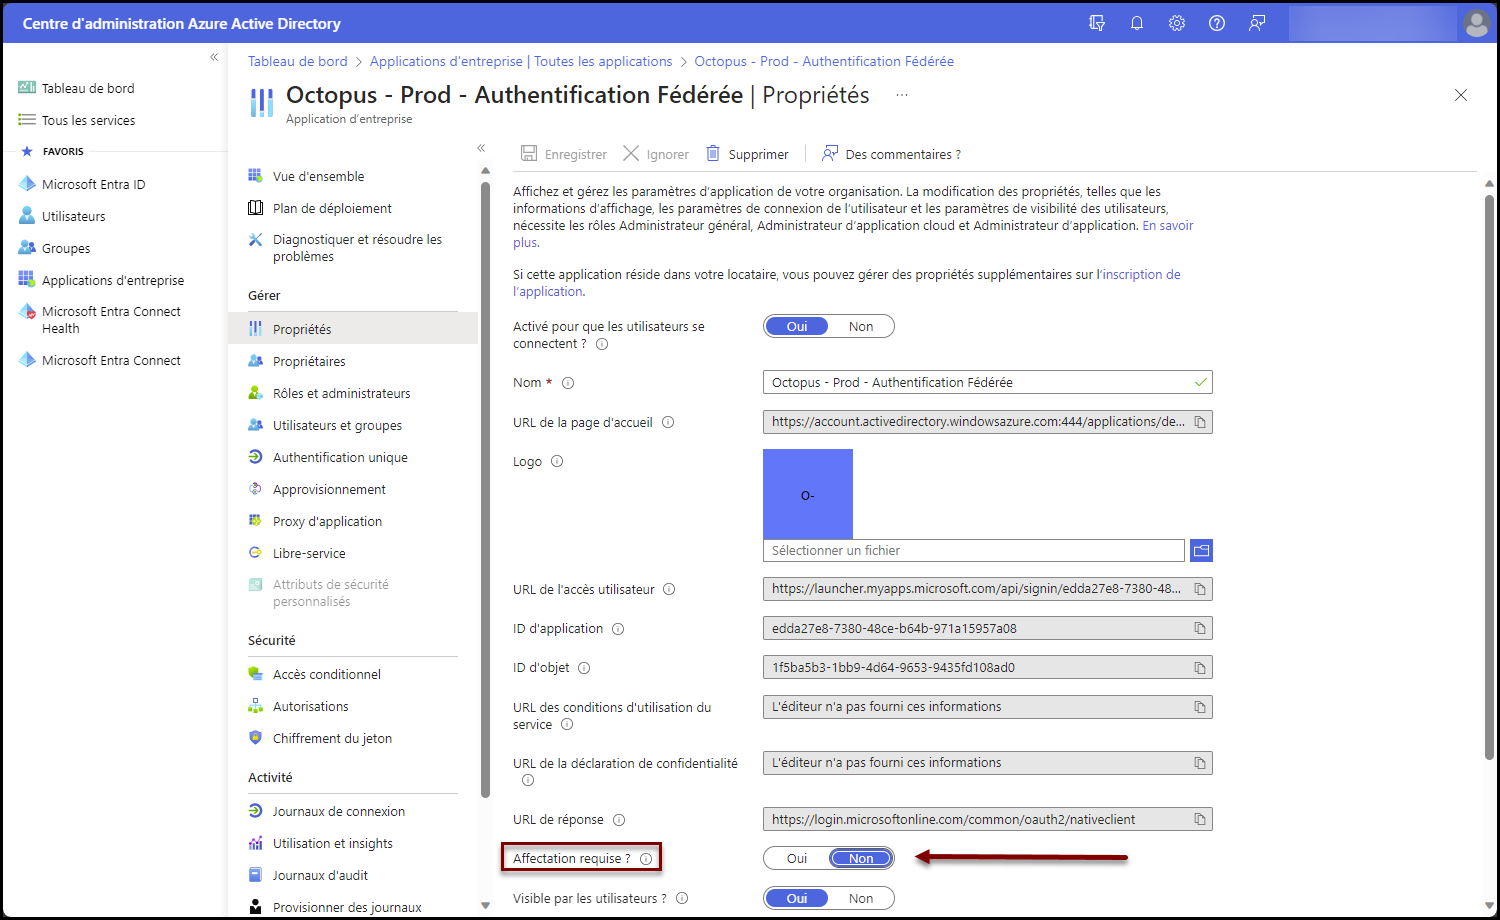
Authorization for all users in your company
To make this application available to all your users, you can disable the required user assignment for this application
- Access enterprise application configuration (Voir la procédure en Annexe)
- Click on the Properties item in the Manage section
- Change the value of the property Required assignment? to No
It may take a few minutes for the configuration to be taken into account by the authentication system.
Manuel user selection
- Access enterprise application configuration (Voir la procédure en Annexe)
- Click on on the Users and groups item in the Manage section
- Add users / groups according to your needs
It may take a few minutes for the configuration to be taken into account by the authentication system..
Octopus configuration
Prerequisites
Once your identity federation is in place, follow this procedure to finalize the setup with Octopus.
Enabling integrated authentication is only available if you have configured and tested your service federation server.
Only an Octopus administrator with the following access rights can complete the Octopus configuration:
- General - Administer Octopus.
- General - Modify common team data.
- Applications - Access the Web Portal.
- Applications - Access to Octopus.
- Applications - Access Web Tech.
Identity federation configuration
Validation
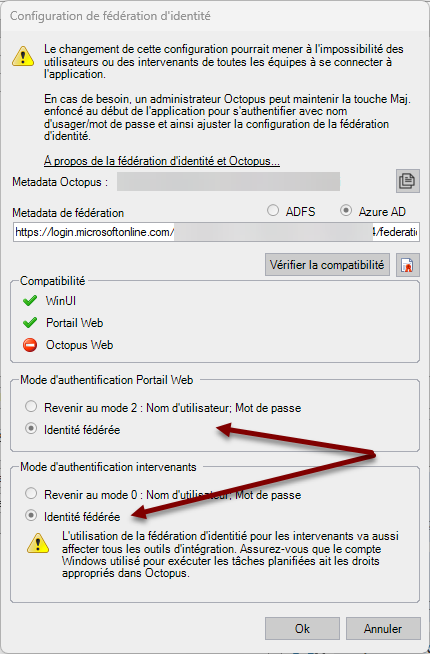
To start configuration, use the Tools > Identity federation configuration menu.
- Cocher Check "Azure AD" as federator type
- Paste the URL of the application federation metadata (obtained in one of the first steps of this wiki)
-
This one has the format https://login.microsoftonline.com/xxxxxxxx-xxxx-xxxx-xxxx-xxxxxxxxxxxx/federationmetadata/2007-06/federationmetadata.xml?appid=yyyyyyyy-yyyy-yyyy-yyyy-yyyyyyyyyyyy
-
-
Click on Check compatibility
The Microsoft Entra ID authentication window for your company may appear. If so, select your account (it must have access to Octopus)
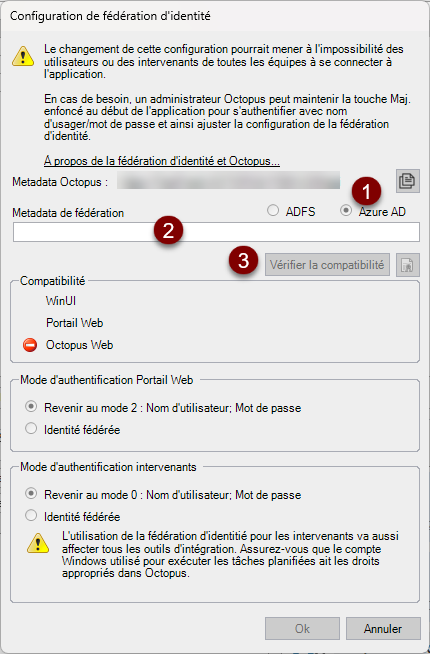
Authentification scope
Select the desired scope of federated authentication:
- Web portal authentication mode
- To have your end users authenticate automatically, select "Federated identity".
- You can return to the previous authentication mode at any time by selecting "Return to mode 2: Username; Password".
- Assigned authentication mode
- To have your technicians (using the Windows application) and Batch tools (MailIntegration, ADSIReader, DataImporter, etc.) authenticate themselves automatically, select "Federated Identity".
- You can return to the previous authentication mode at any time by selecting "Return to mode 0: Username; Password".
Annexe
How to find the enterprise application
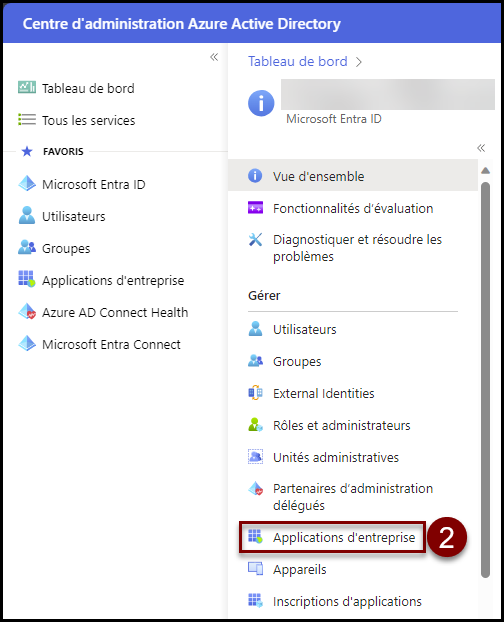
- Ouvrir Open the main Microsoft Entra ID administration console
- Centre d'administration Azure Active Directory (https://aad.portal.azure.com/#view/Microsoft_AAD_IAM/ActiveDirectoryMenuBlade/~/Overview)
- Click on Enterprise Applications in the Manage section
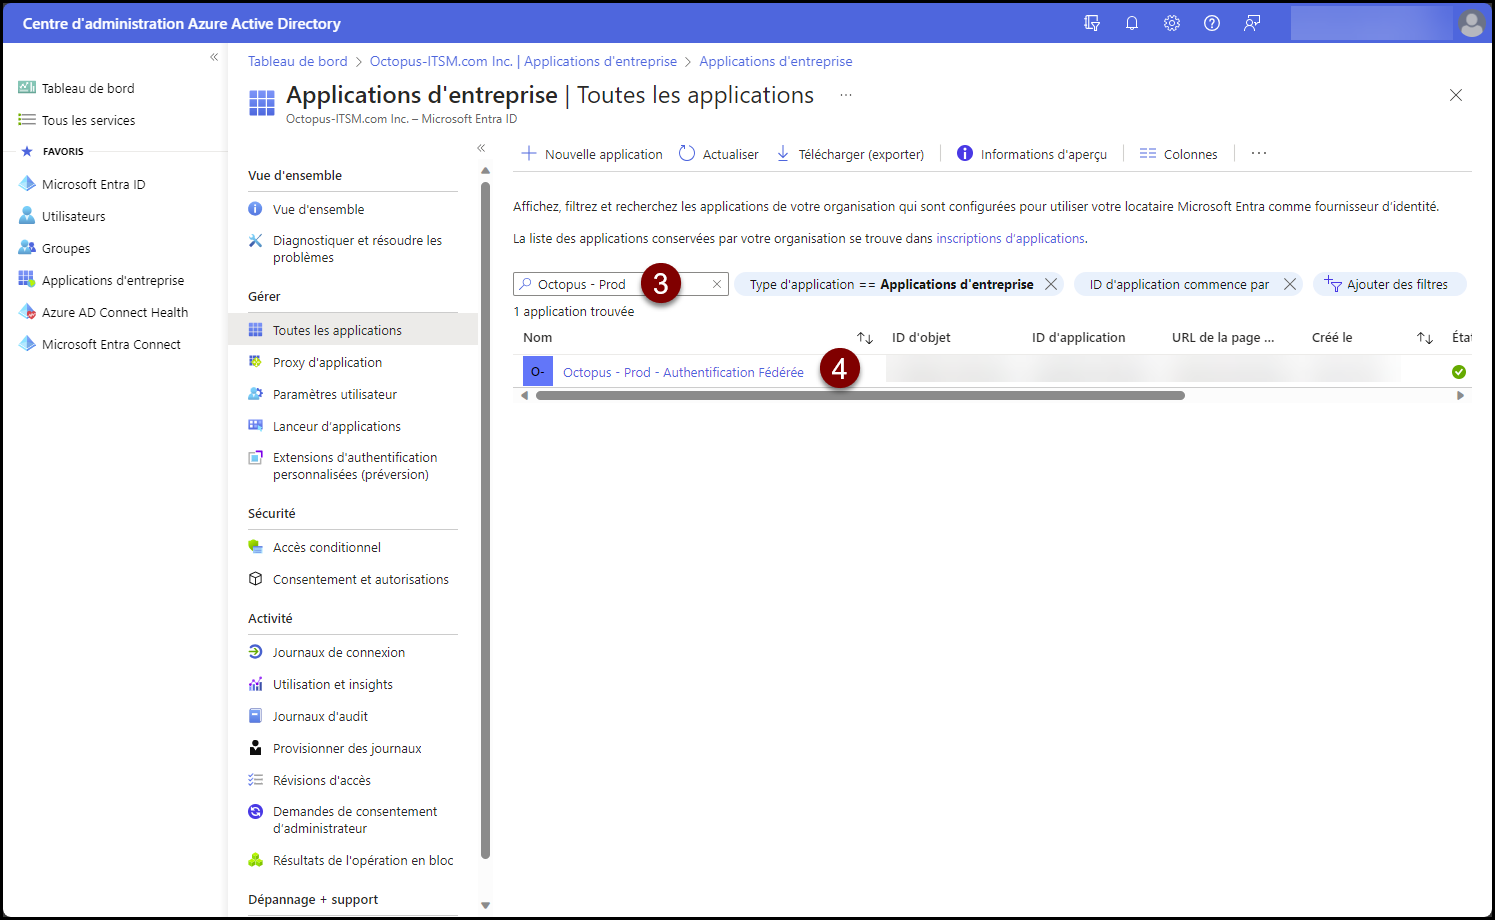
- In the search box, enter the name used to create the enterprise application
- Select the company application created
- Open the main Microsoft Entra ID admin console
- Centre d'administration Azure Active Directory (https://aad.portal.azure.com/#view/Microsoft_AAD_IAM/ActiveDirectoryMenuBlade/~/Overview)
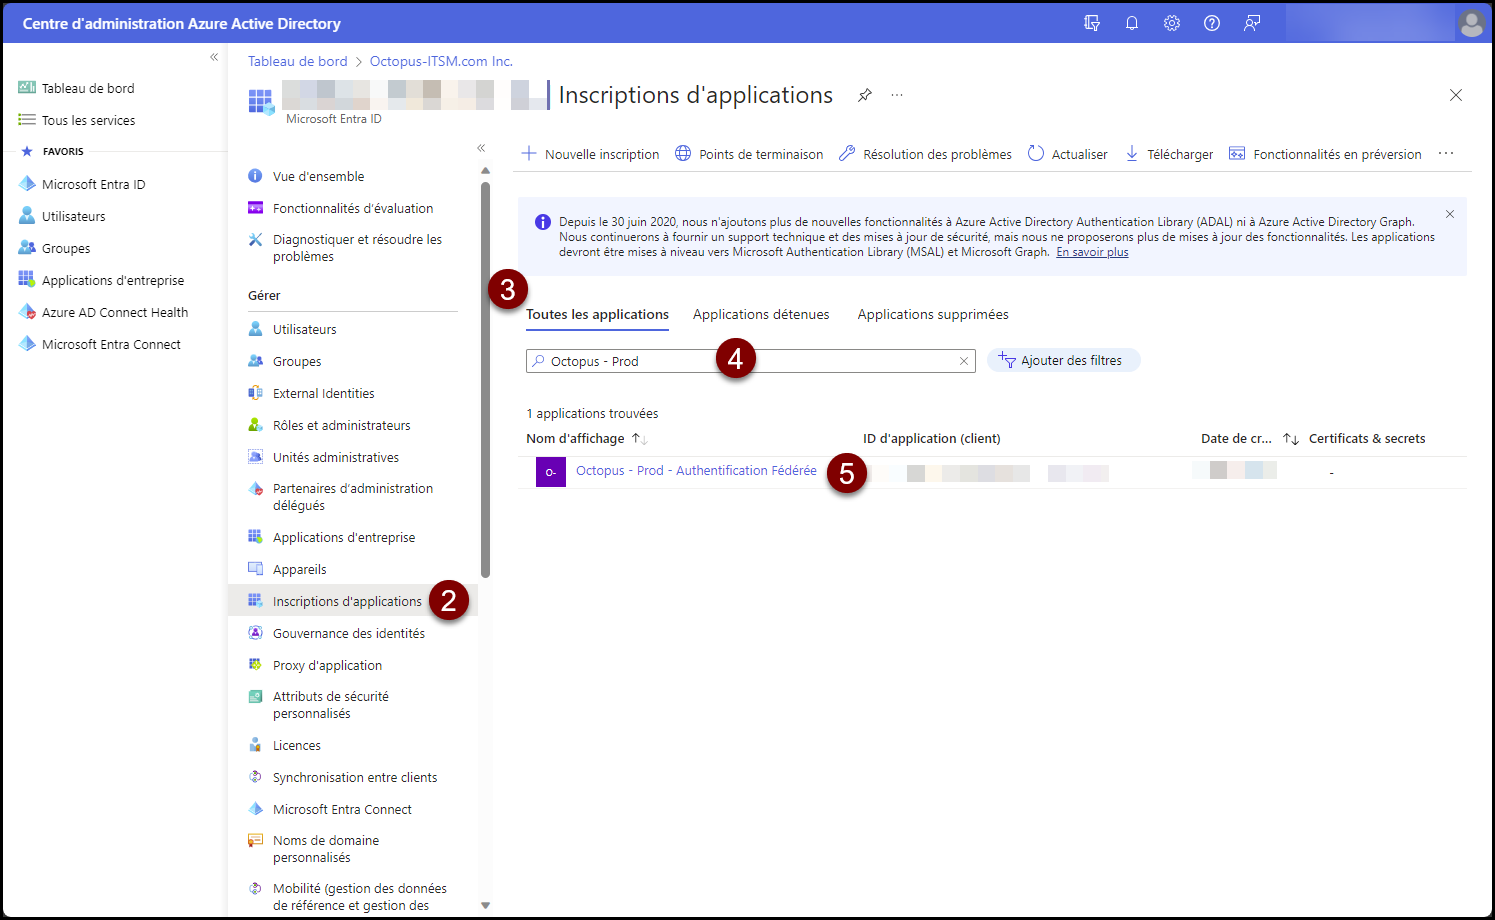
- Click on the Application registrations item in the Manage section
- Click on All applications
- In the search box, enter the name used to create the enterprise application
- Select the company application created
Thank you, your message has been sent.