Table of contents
Introduction
With board you can organize and visualize Incidents, SRs or open cards in a Kanban style.
This method, which is very popular for its efficiency, helps to see the overall work to be done and how it is progressing.
Octopus has had a makeover with the arrival of themes available with the version 6.
The appearance of the boards differs a little between versions 4 and 6 of Octopus.
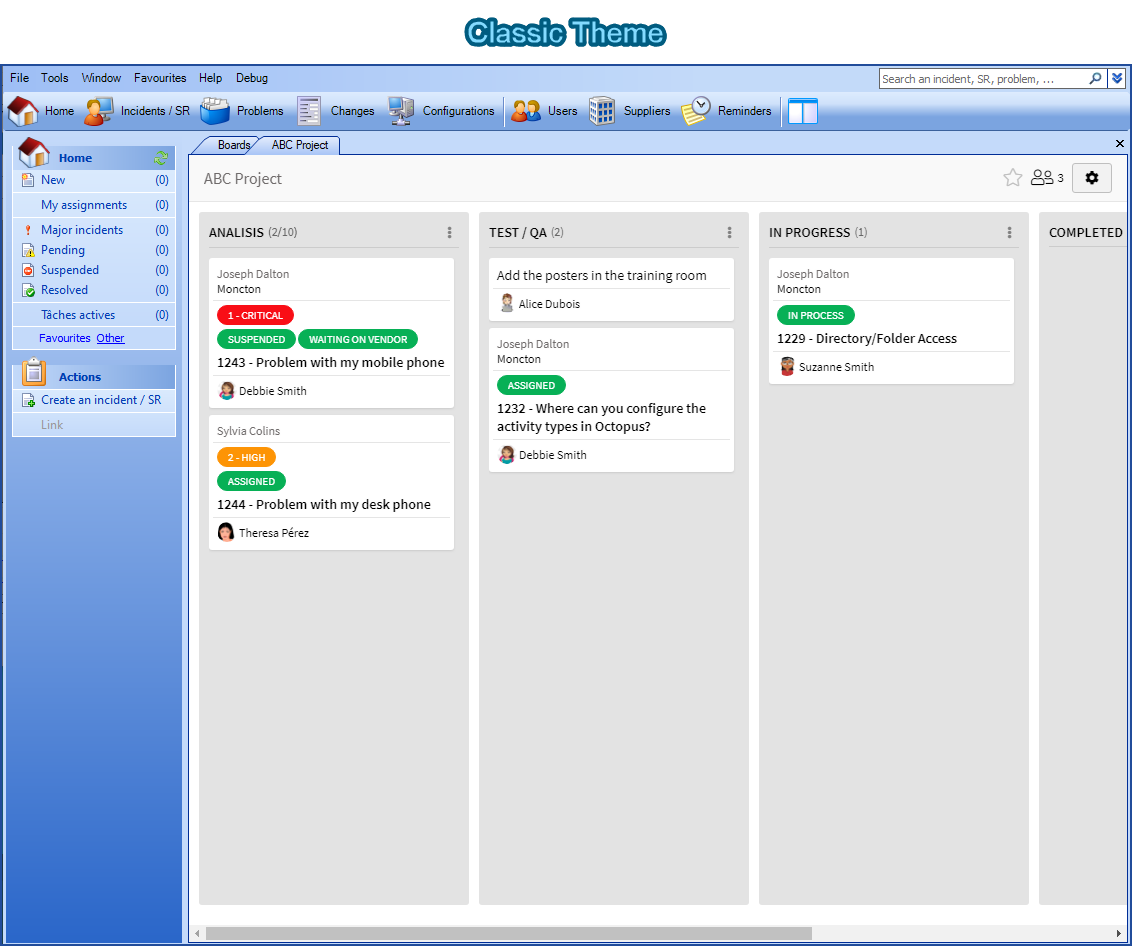
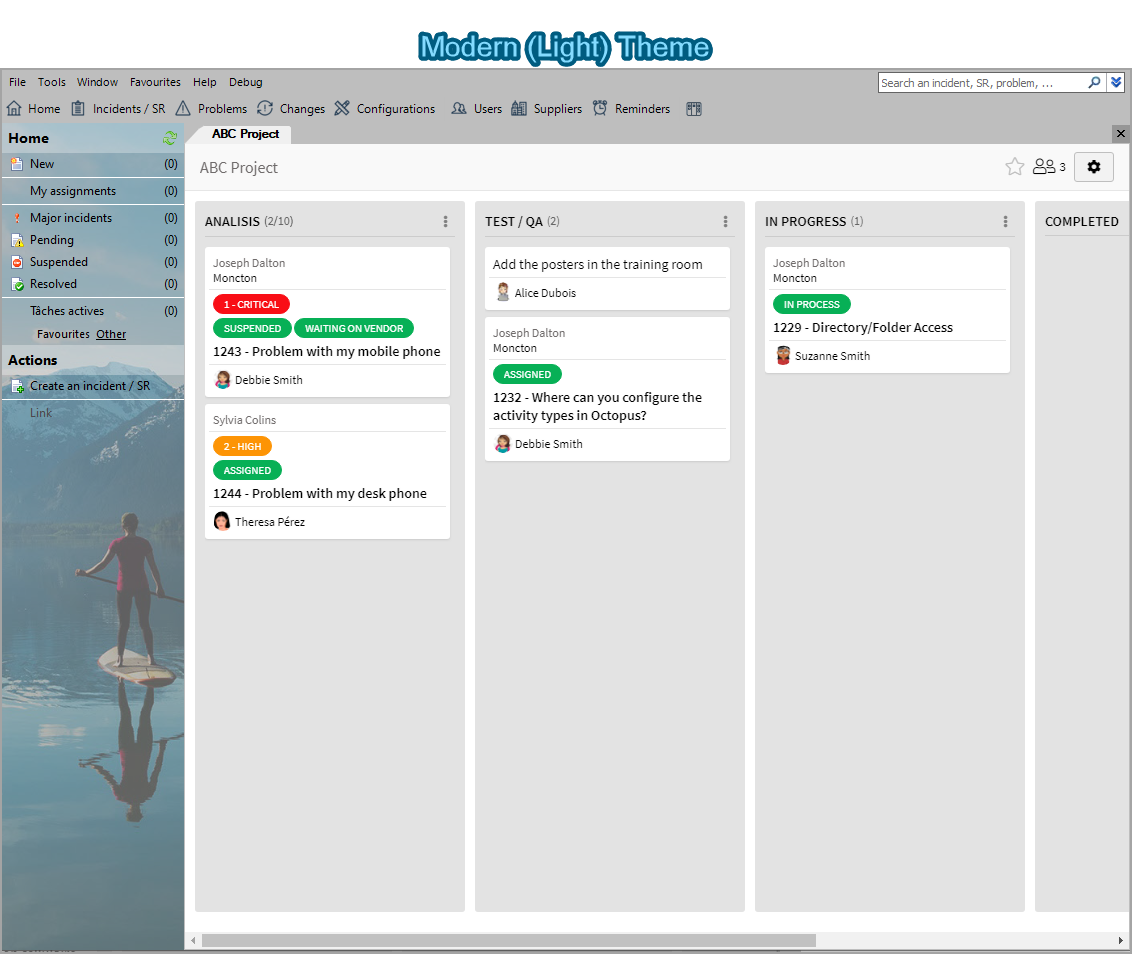
It is important to mention that the boads operation is identical, regardless of the theme and the Octopus version used.
The Modern (clear) theme will be used to explain how the boards work.
For more information on the Octopus themes, see the How to Use the Themes to Change the Look of Octopus? article.
What is a Board Made of?
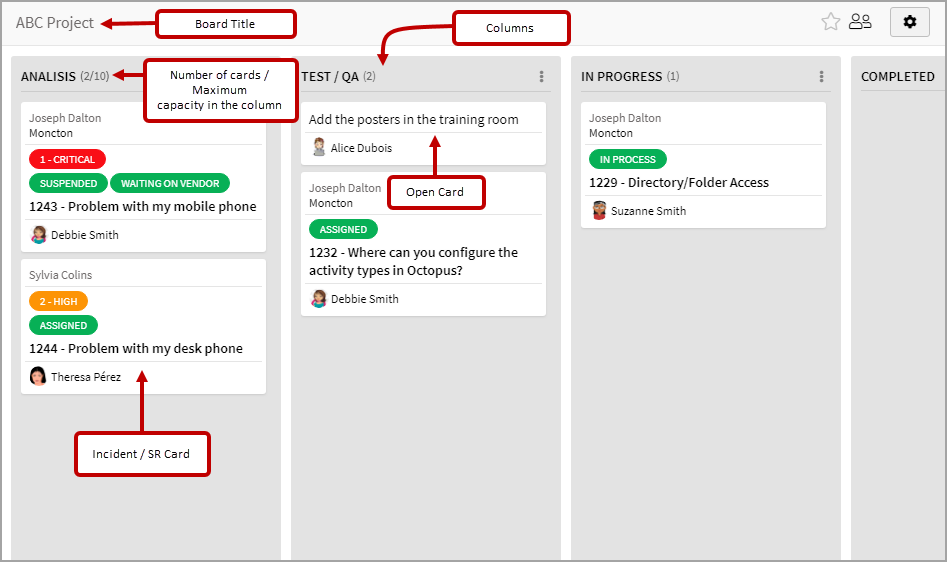
A bord is composed of:
- A title
- Columns
- Of Incident/SR card or open cards inside the columns
The number of columns is unlimited and each column is named.
A maximum card capacity can be specified for each column.
Create a Board
To create a board you need to:
- Click the board button

- Click the New button

- Add the board name in the Title field
- Add a column and write its Title
- Add more columns if required
- Save the board

Modifing the Boards and Manipulating the Columns
Once the board is created, it is possible for an administrator of the board to modify several aspects of it.
To modify the configuration of a board, click on the  button.
Subsequently, it is possible to:
- Easily change the name of the table or columns
- Add or remove columns
- Move the columns
- Add or modify the capacity of a column
- This information will be used to compare the number of cards in the column to the maximum capacity
- Merge two or more columns
- This allows more space to be given to a subject which has more cards.

If the Octopus user does not have the rights to modify the table, the button will be visible, but inactive
 .
.Members and Permissions in the Board
There are three types of members in Octopus boards, namely:
- Administrators
- Collaborators
- Visitors
Depending on the member type, the permissions offered will be different:
|
|
How to View or Modify the Members of a Board
To know if a board is shared with other members, just observe the button to the left of the configuration button.
 |
Indicates that the board is private. |
 |
Indicates that the board is shared with other members. |
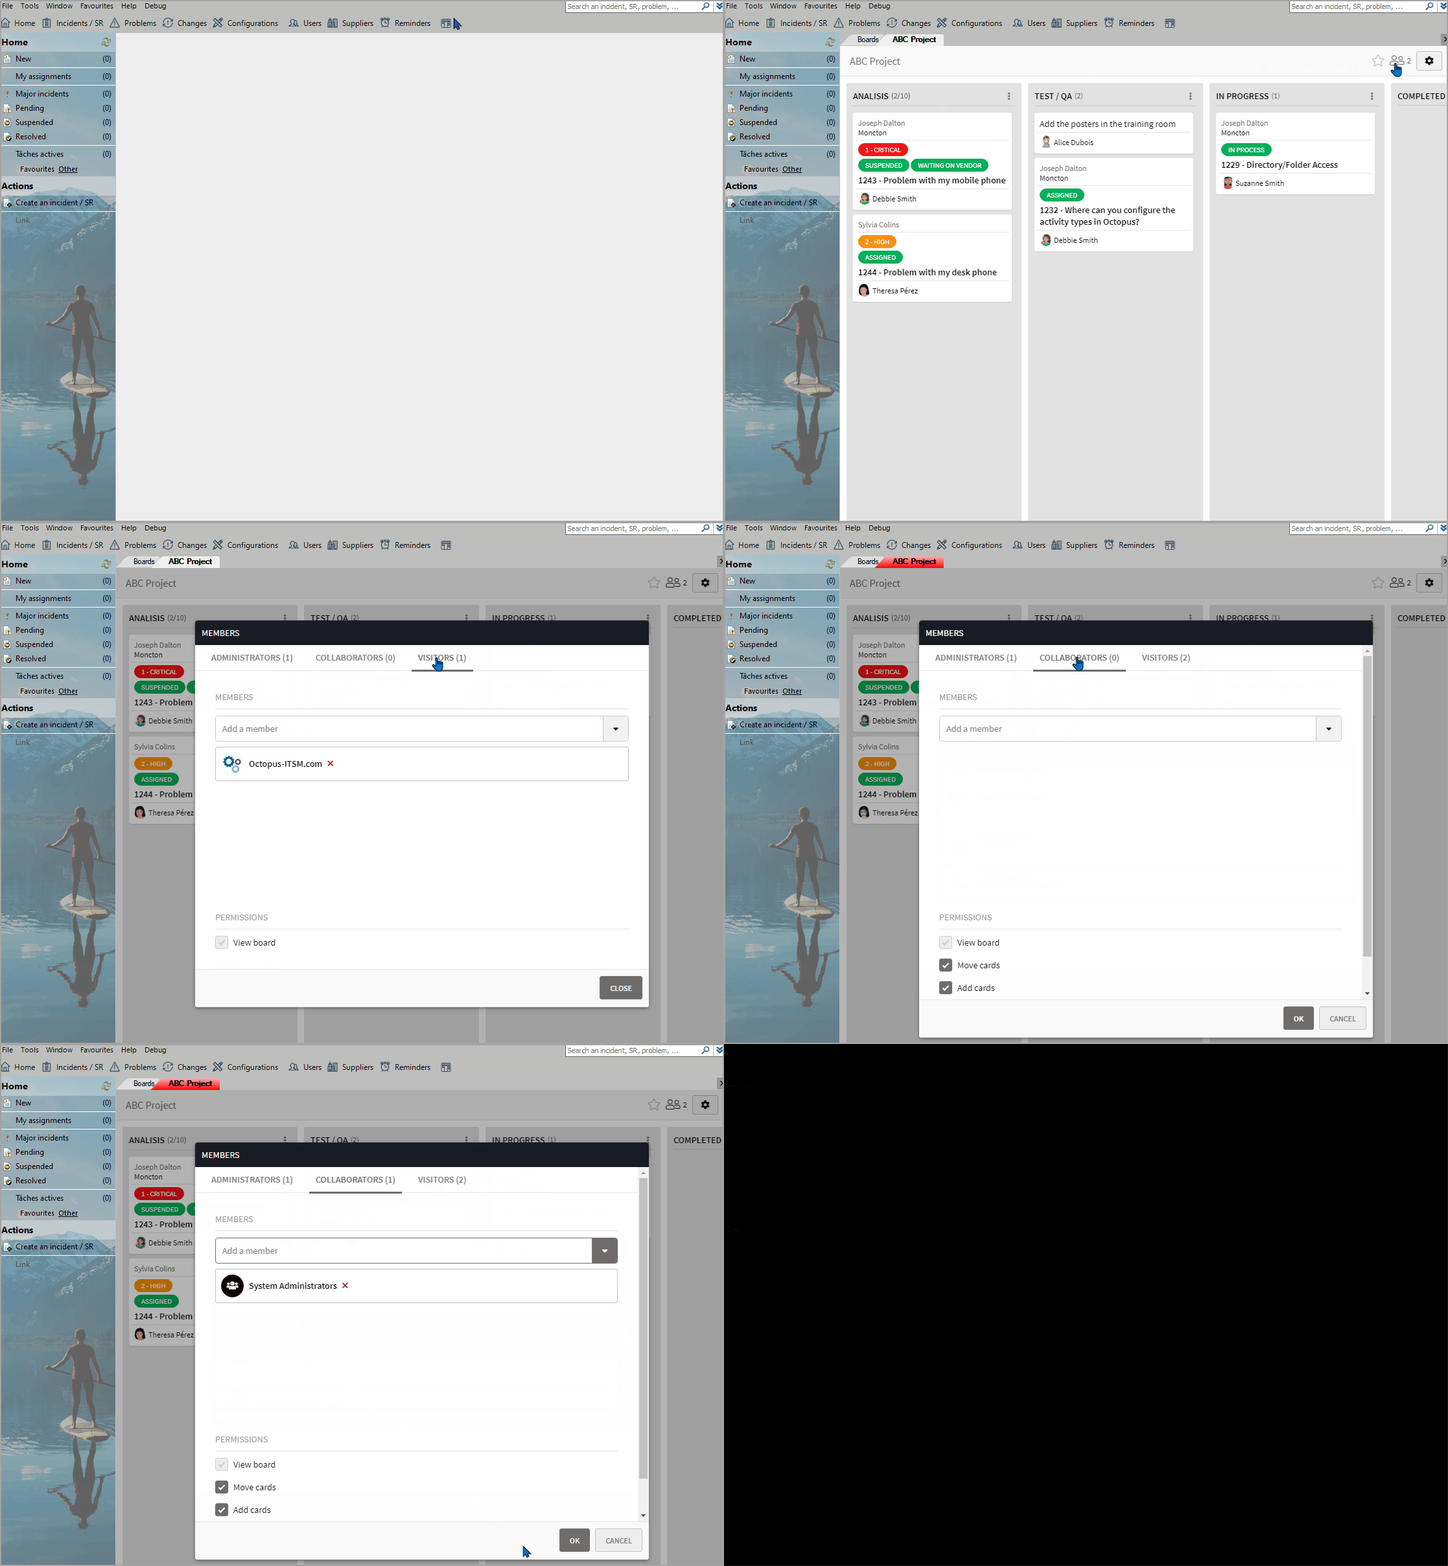
To view or add members to the board, you must:
- Open the board
- Click the Show members icon
- Select the required member type:
- Administrators
- Collaborators
- Visitors
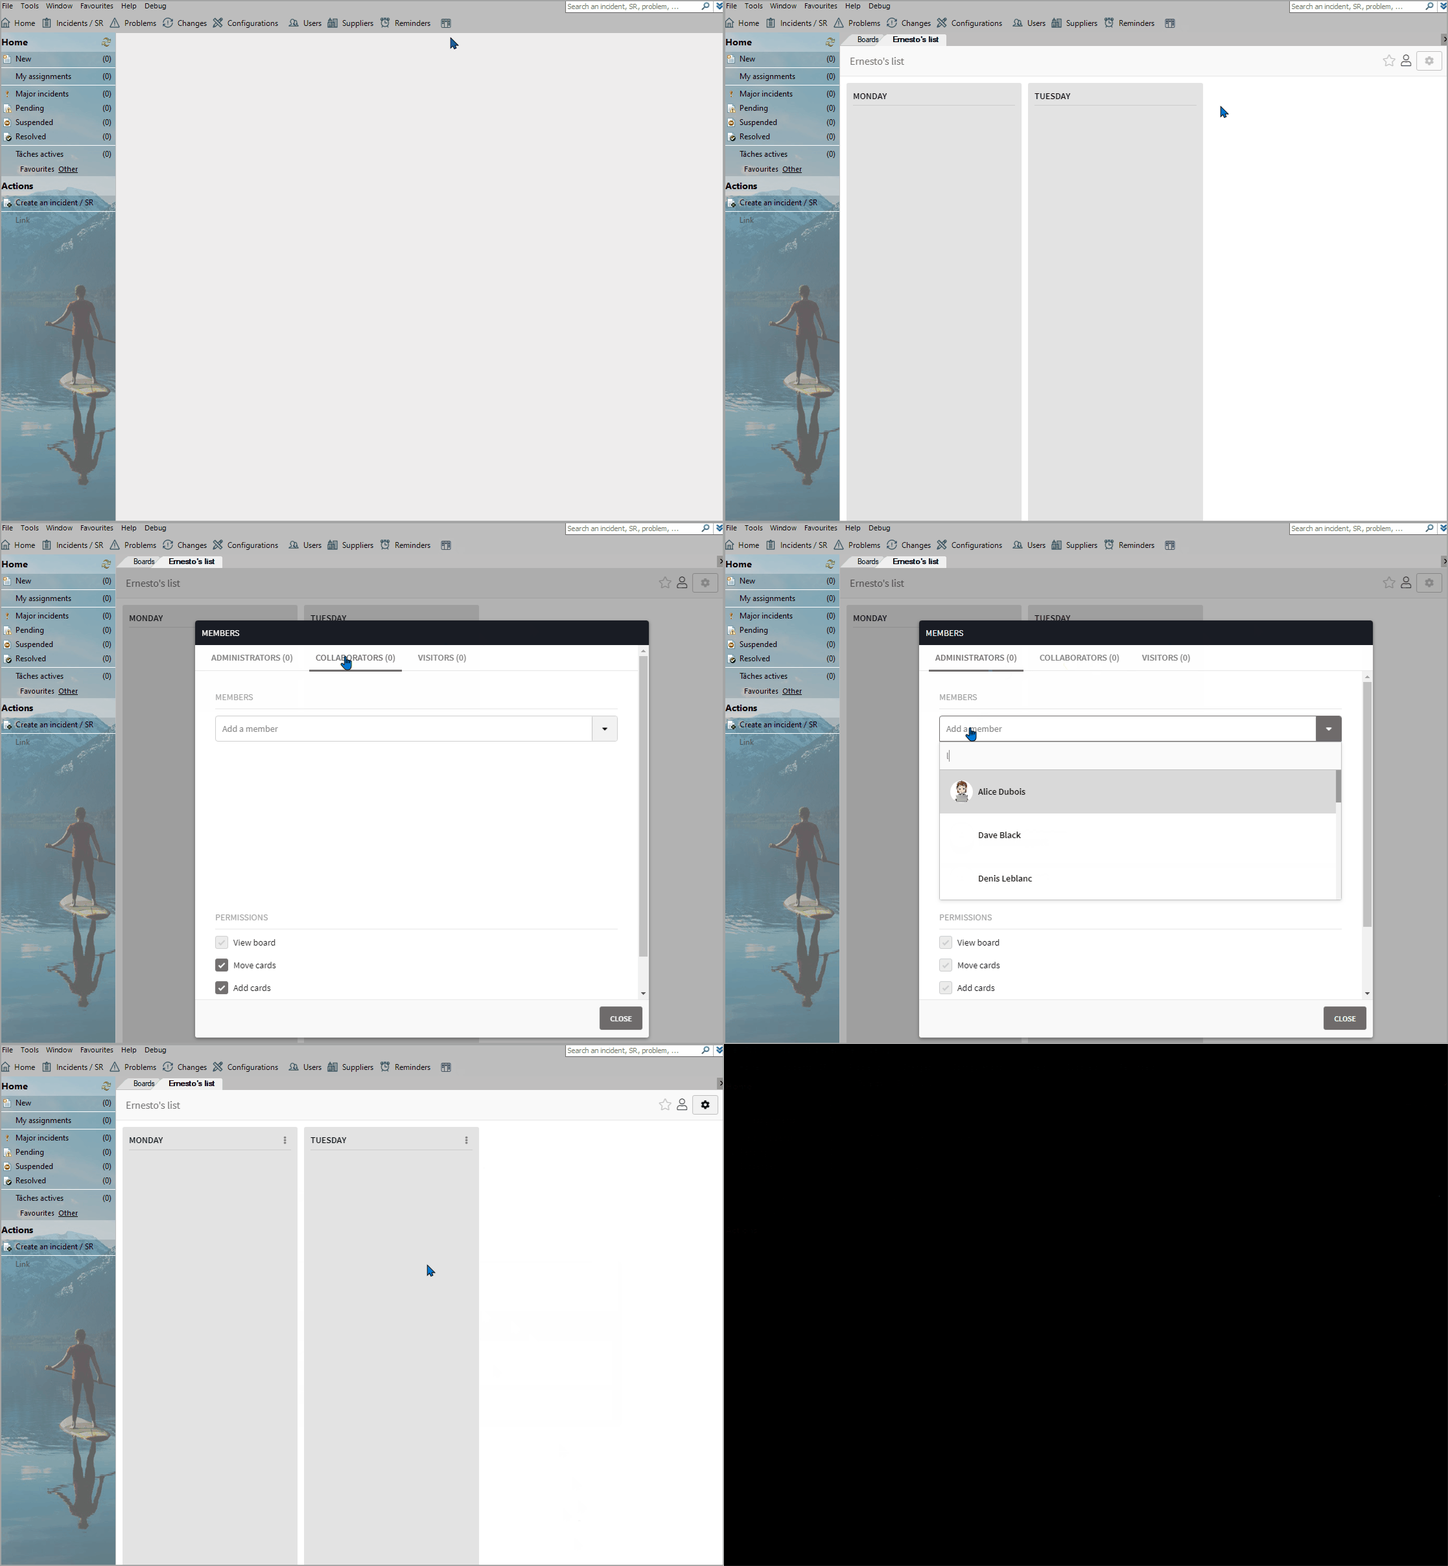
- Click the Add a member drop-down arrows and:
- Select one of the groups
- If a group is selected, the people who have access will change automatically according to who is in the group
- Search for people individually and add them
- Select one of the groups
How to Modify the Permissions of Member Types
The permissions are granted to the member types and members of a same type will have the same permissions.
To modify the permissions, you must:
- Open the board
- Click the Show members icon
- Select the type of members to change
- Modify the permissions for the type
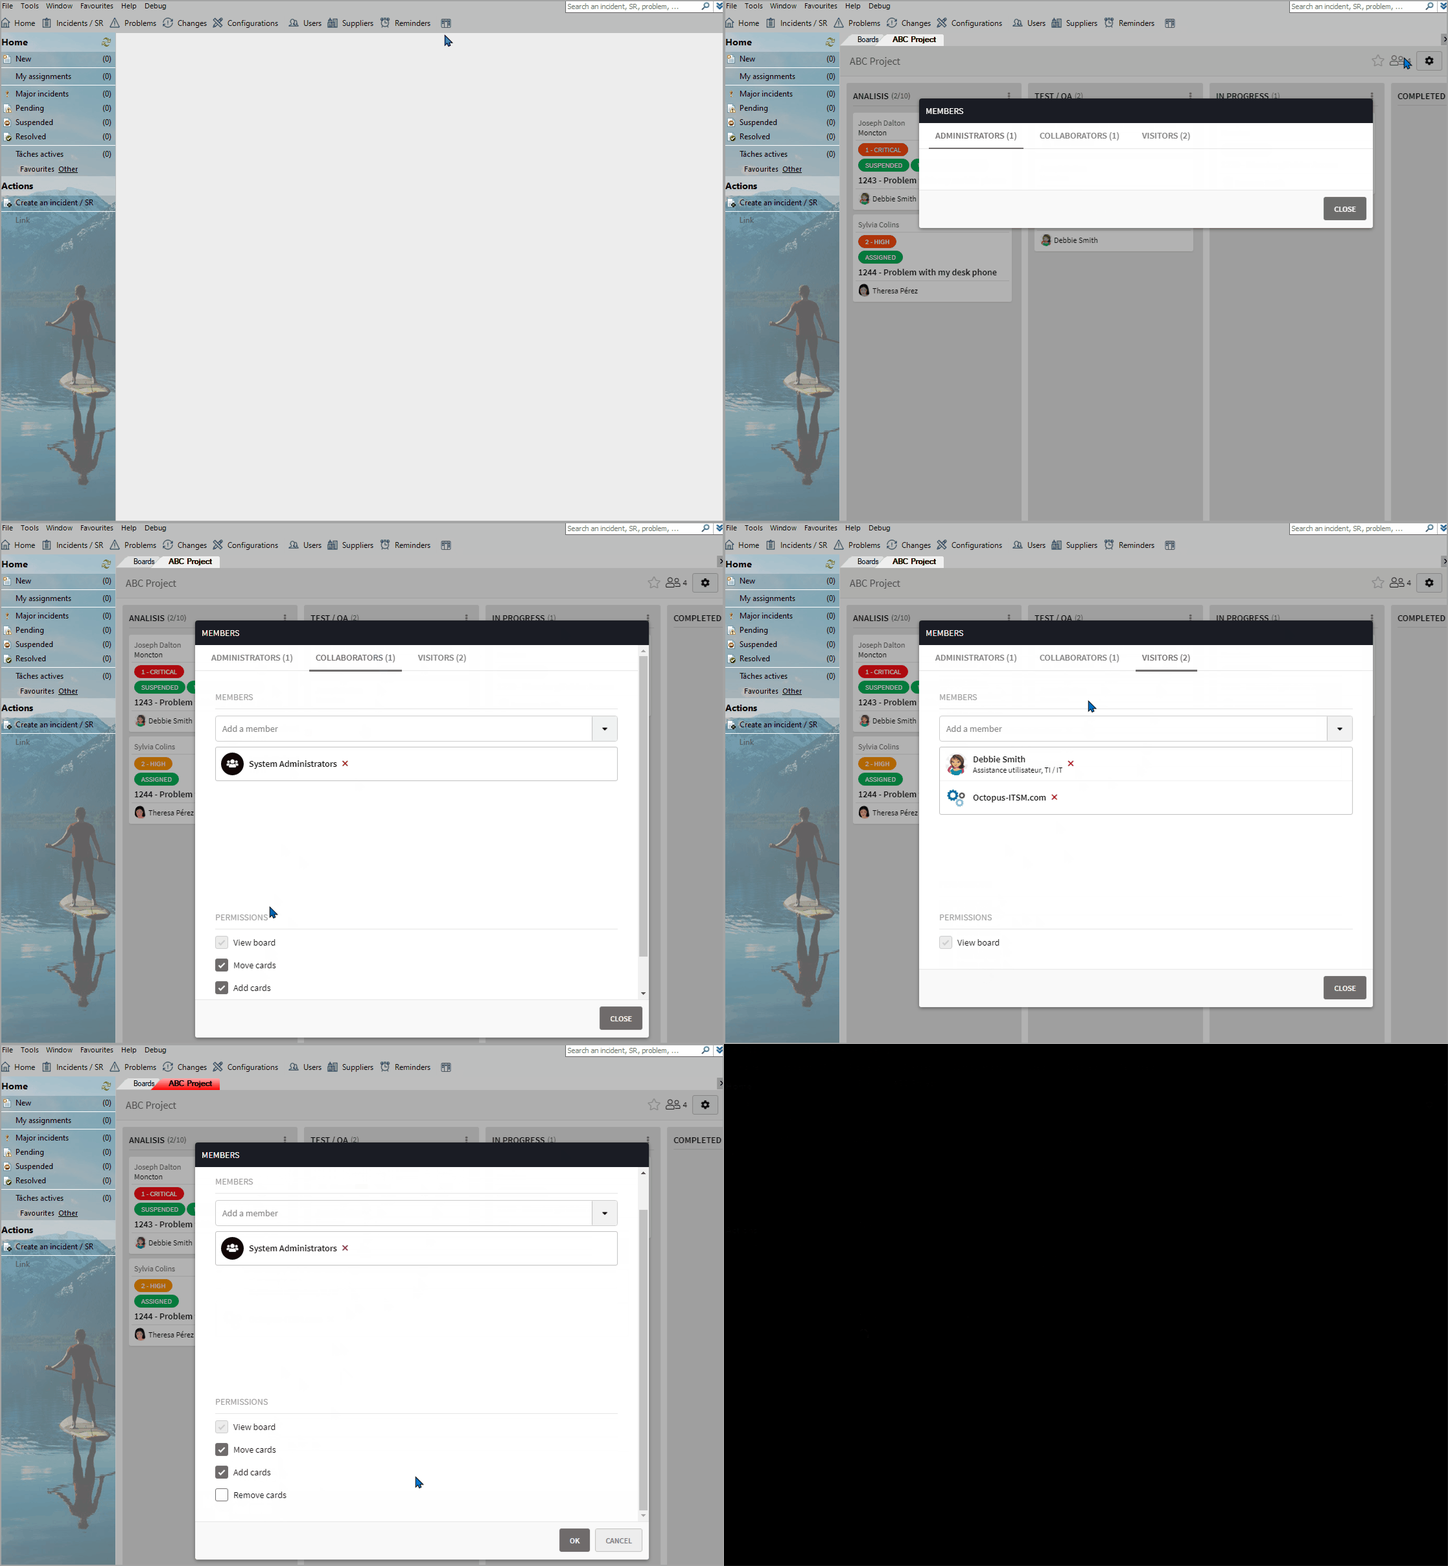
If a board is shared with a group and a new person is added to the group, this person can automatically view the board and inherits the group's permissions on the board.
What is an Orphan Board?
An orphan board is a board that no longer any administrators defined for it.
You must have permission to Administer boards to view orphan boards.
They are identified with the  icon.
icon.
To correct the situation, just add a board administrator as a member of the board.
A board can only be orphaned when its last administrator is deactivated from the Users module. As the system will not let you manually remove the last administrator of a board.
Also, when the person with the permission to Administer boards, adds a new administrator to an orphaned board, it will automatically refresh the information on his screen and may even give an error that he does not have access if he was not a member of this particular board.
The Cards
The board is made up of two card types:
- Open cards
- Incident / SR cards
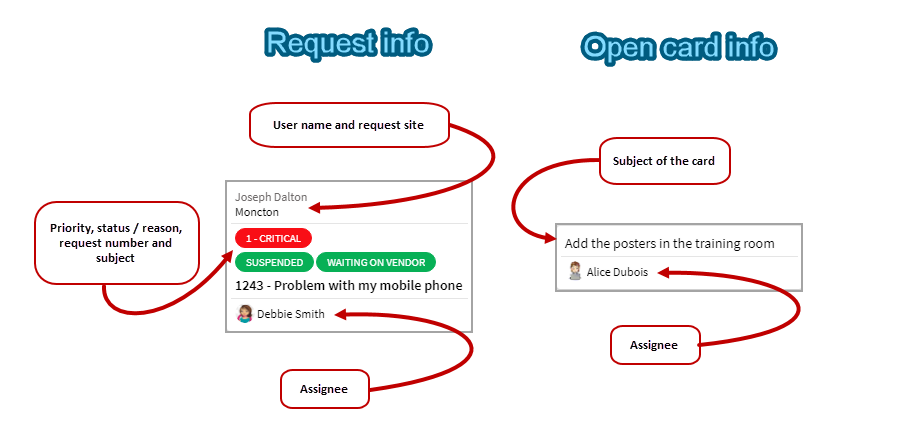
The information visible in the card of a board depends on the type of card:
|
|
In an Incident / SR type card, the priority will only be displayed if the priority of the request corresponds to one of the two highest priorities defined in Octopus
Adding a Card
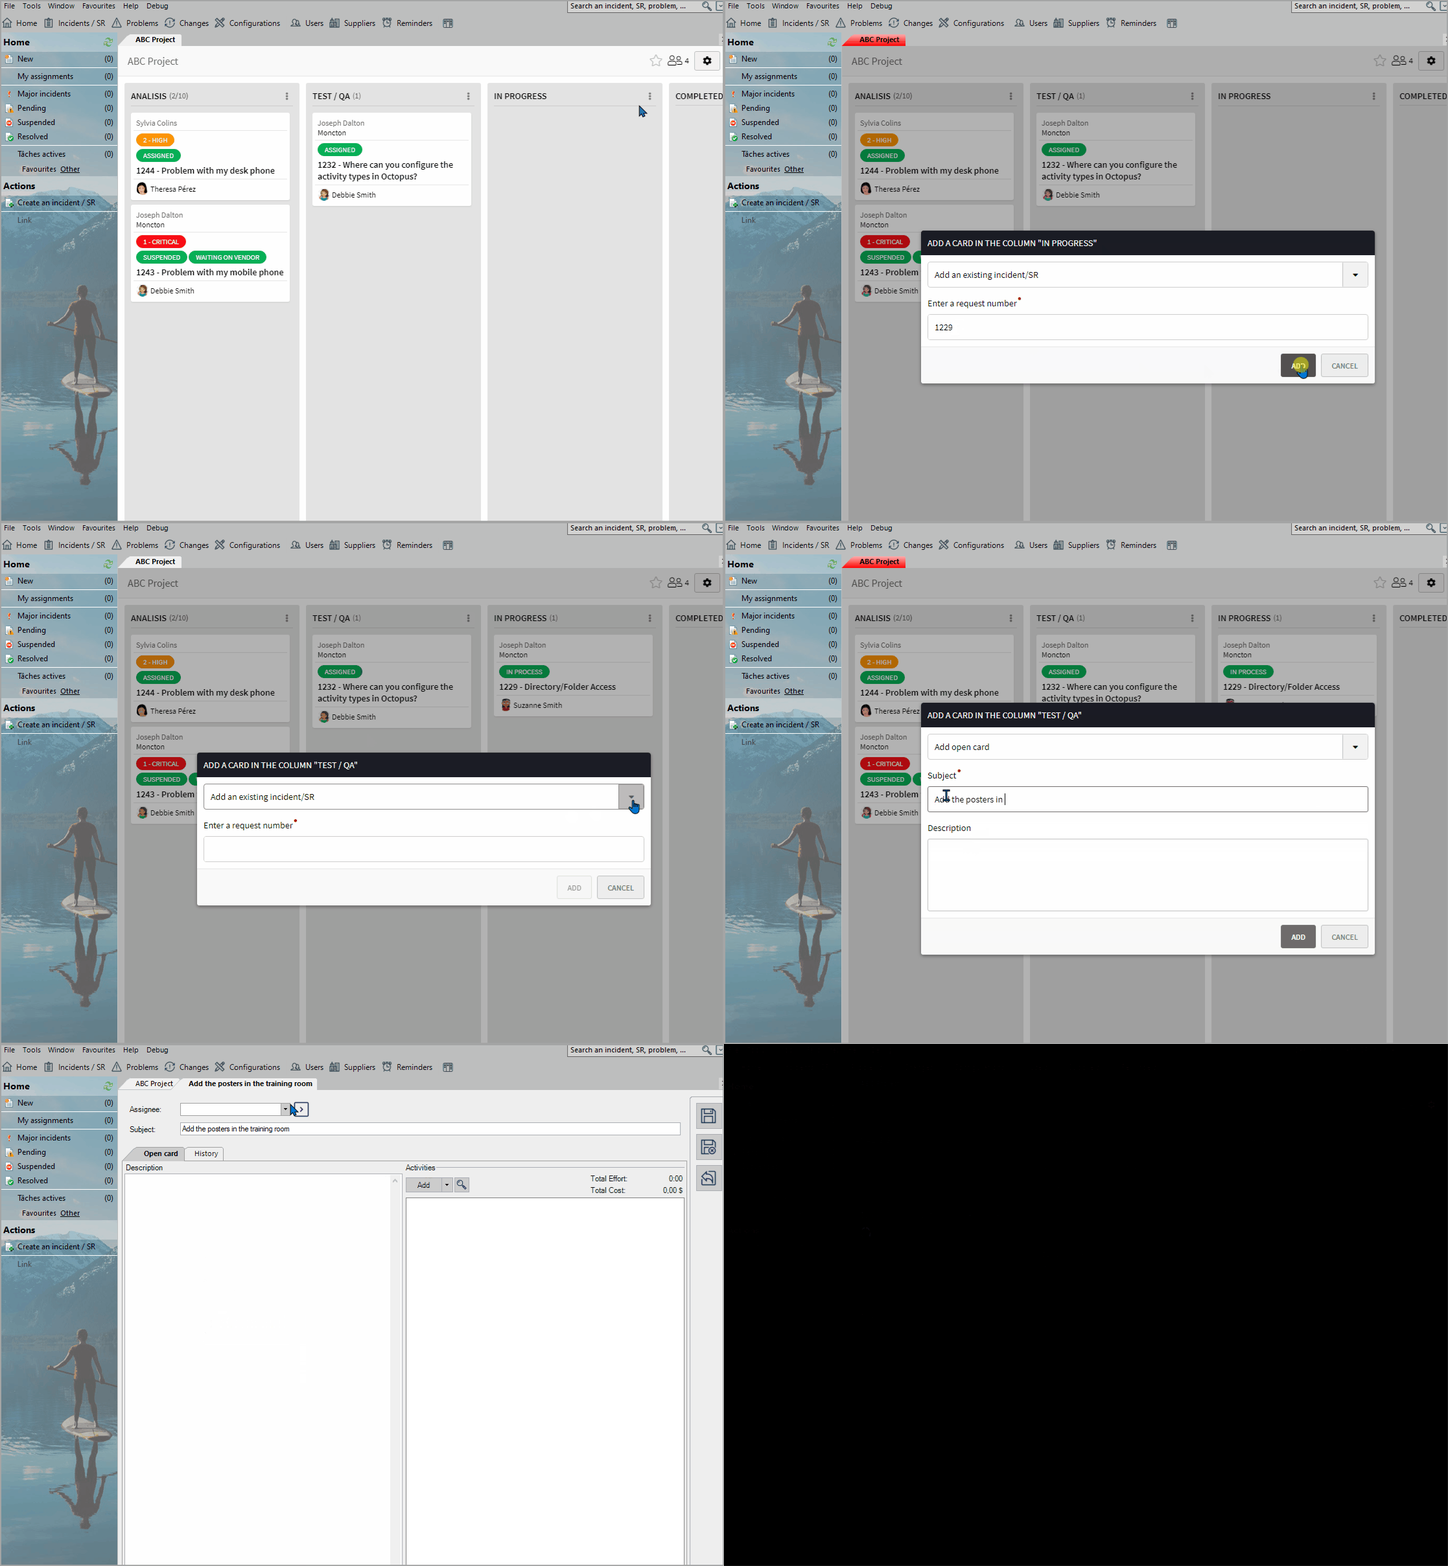
Usually when we add a card to the board, it is linked with an incident or a service request, but in some cases we want to track an item that is not linked to a request. in this case it is an open card.
To add a card you must:
- Click on the button at the top of the column where the card should be added.

- Select Add a card
- Use the combo box to choose if it is an Incident / SR type card or an Open card
- Dans le cas de :
- Incident /SR
- Enter the card number
- Open card
- Add the subject and it's also possible to add a description
- Incident /SR
- Dans le cas de :
- Click the Add button
Move Cards
Cards can be moved from column to column within the same tableau simply by selecting the card and dropping it in the desired location.
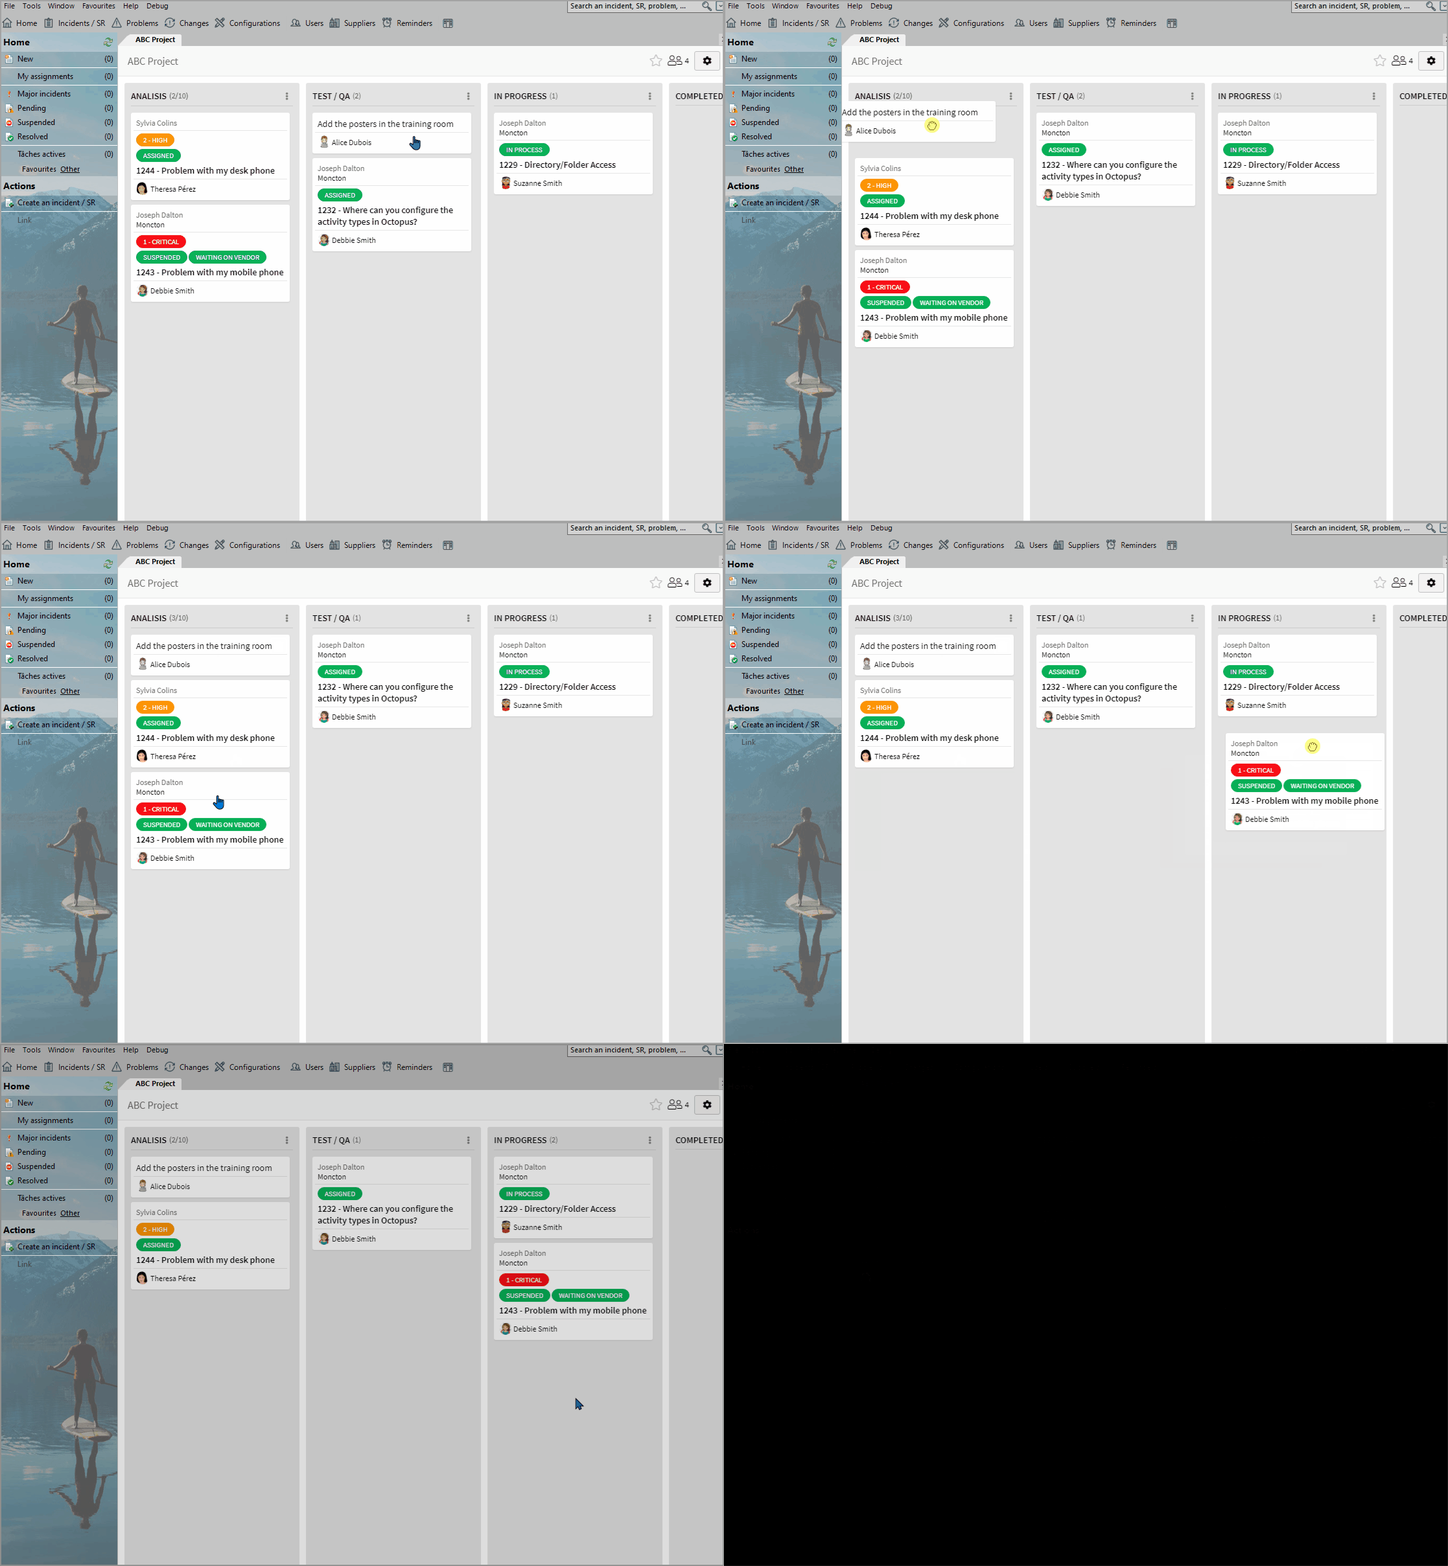
Consult and Modify an Open Card
When a card is added it can be viewed and modified. The information that is visible and modifiable will be different depending on the type of card.
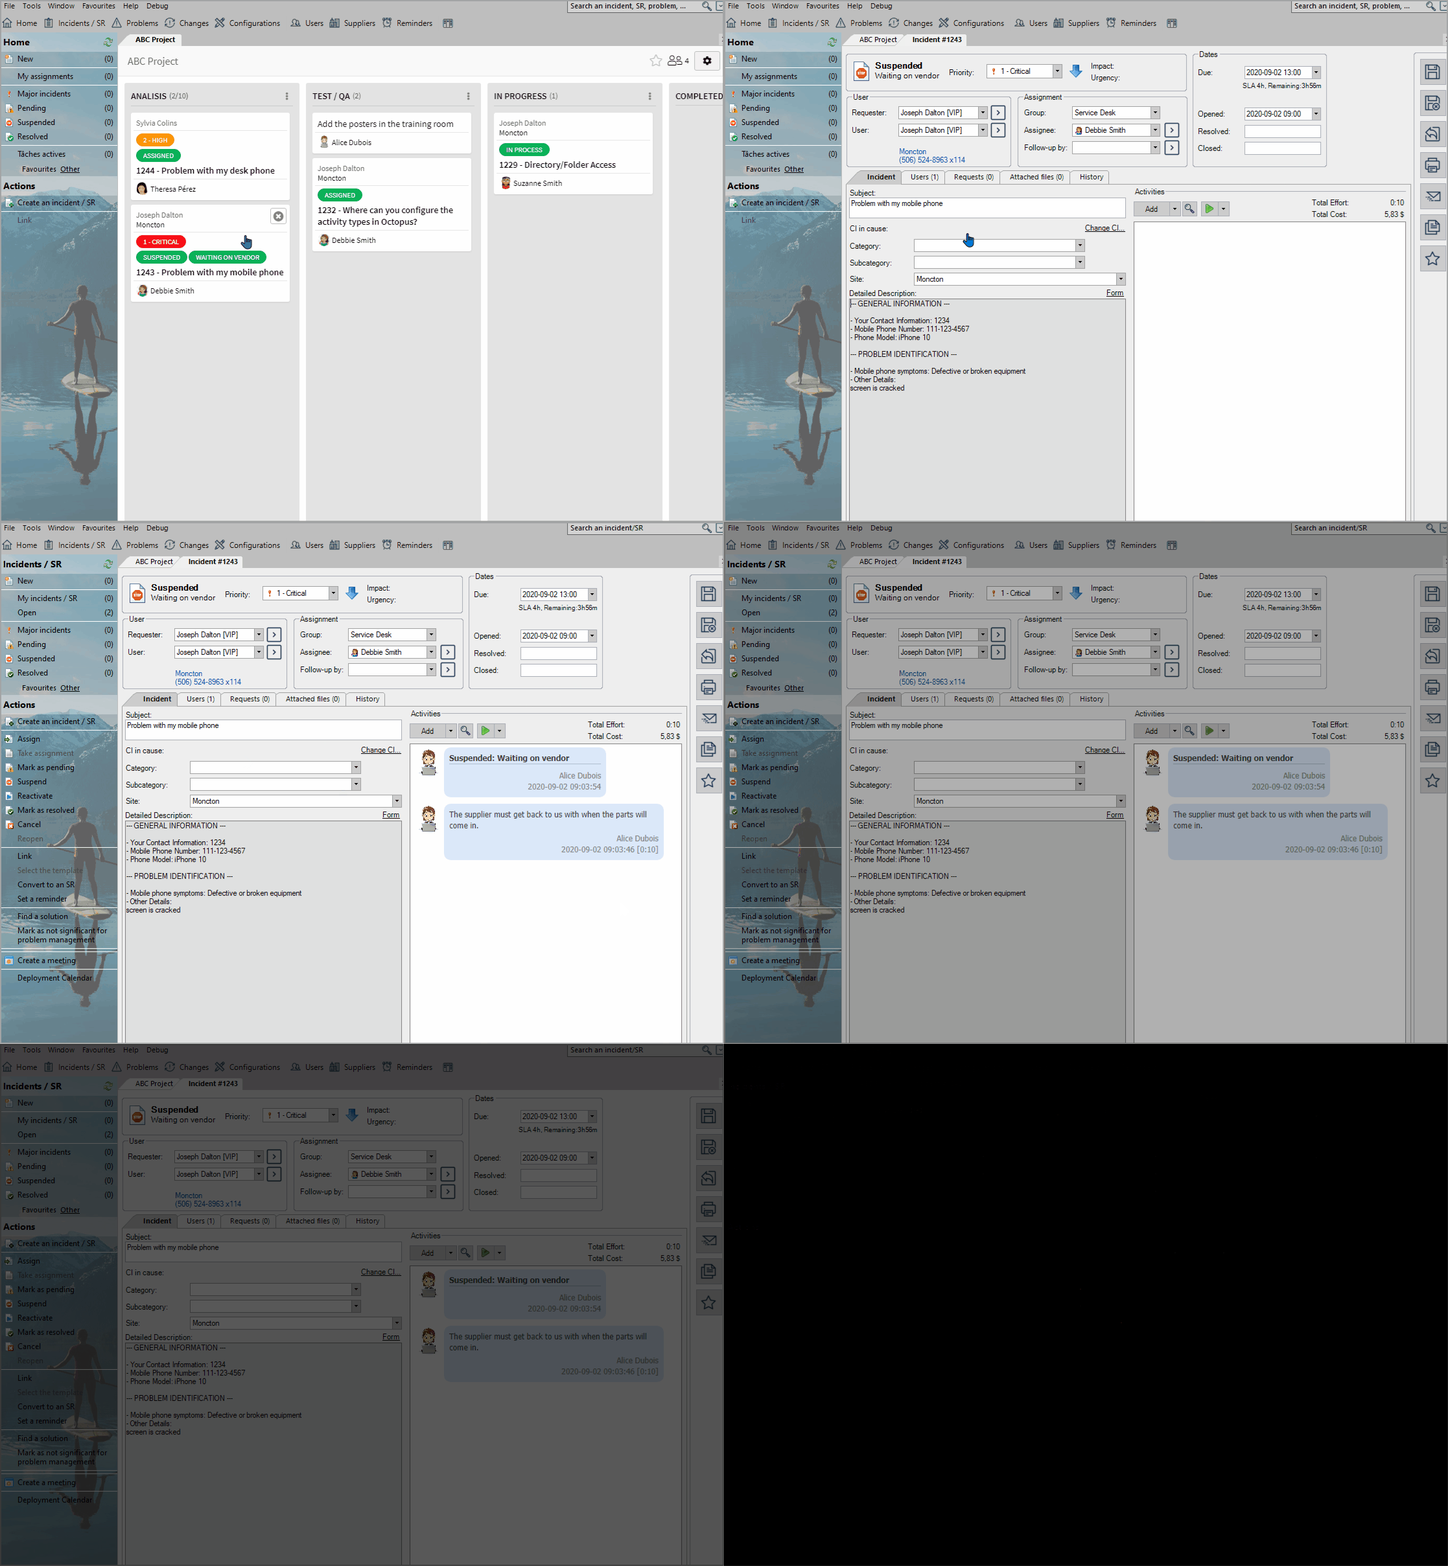
Incident / SR Card
When an incident / SR card is selected, the request window opens and it is possible to view and modify the information directly in the request .
Open Card
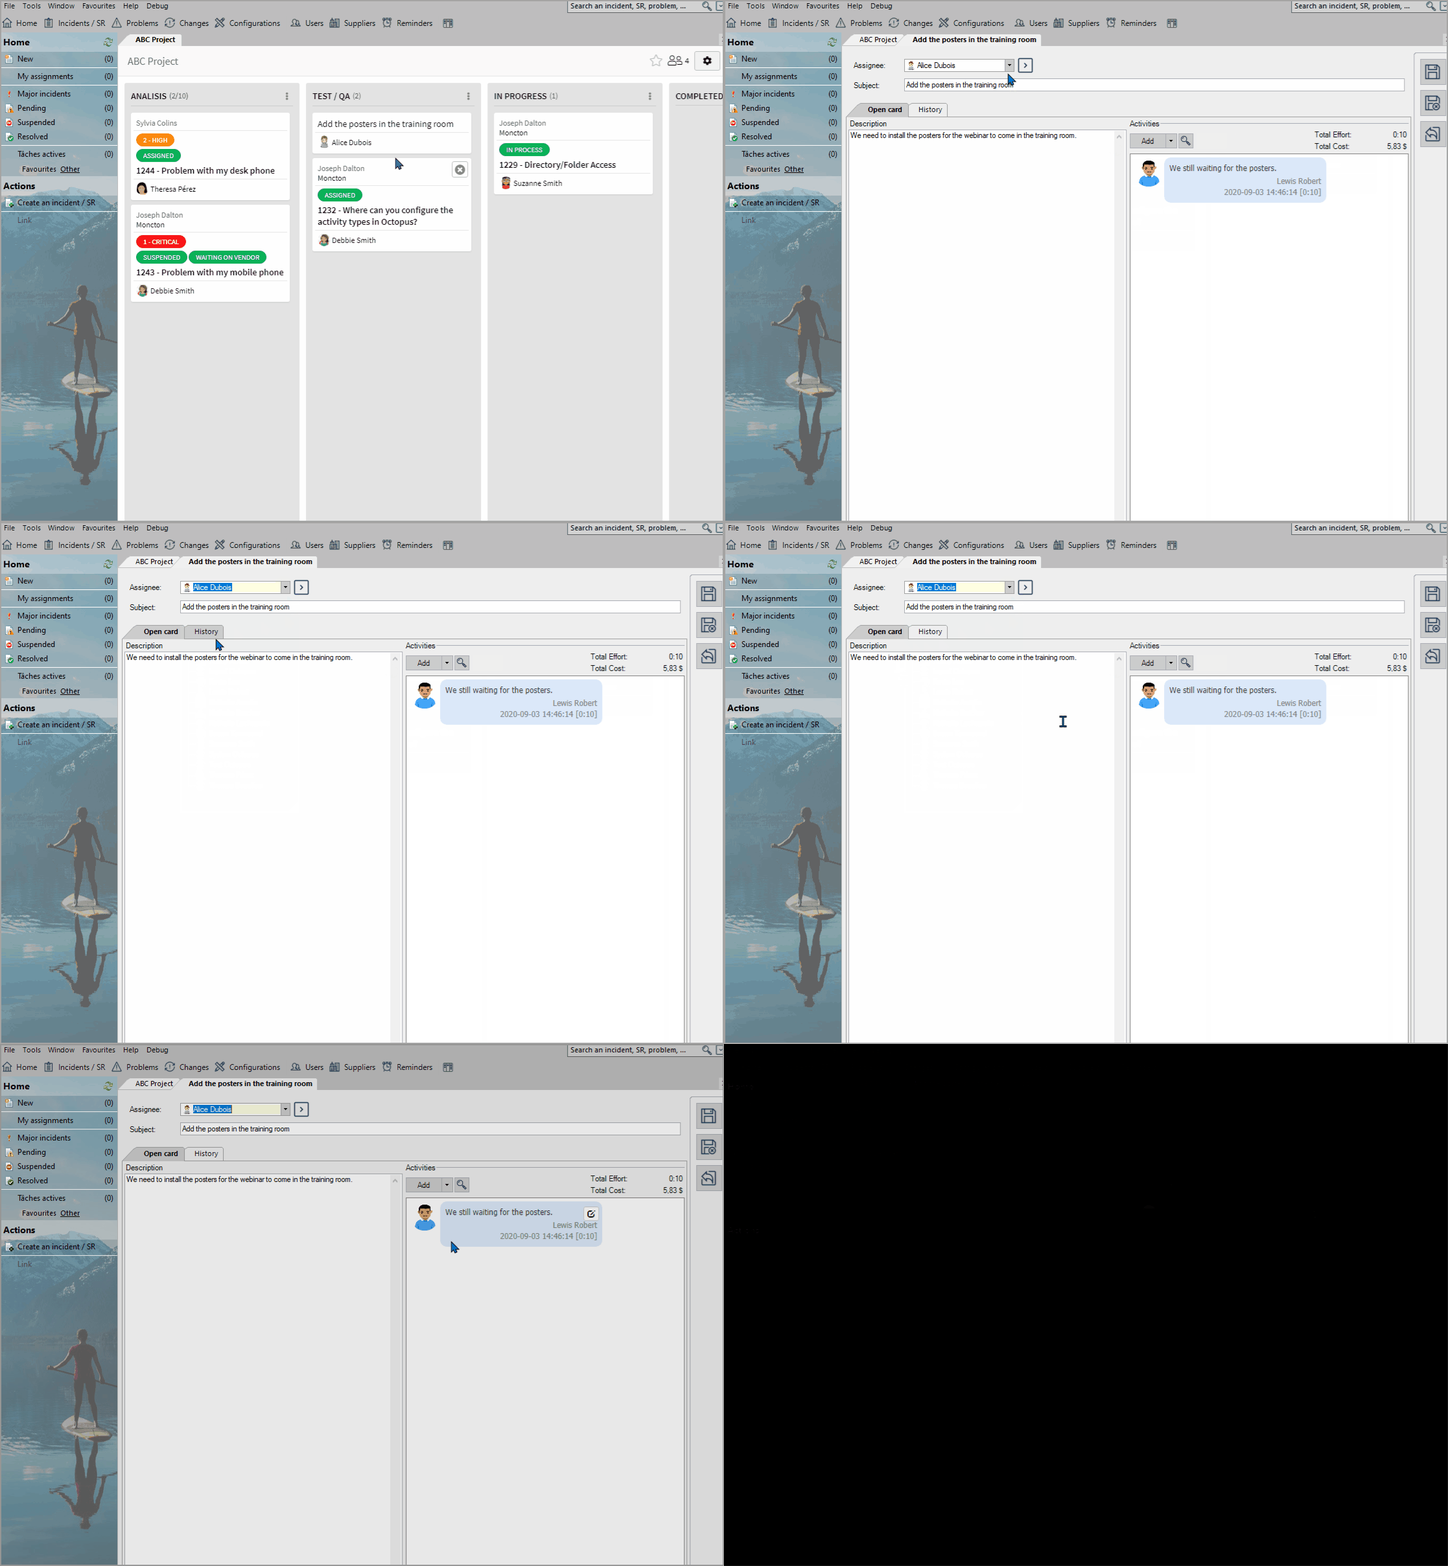
In the board we recognize an open card, by its subject. If we open the card, we have access to other elements:
- You can add an assignee
- No notifications are sent to the assignee
- Modify the subject
- Modify or add a description
- Consult the activities already there or add new activities
Add Activities to a Card
In both types of cards, it is possible to add activities.
Incident/SR Card
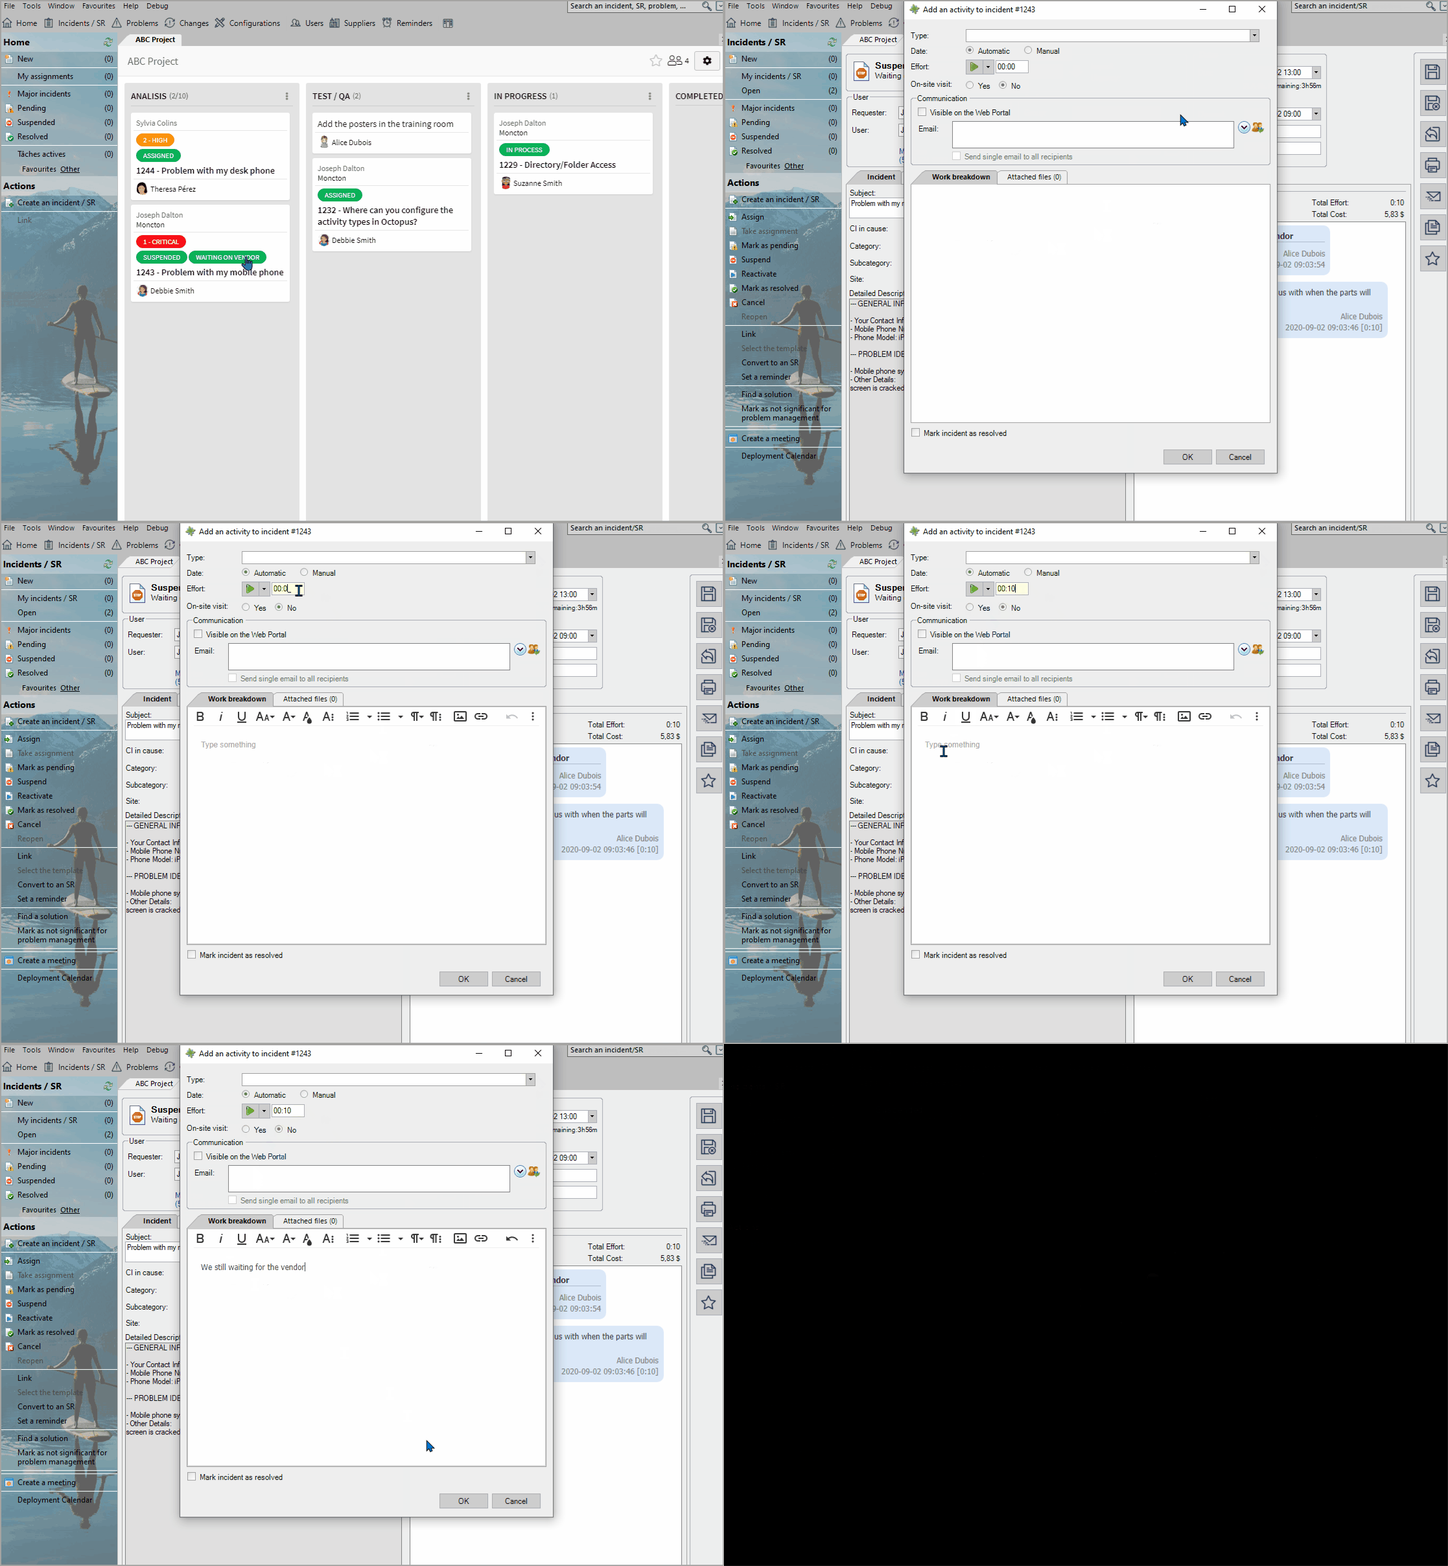
When you open an Incident / SR card, it opens the request in question and you can add an activity to the request as usual.
Open Card
When an activity is added to an open card, you can:
- Select an activity type
- Modify the date of the activity
- Enter the effort
- Indicate if an onsite visit was required
- Add attachments
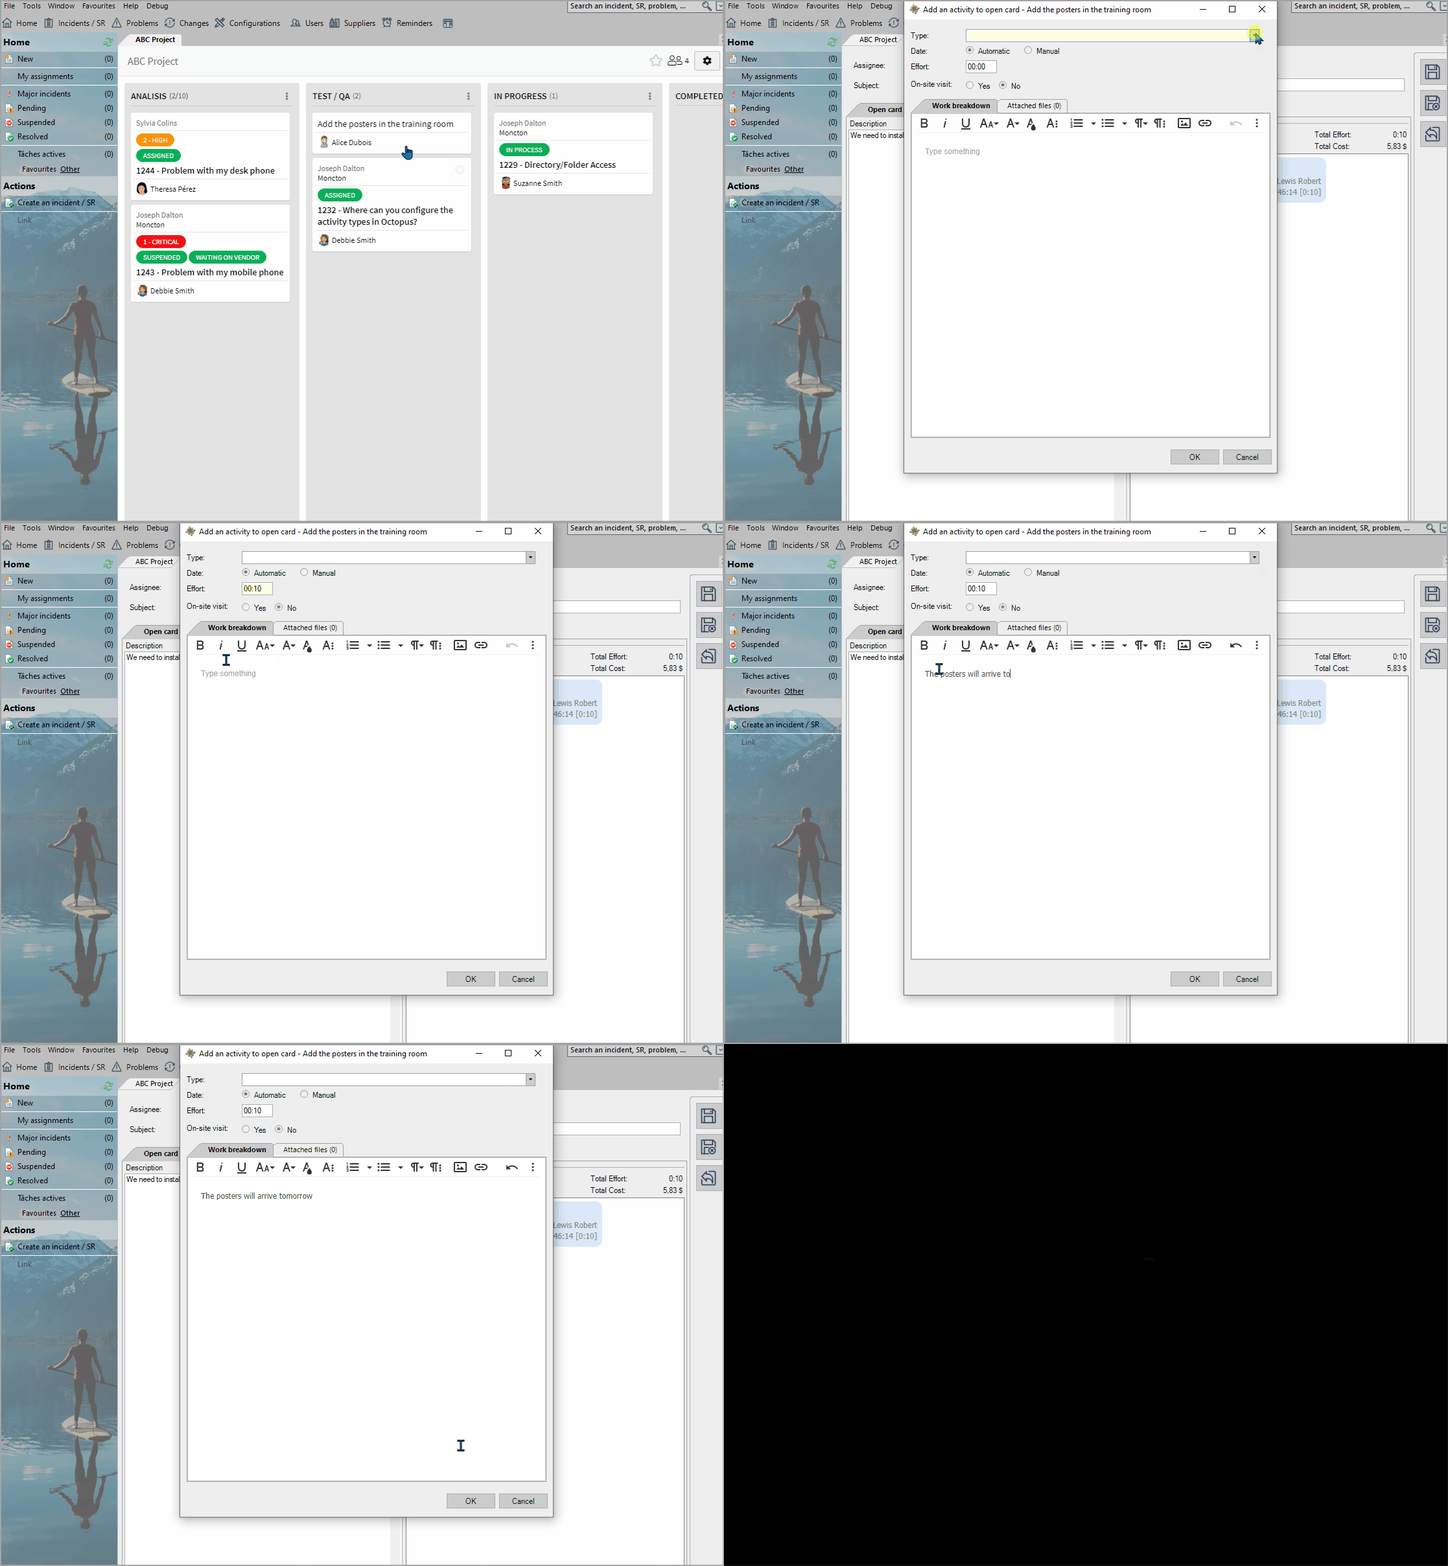
Activities made from an open card are visible in the Octopus user's personal timesheet, but are not visible in the timesheet report used by managers.
Sending email is not available when adding an activity to an open .
Remove an incident/SR Type Card
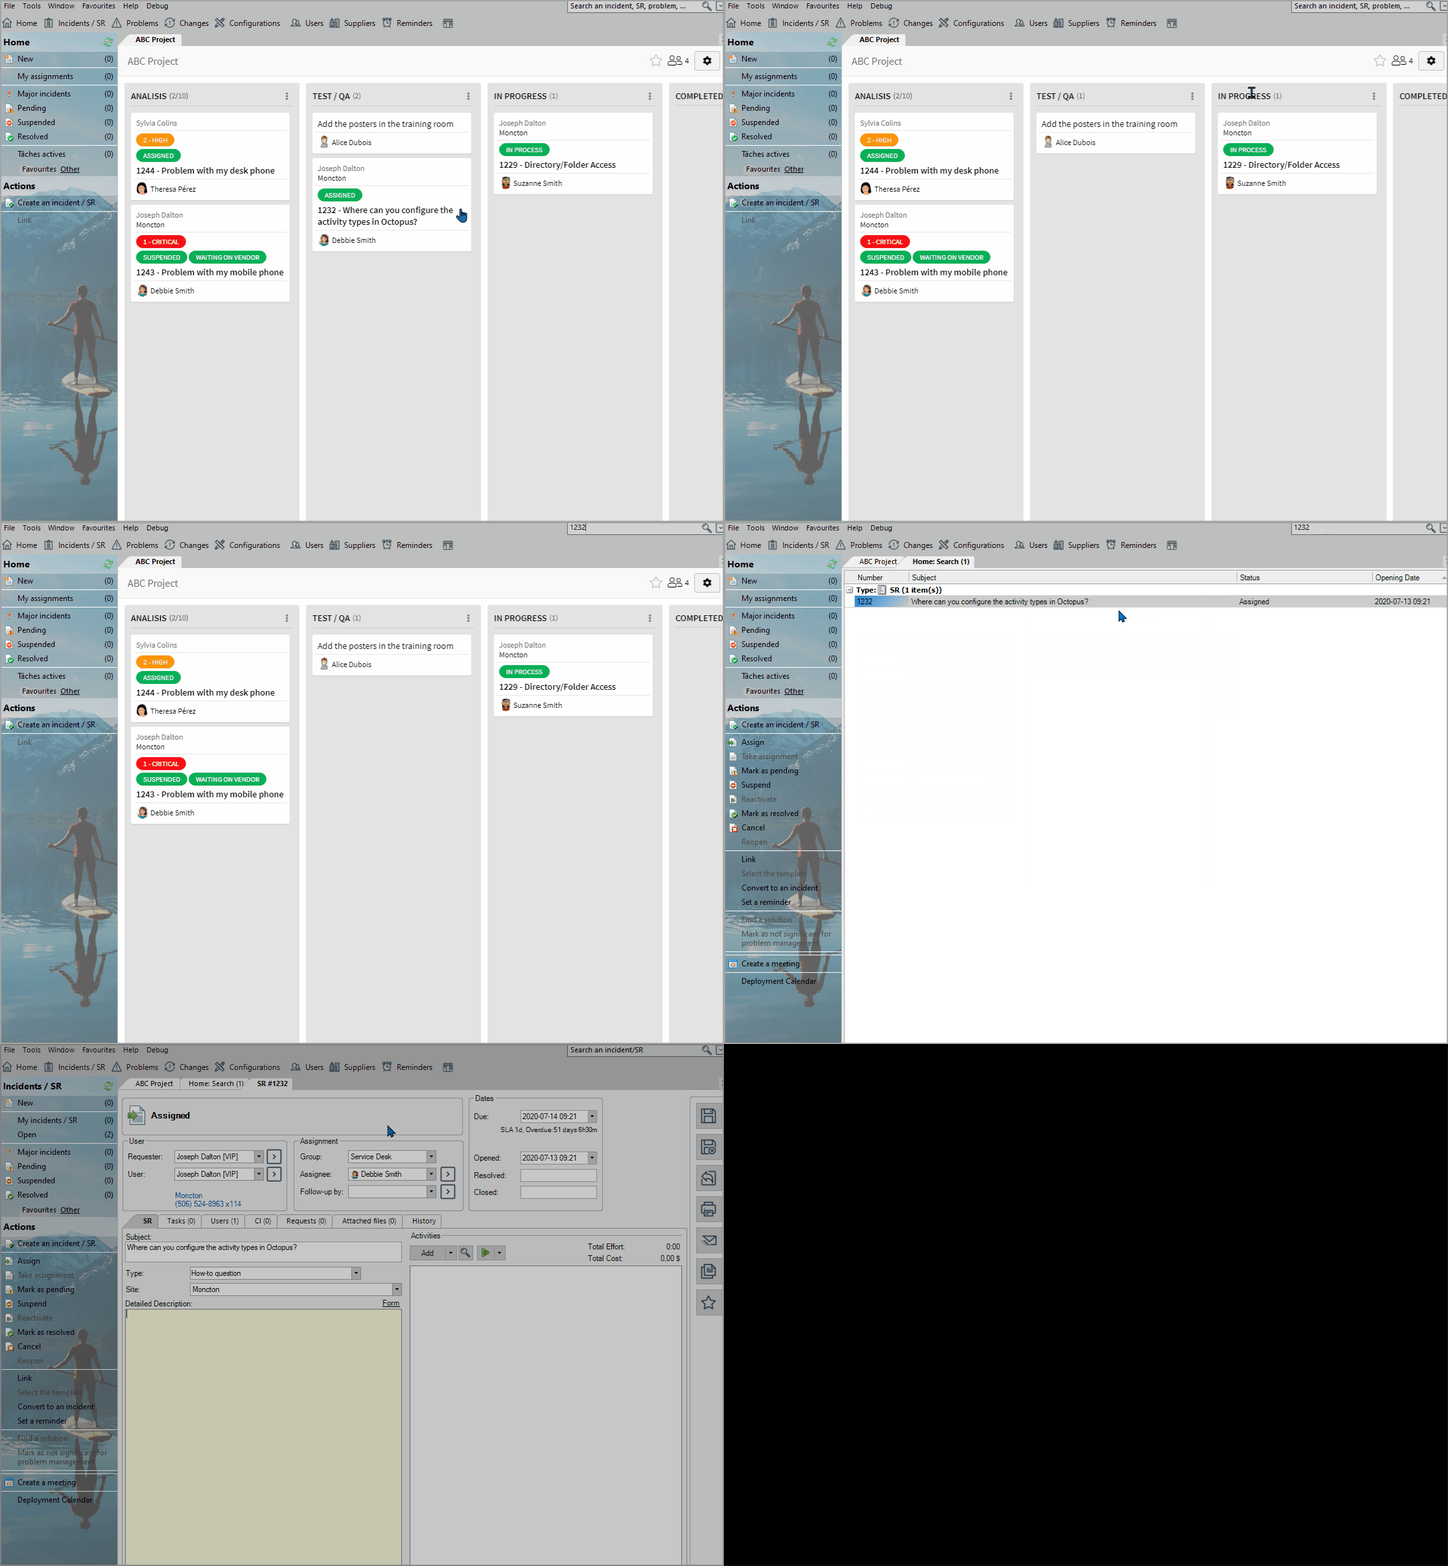
Removing a card does not affect the incident / SR. It just removes the card from the board.
To remove an Incident/SR card, simply click the  button situated in the upper right corner of the card in question.
Delete an Open Card
You can delete and open card with the garbage can ![]() button.
button.
A confirmation message will appear before it is deleted.
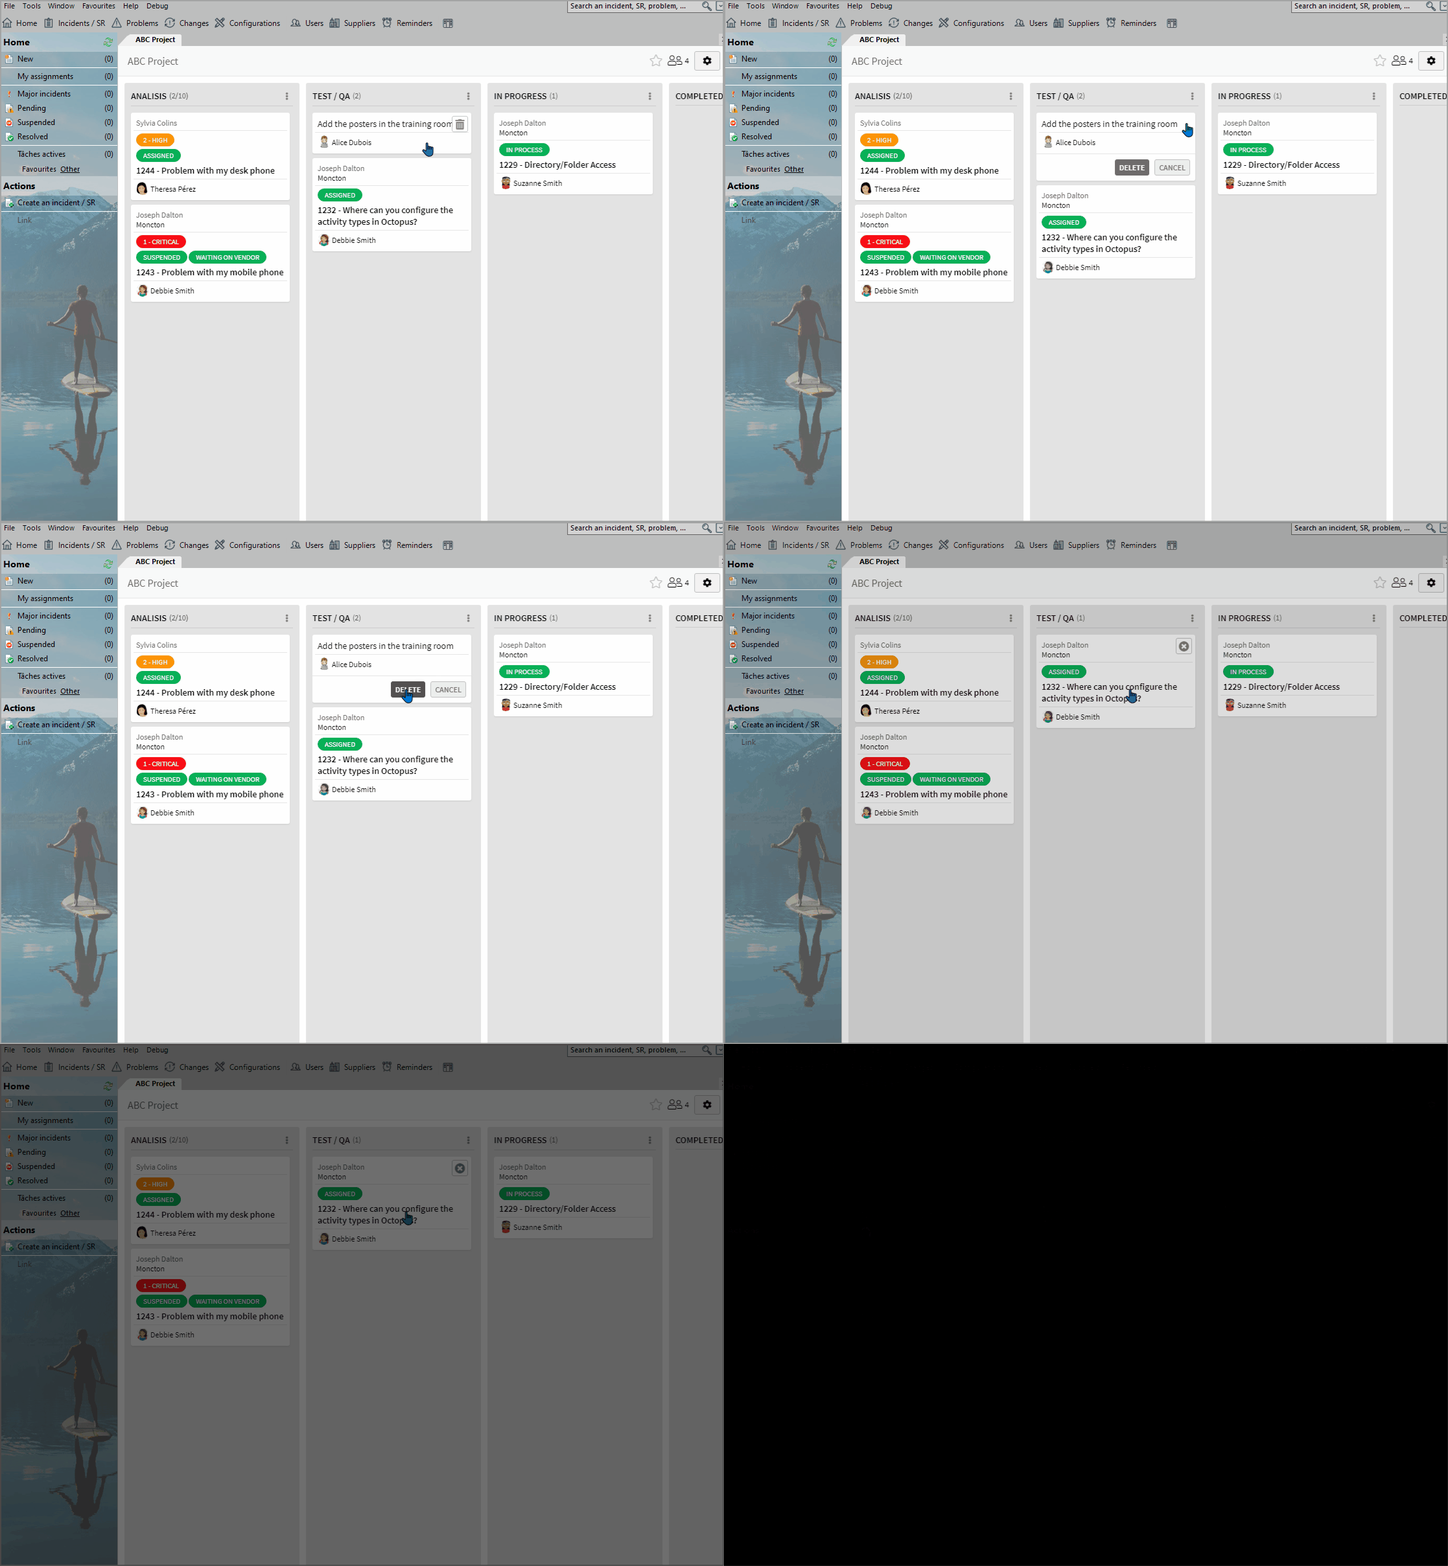
- If an open card is deleted, all data relating to this card including activities are also deleted.
- There is no possibility of retrieving the information.
- The efforts of the activities entered are also lost.
Label on the cards of a board
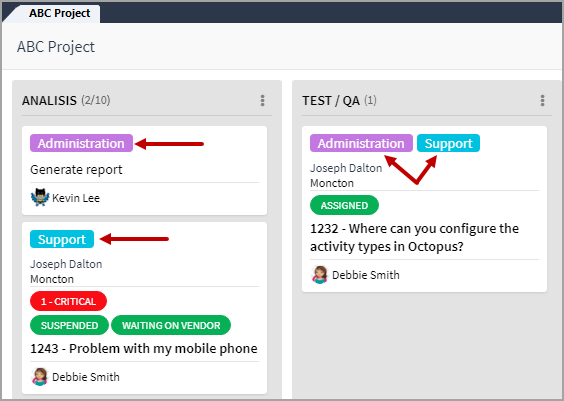
You can now personalize labels for each of the boards and use then on the cards.
The labels are visible in the upper left corner of the cards and they are used to categorize cards.
Labels can be used in an Incident /SR card and in an Open Card.
It is also possible to personalize the label with a colour.
Managing the labels of a board
A board can have several different labels.
Each label can be defined with a colour and a name.
The name is not mandatory.
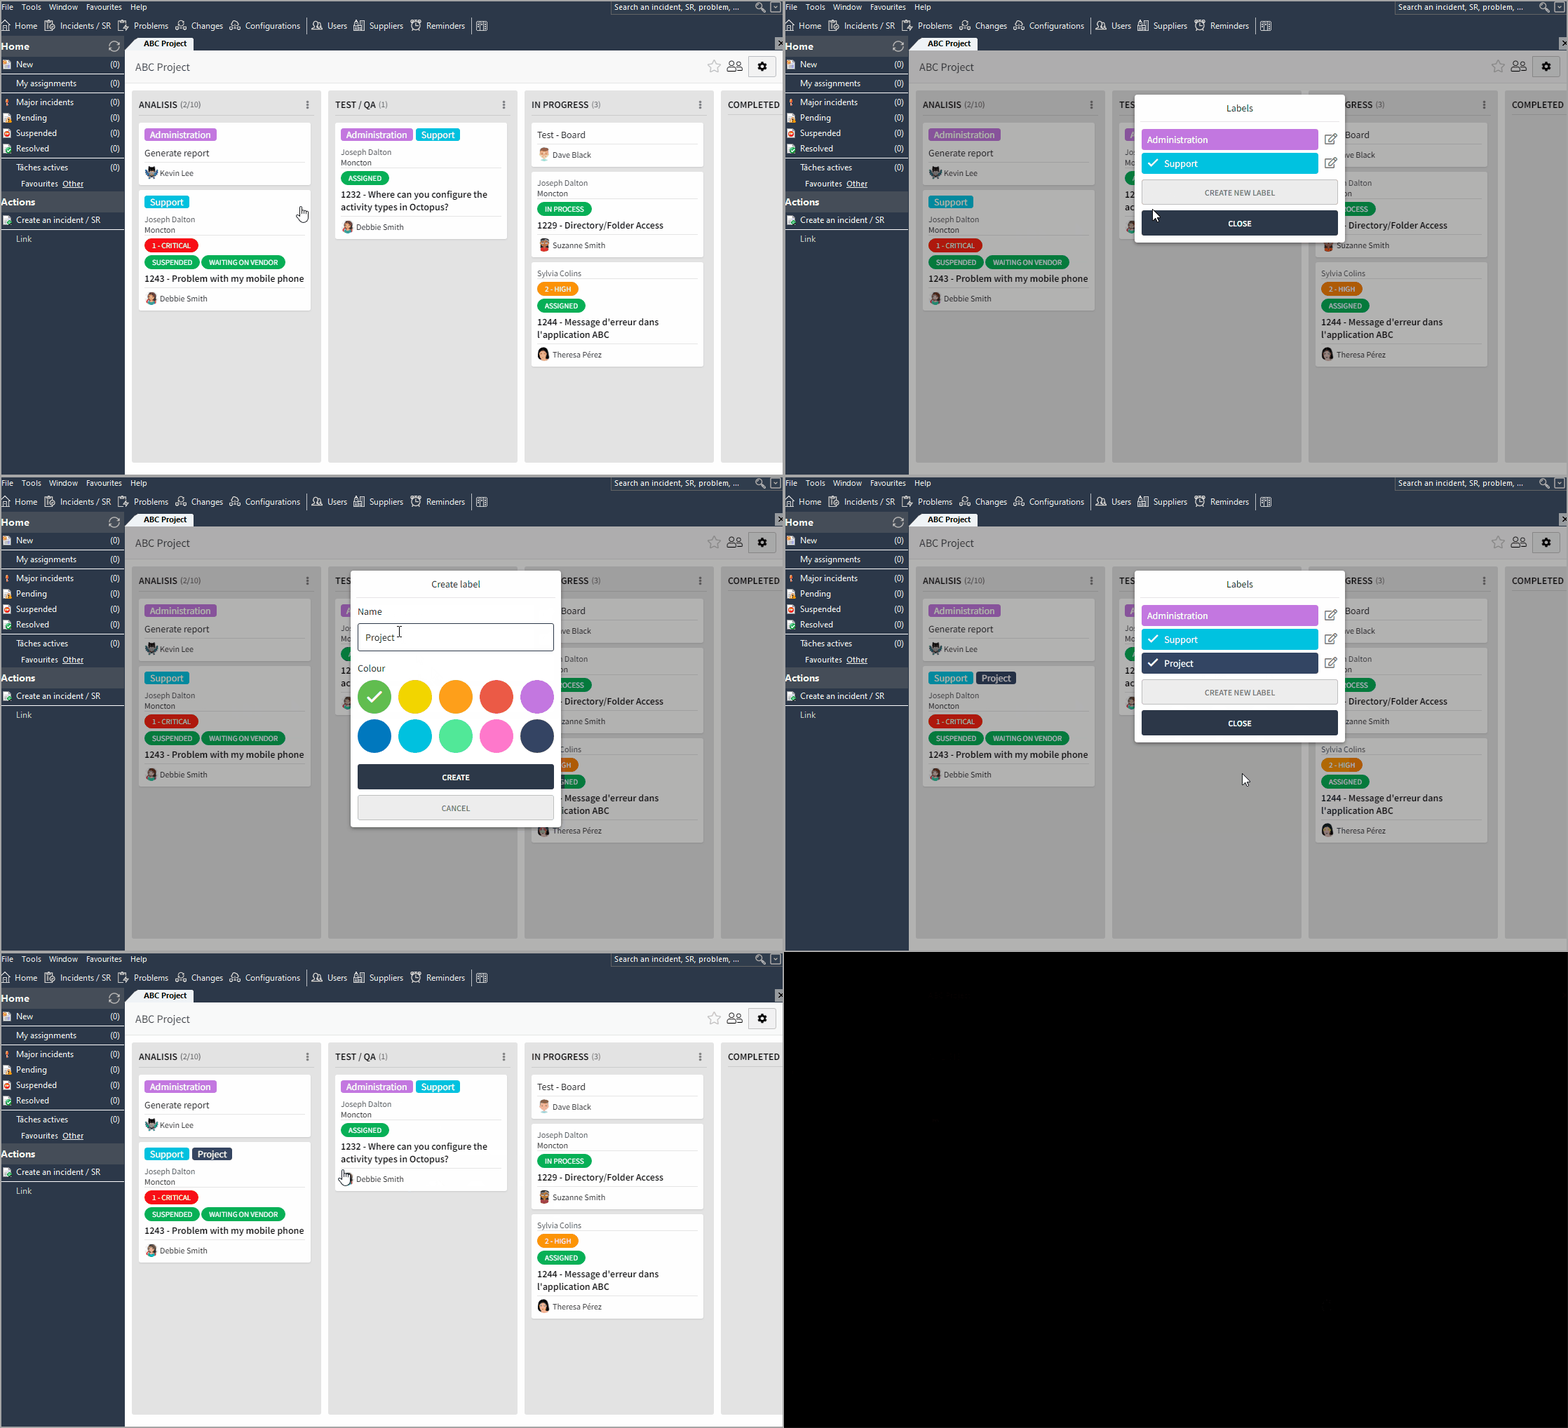
Adding a label to a board
The addition of a label to a board is done from a card.
To add a label, you must:
-
Click on the button located at the top right of a card in the board.

-
Select Edit labels
- Select the CREATE NEW LABEL button
- Select the colour and enter a name
- Click on the CREATE button
- Click on the CLOSE button
Modifying a label in a board
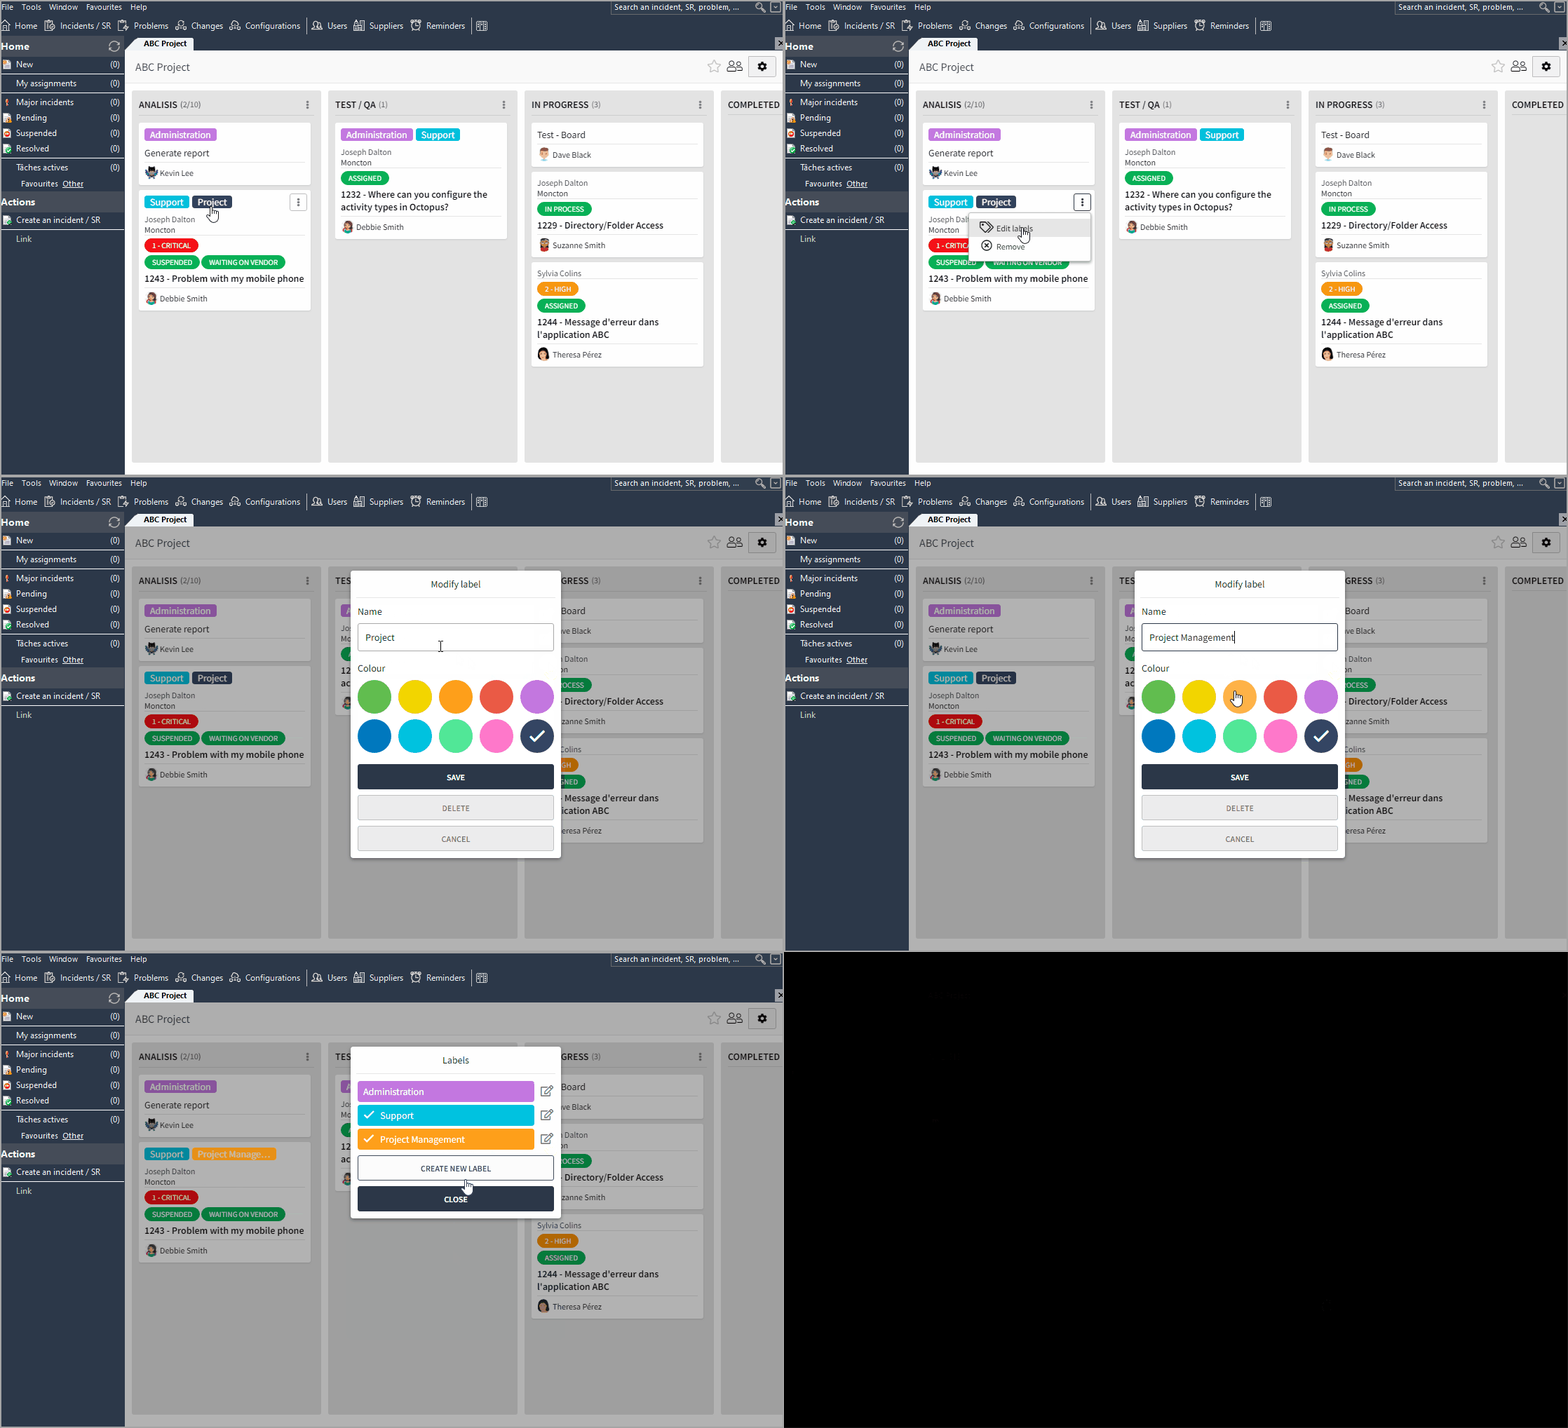
The modification of a label is done from a board.
To modify a label, you must:
- Click on the button located at the top right of a card in the chart.

- Select Edit labels
- Click on the button located to the right of the label to change

- Change the colour and/or the name
- Click on the SAVE button
- Click on the CLOSE button
The label that has been changed is changed in all cards in the board that use that label.
Delete a label from a board
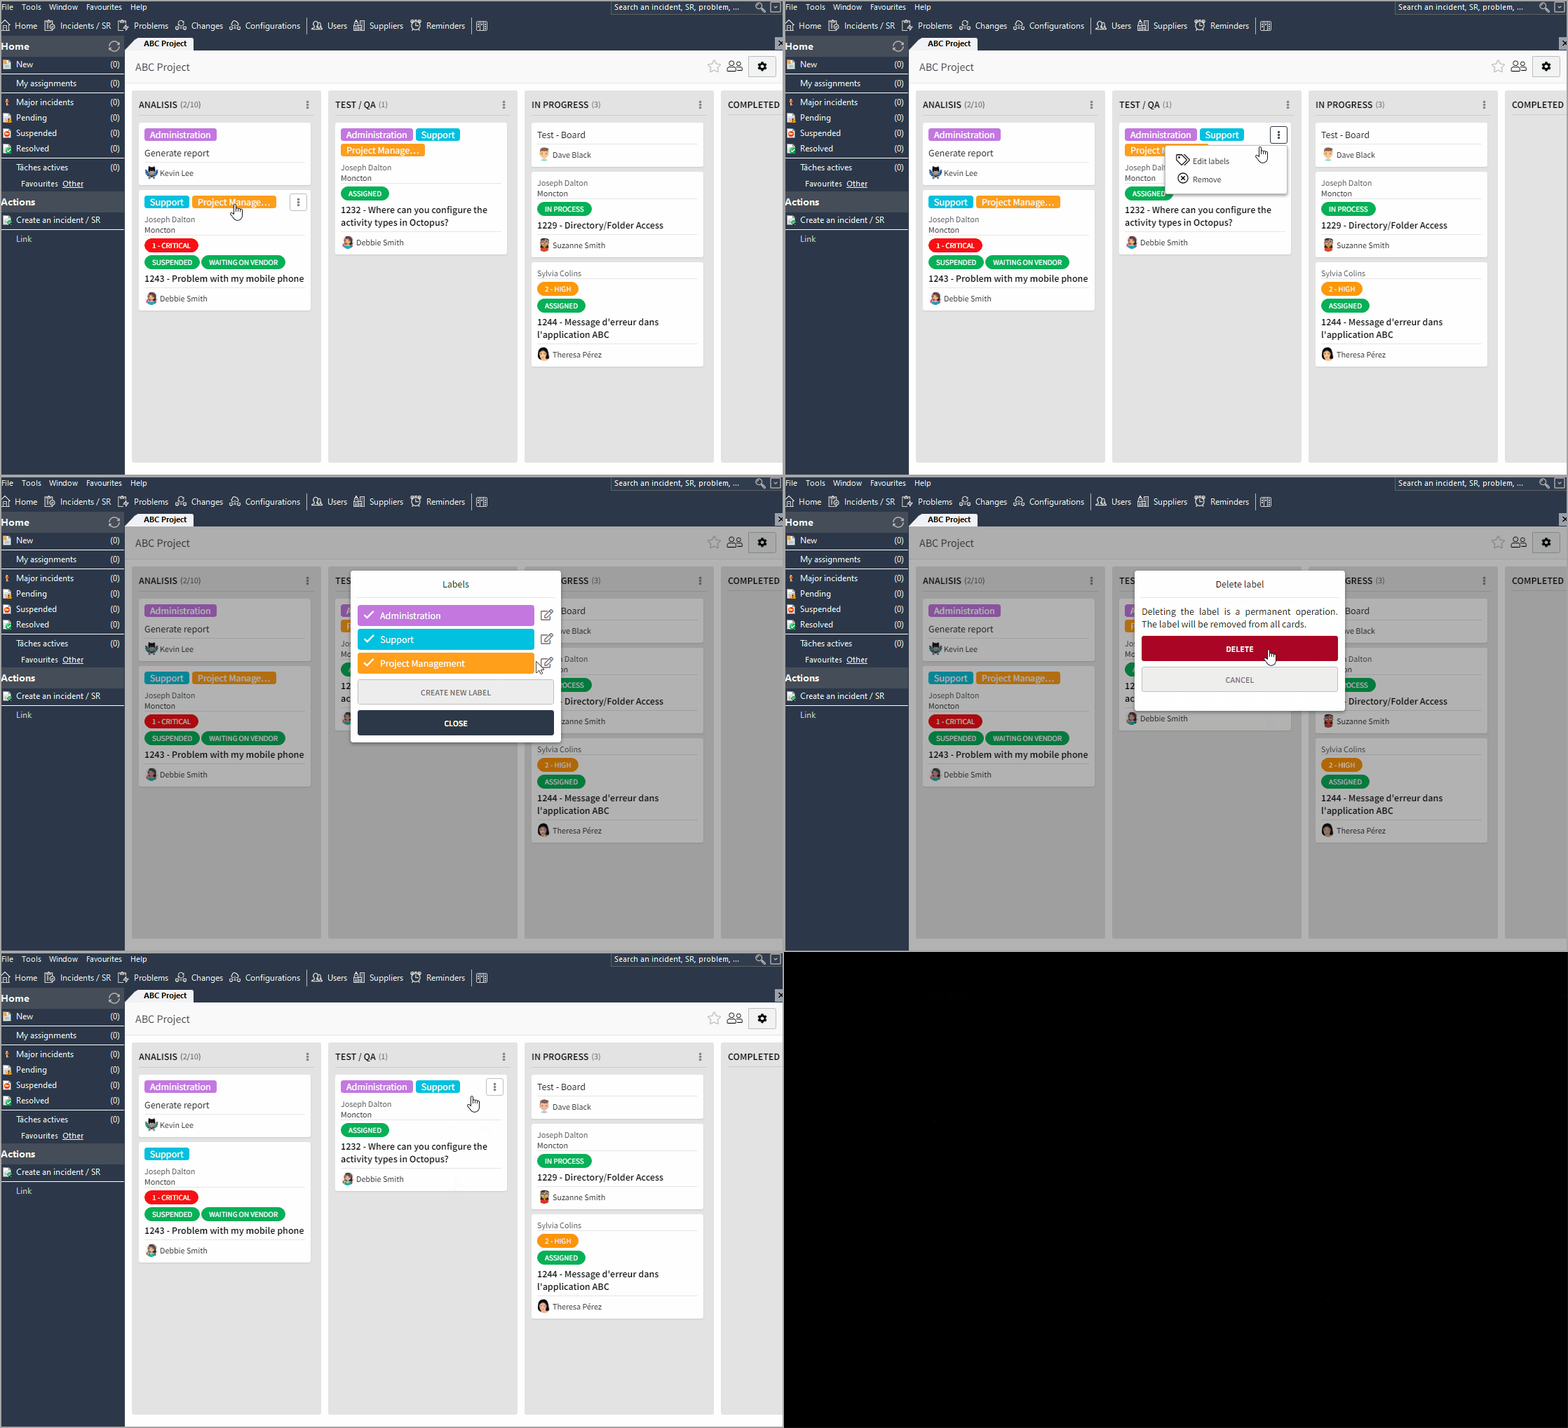
The deletion of a label is done from a card.
To delete a label, you must:
- Click on the button located at the top right of a card in the chart.

- Select Edit labels
- Click on the button located to the right of the label to change

-
Click on the DELETE button
-
Click on the DELETE button to confirm the deletion
The label that is deleted is removed from all the cards in the table they use it.
This operation is permanent.
How to add or remove a label from a card
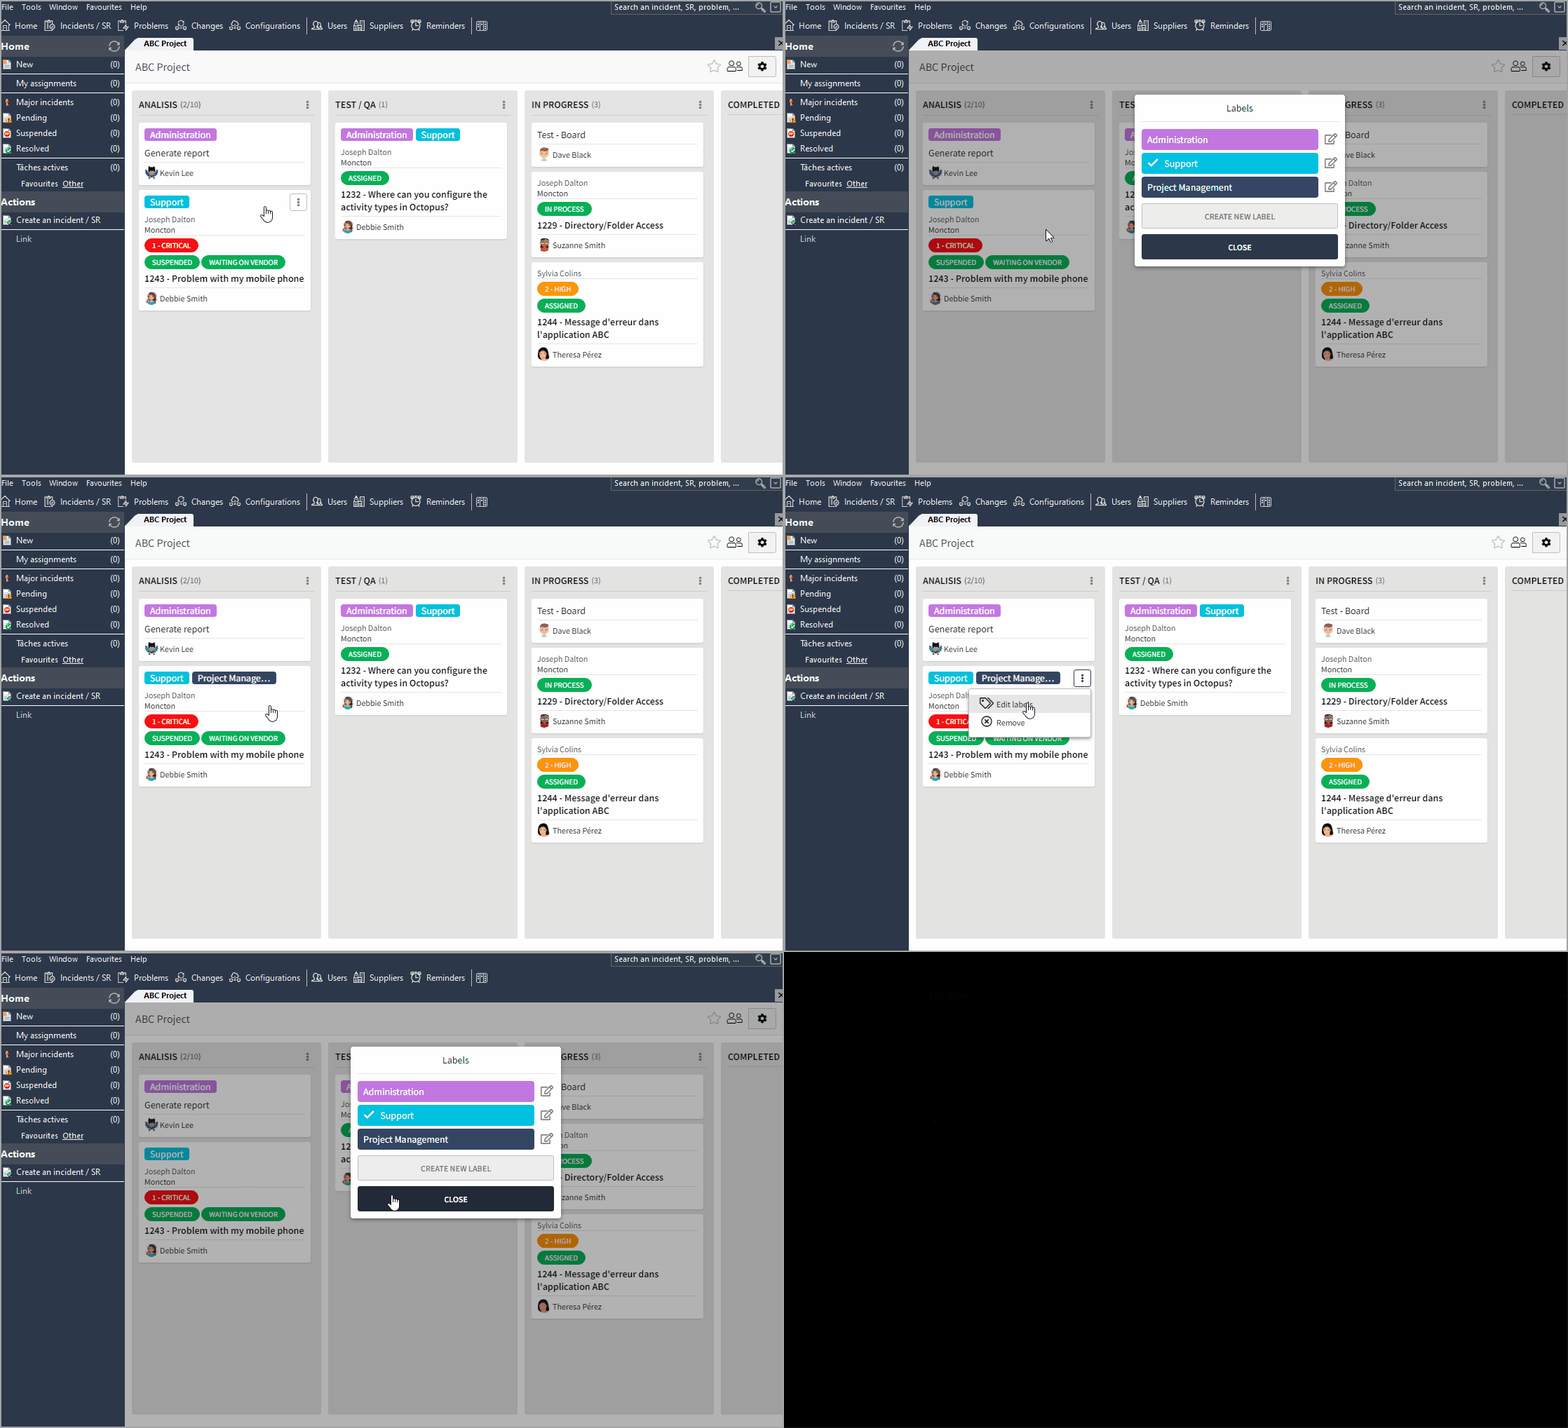
To add or remove a label from a card, you must:
- Click on the button located at the top right of a card in the chart.

- Select Edit labels
- Click on the label to add or remove from the card
- Click on the CLOSE button
A card can contain one or more labels that are defined in the board to which it belongs.
Add or Remove a Board From the Favourites
A board can be added or removed from the favourites.
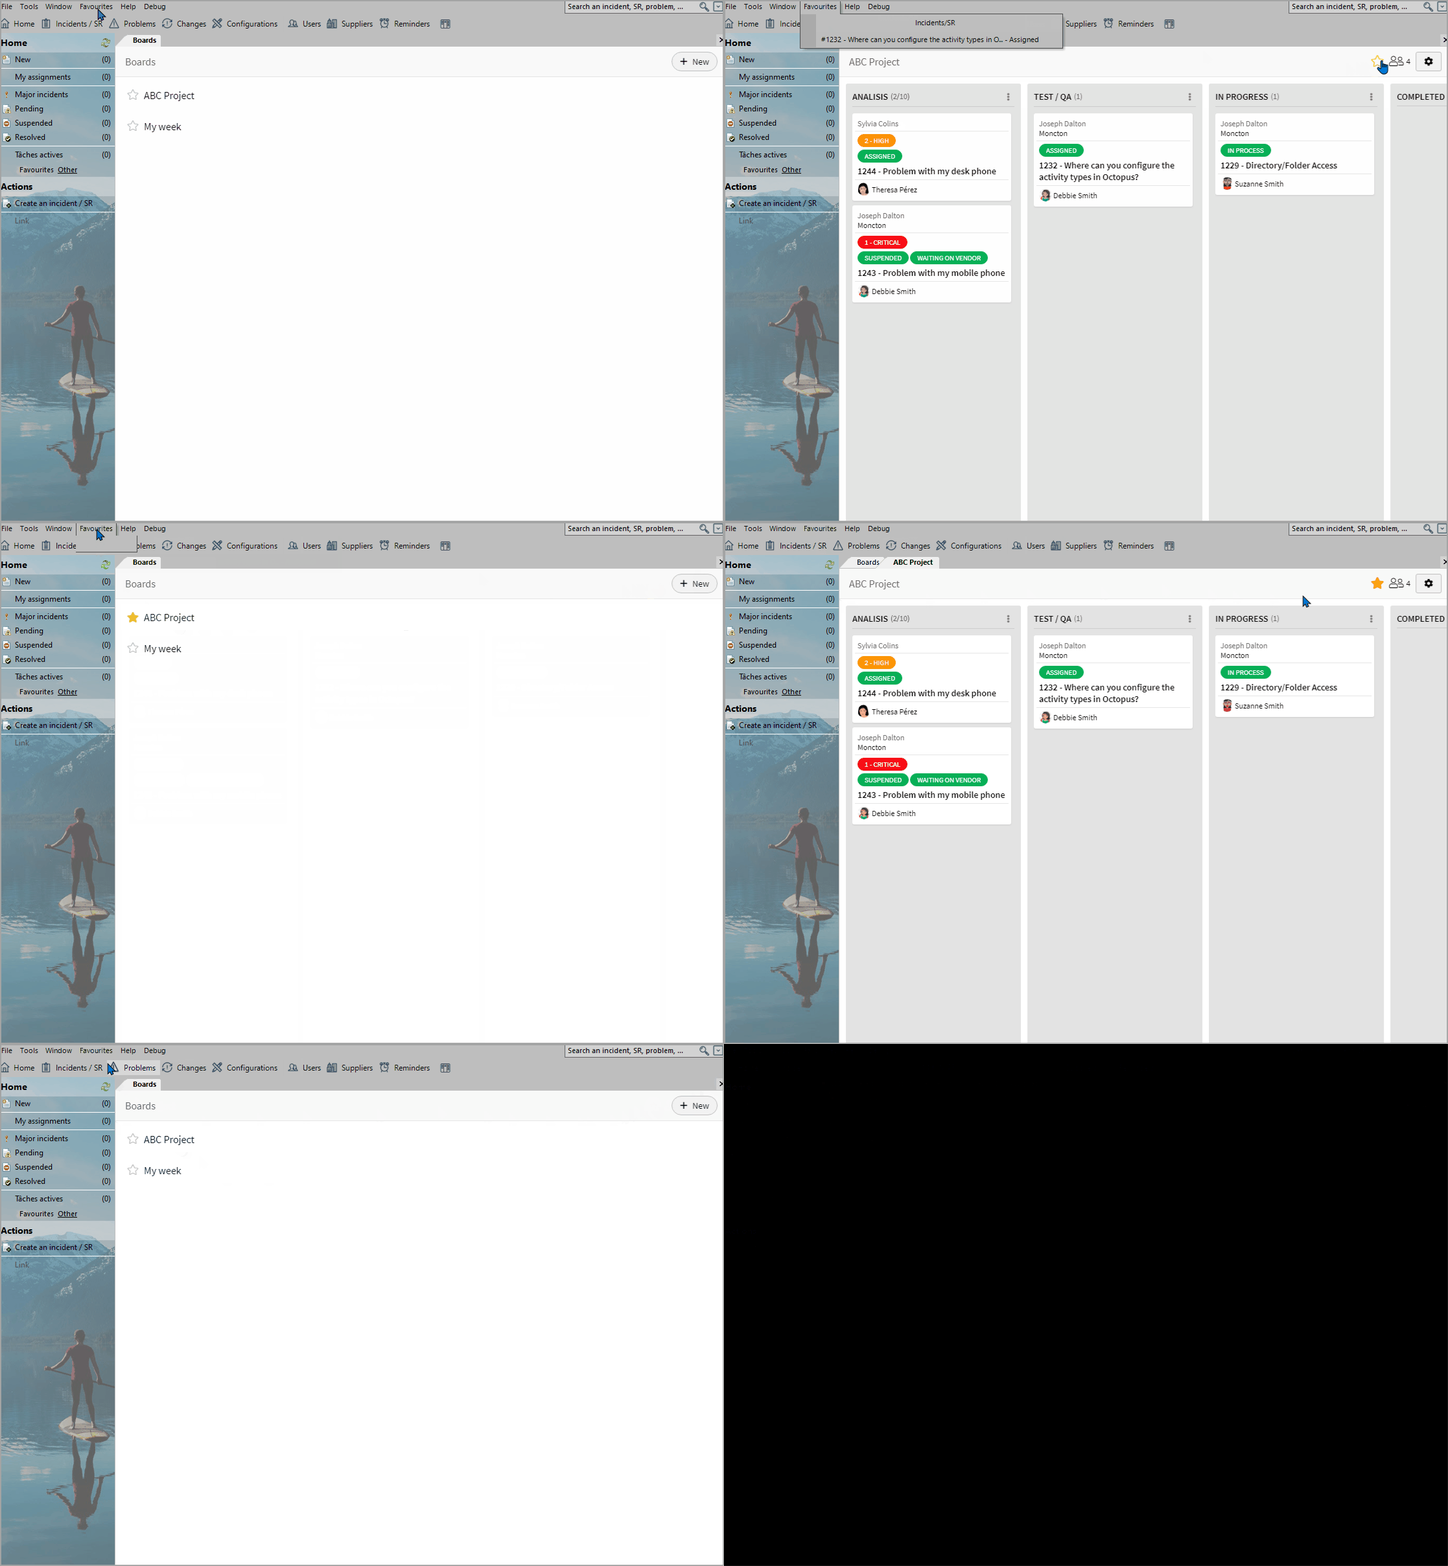
To add or remove a board from favourites, simply use the star button.

Open the Board in a New indow
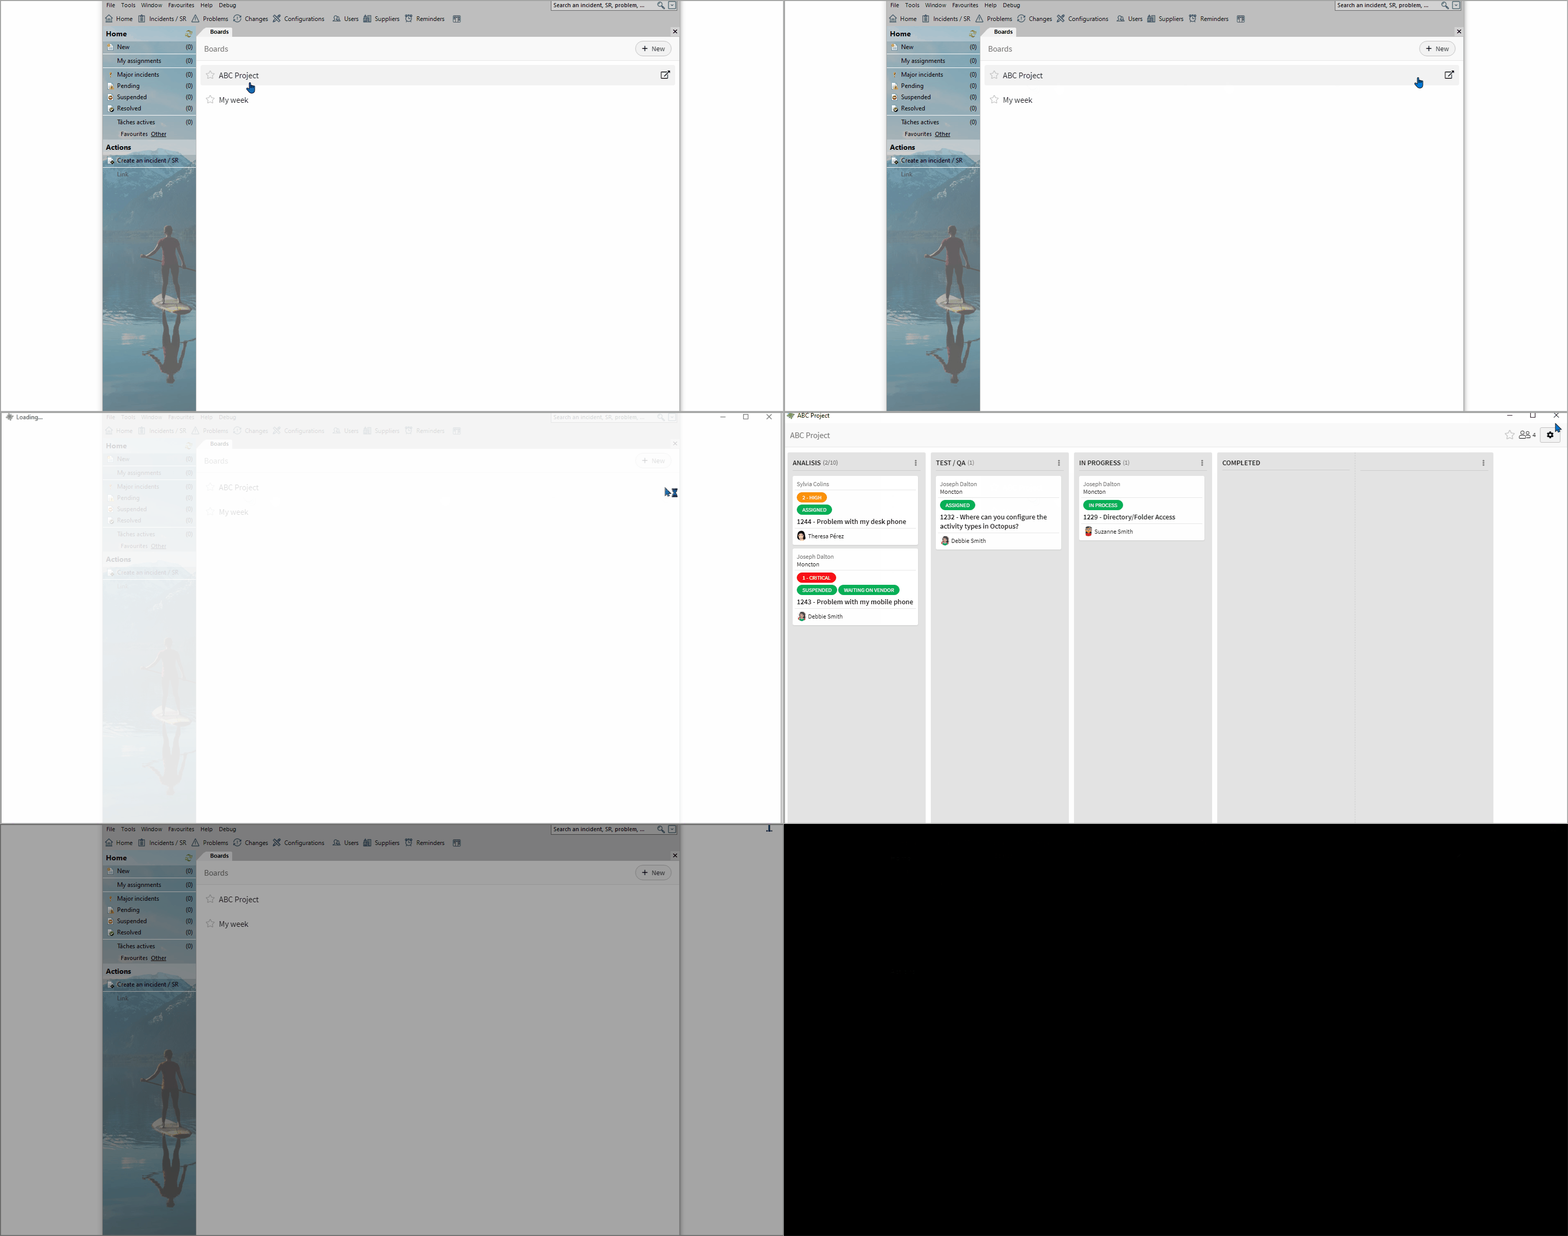
Boards can be opened in a separate window.
To open a board in a new window, click the  button from the list of boards.
Change History
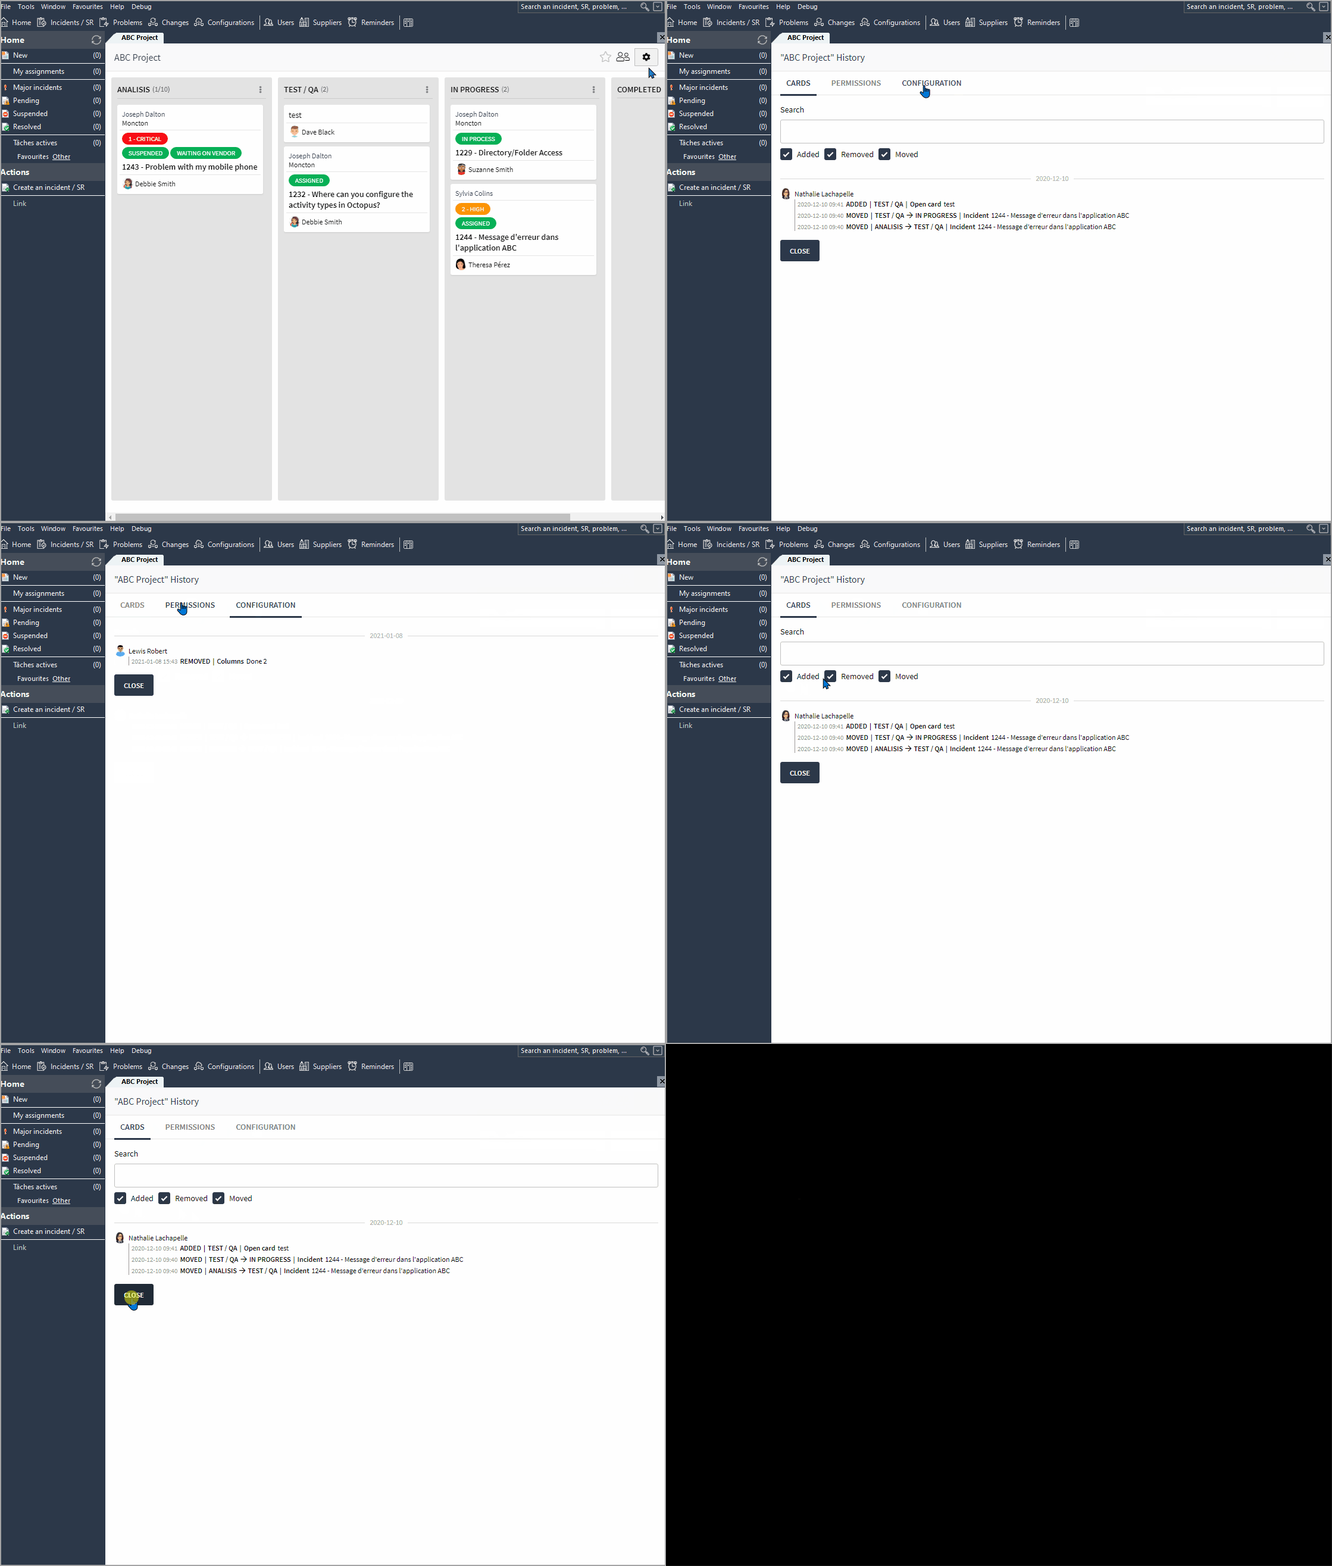
Changes made to the board are kept in the history.
The types of changes in the history are:
- Added
- Removed
- Moved
The history contains three types:
- Cards
- Permissions
- Configuration
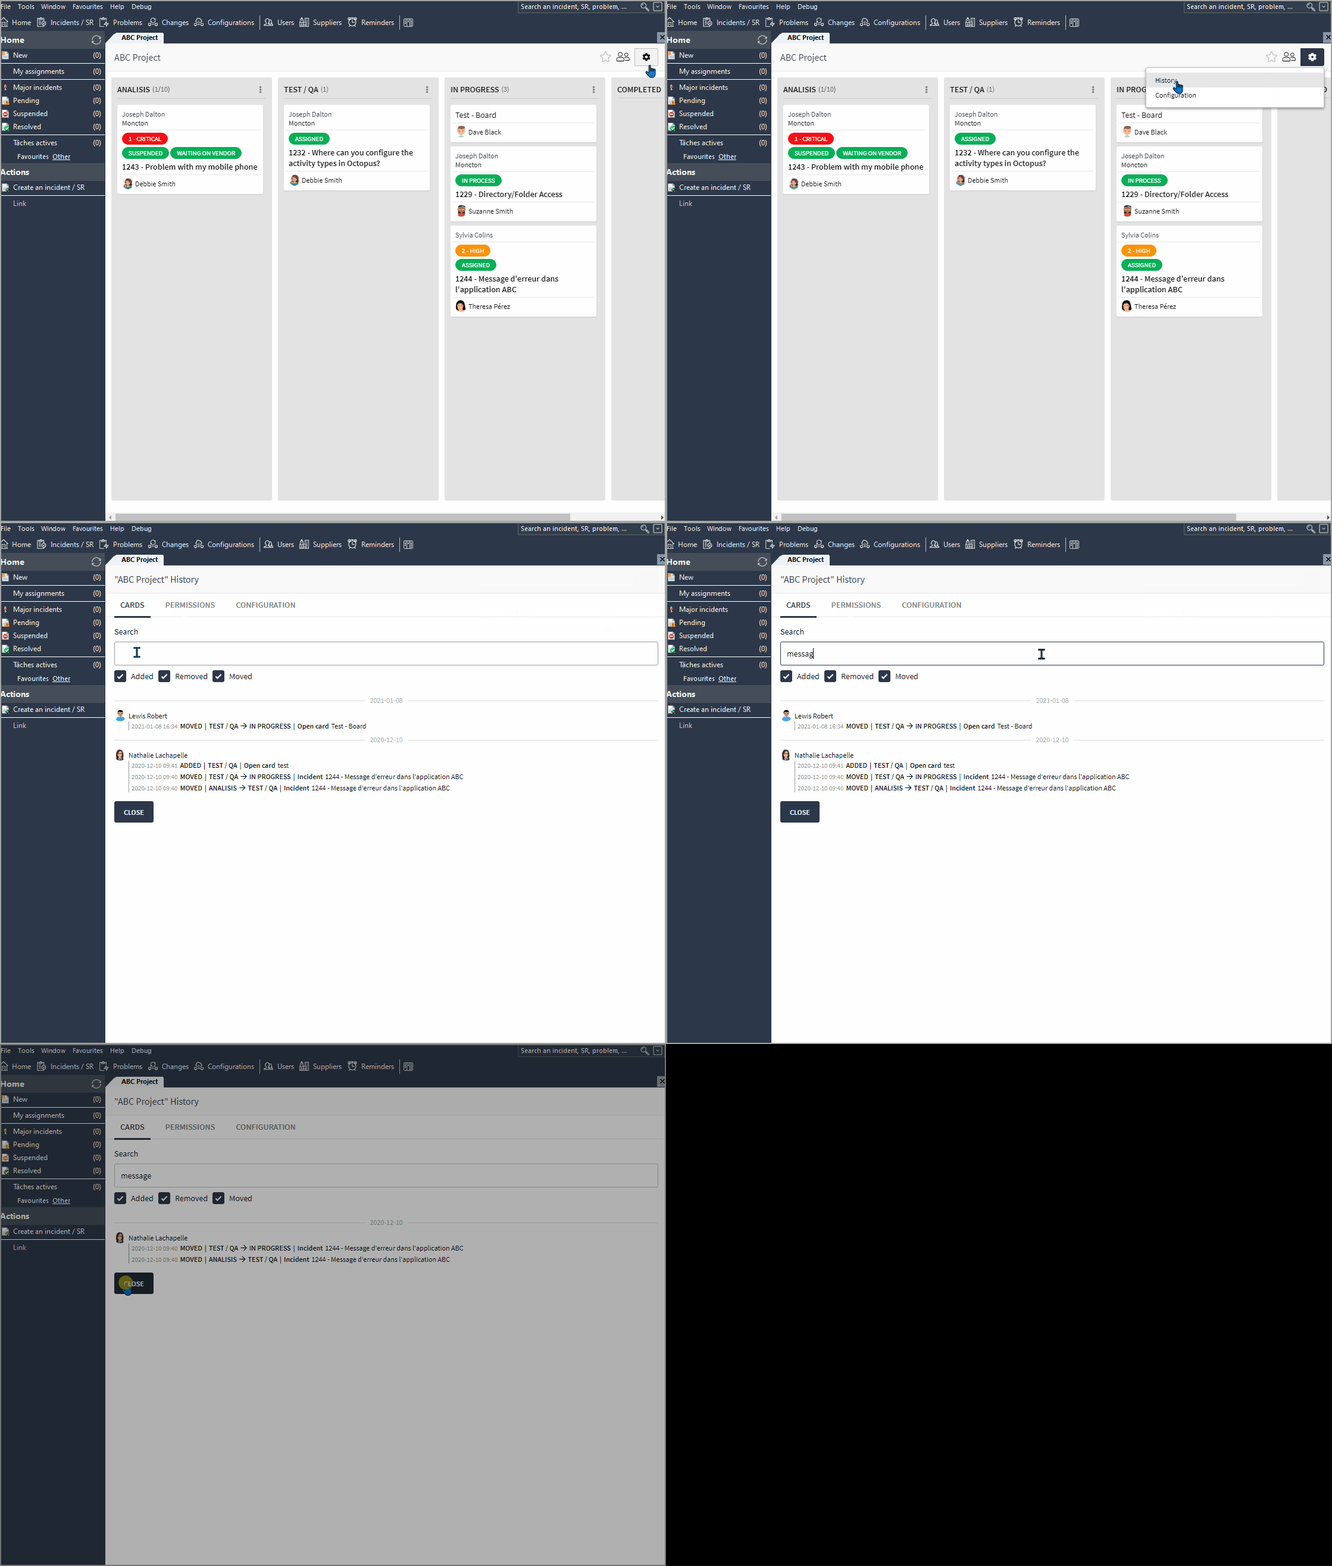
To see the board history, click on the  button, then select the History option.
The history types are accessible and by default the three types of changes are selected.
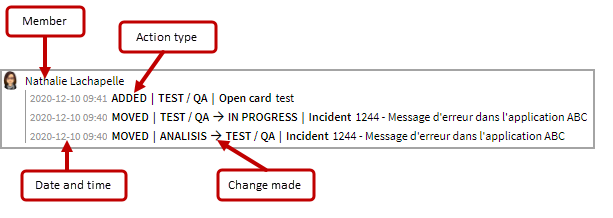
The information displayed in the history always has the same look:
- Member who made the change
- Date and time of the change
- Action type
- Change made
Search the History
Searching is only available for the Cards type.
The search is based on two fields of the card:
- Request number
- Card subject
Thank you, your message has been sent.
