Table of contents
Related Articles
- Conversion to custom fields - starting with 4.2.270
- Custom Field Library - Explainer Video
- Create customized forms in Octopus
- Web Forms - Operation Over Time
Introduction
This article will explain the interaction between the custom fields, the forms and how the information captured in the forms can be used.
We will start with an overview of the library that contains the custom fields. Then we will look at the important concepts in detail and some examples.
These are the advantages to the use of the custom fields:
- Increases the uniformity of the names used for the fields in forms.
- Easily reuse a field in multiple forms.
- Allows to use the data collected with forms in lists and searches.
- This will facilitate reporting on some data.
- Allows to update the forms once saved in Octopus.
Impact of Using Forms in Octopus
It is possible and even recommended to use forms to create requests in Octopus. Whether by users on the Web Portal or by Octopus users in the application. This gives homogeneity to the data in the requests.
Form fields can be added to lists as columns or used as search criteria.
In addition, this mode has an effect on the update of the requests in Octopus: when a form is used at creation, it will be required if a modification is necessary for one or more answers.
The next section explains in detail how the Detailed Description field behaves depending on how the request was created.
Initial Creation and Behaviour of the Detailed Description Field
The following 3 scenarios impact the creation and update of requests in Octopus:
- The request has a mandatory form.
- The request has a form that is not mandatory.
- The request has no form.
What you need to know:
The Detailed Description form does not maintain a link to the tasks once the request is created.
This means that modifications to the form after the creation will have no impact on tasks and conditions will not be taken into account. They will not create new tasks either.
In certain cases if the new responses change the workflow too much, it may be better to create a new request.
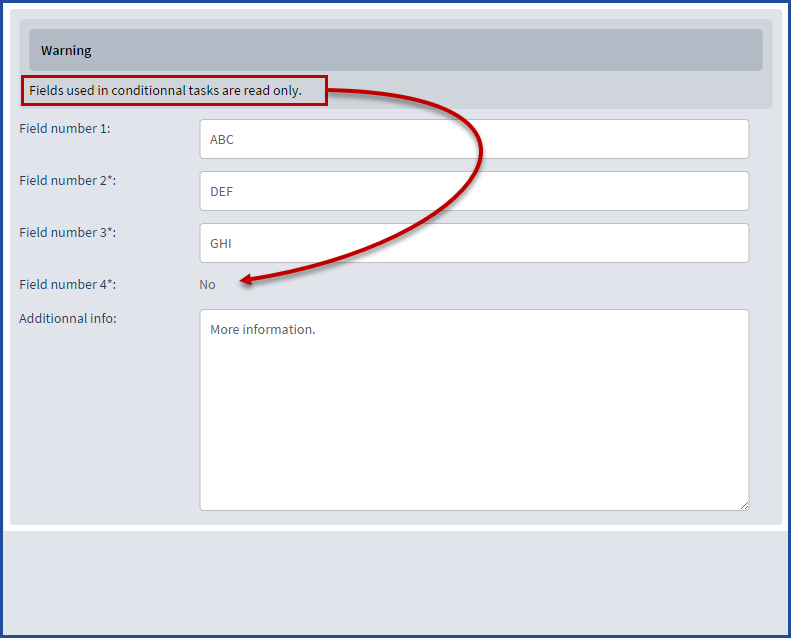
In addition, the fields in the form that were used for task conditions will remain in read-only. A warning will be visible at the top of the form that says Fields used in conditional tasks are read-only.
With a Mandatory Form
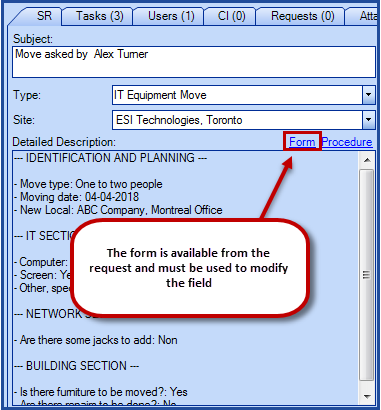
Since the form is mandatory, the link to the form needs to be used to create the request.
When creating the request

When updating the request
With a Form That is Not Mandatory
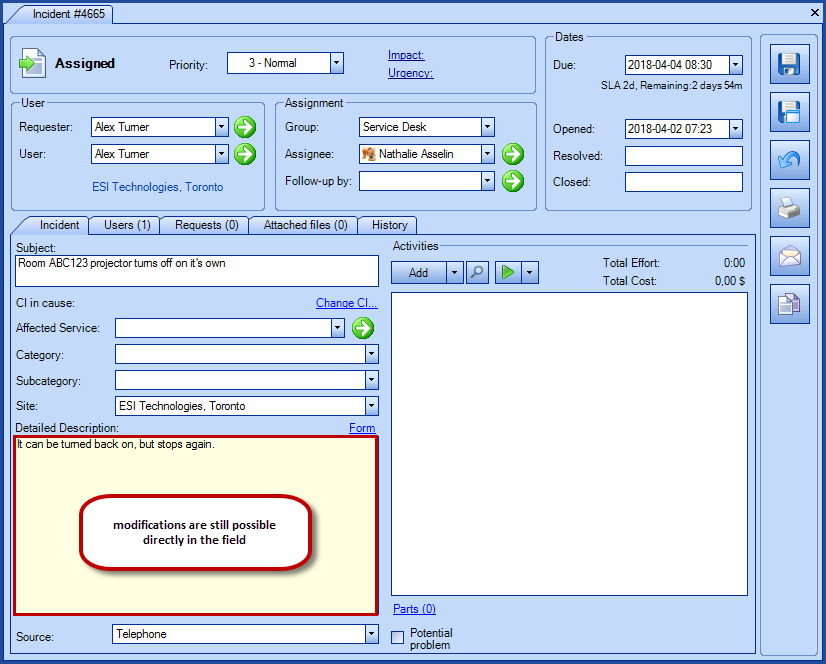
When a form is not mandatory, you can choose to use the form or not. If it's used the Detailed Descrption field will be in read-only as explained in the previous section.
Any request that was not created from a form can still be updated directly in the Detailed Description field.
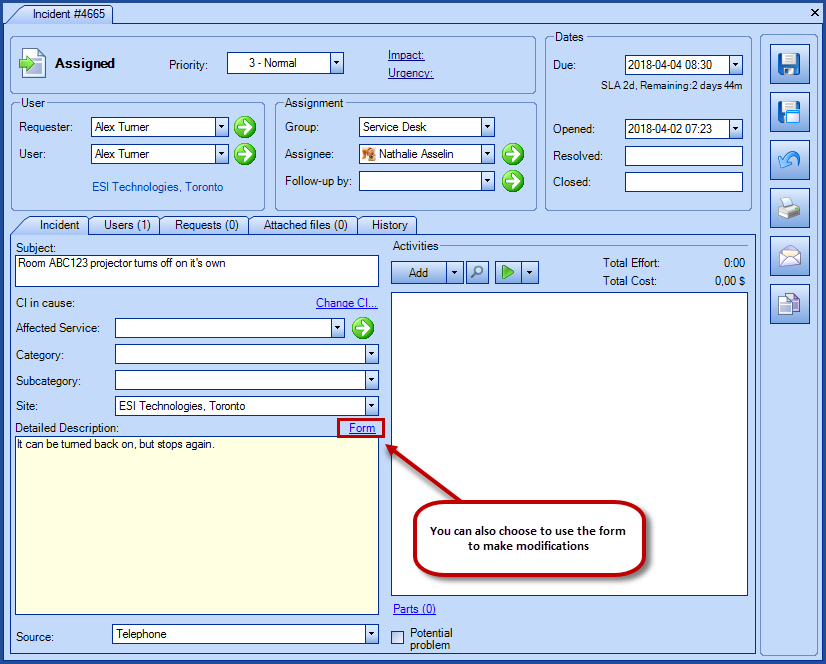
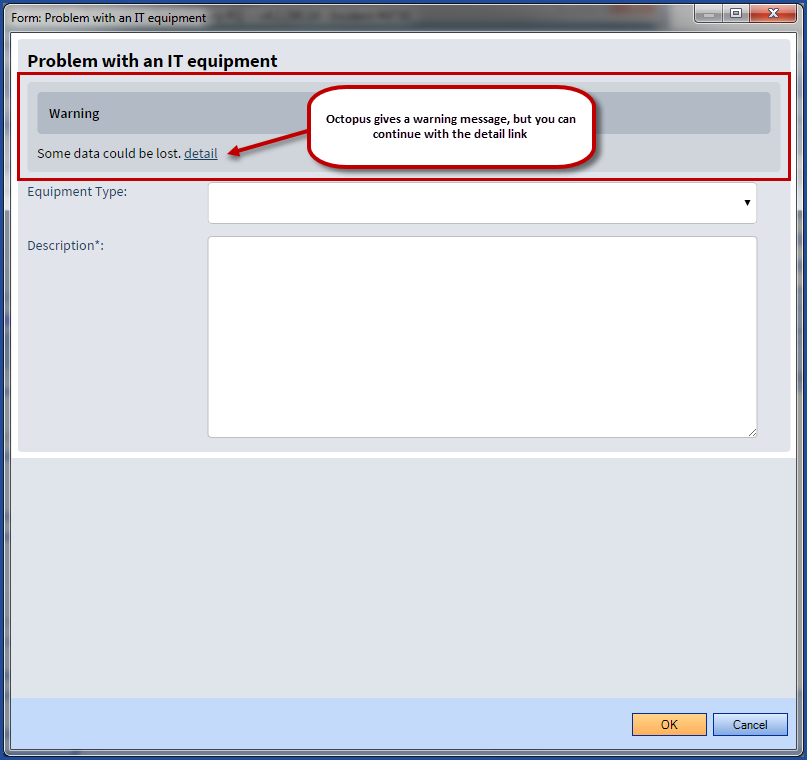
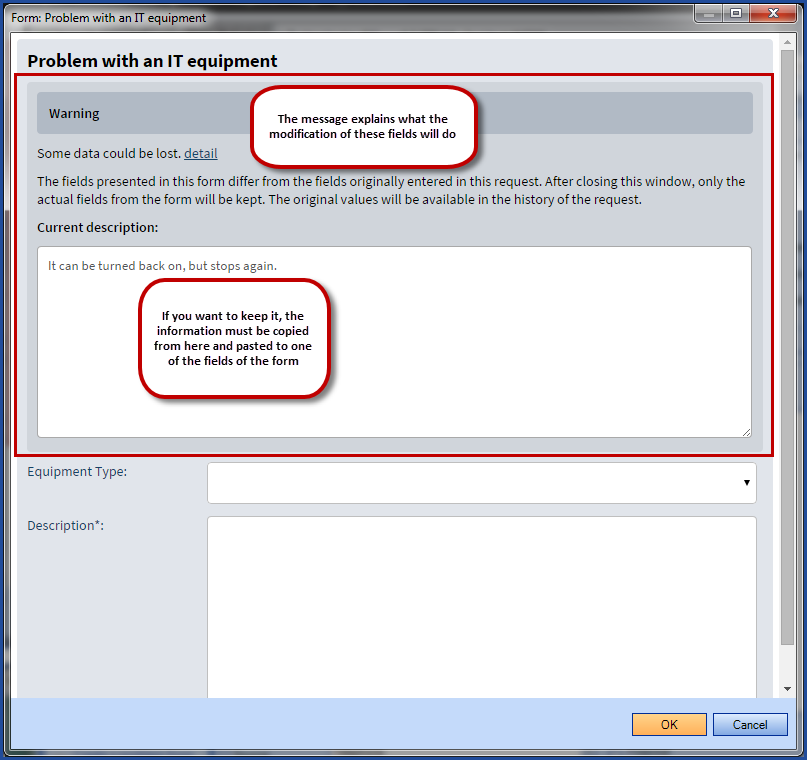
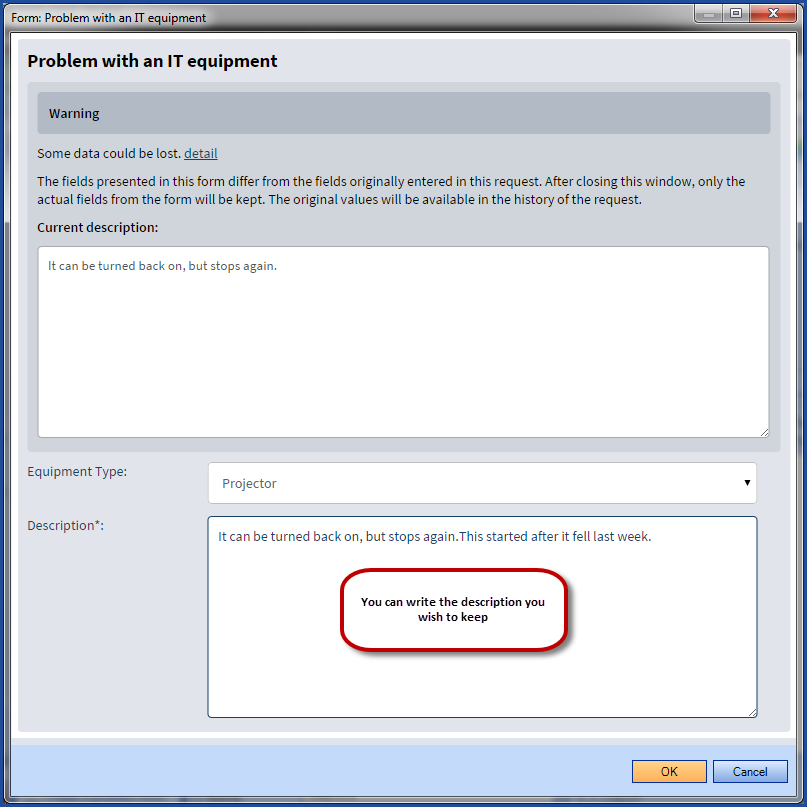
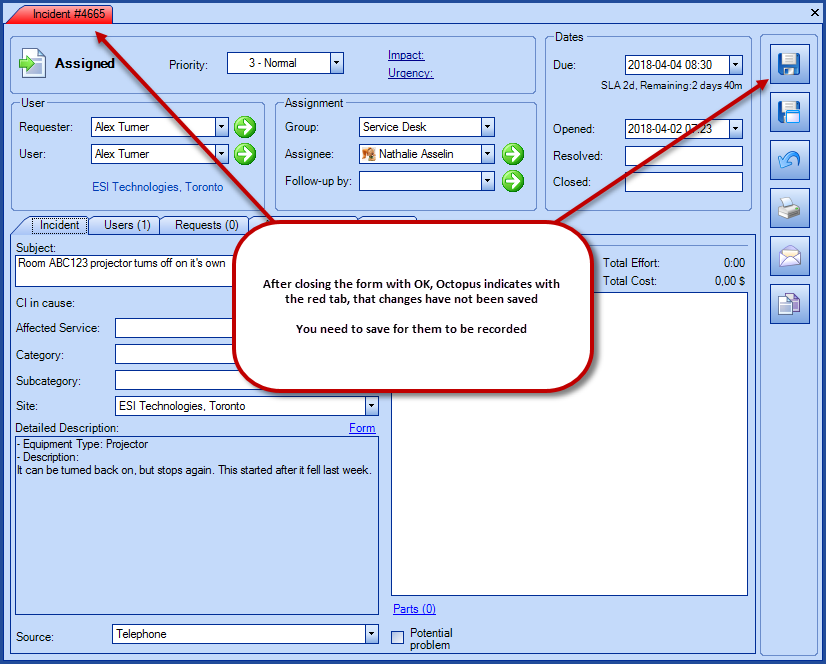
From the moment the form is used, Octopus will display a warning to indicate that the behaviour will change. If you choose to modify the request with the form, you will need to save the request to keep these changes. They will then be listed in the Detailed Description and kept in the request history.
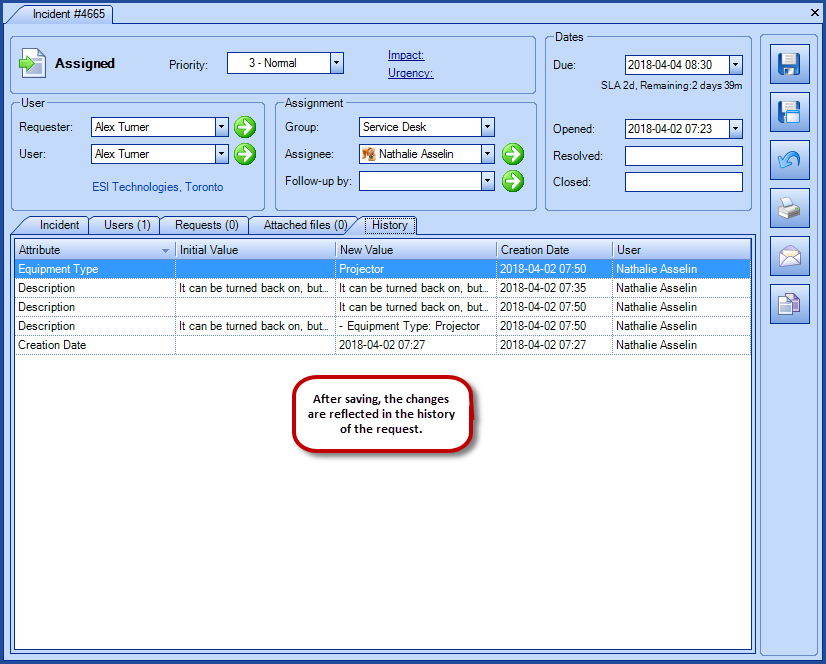
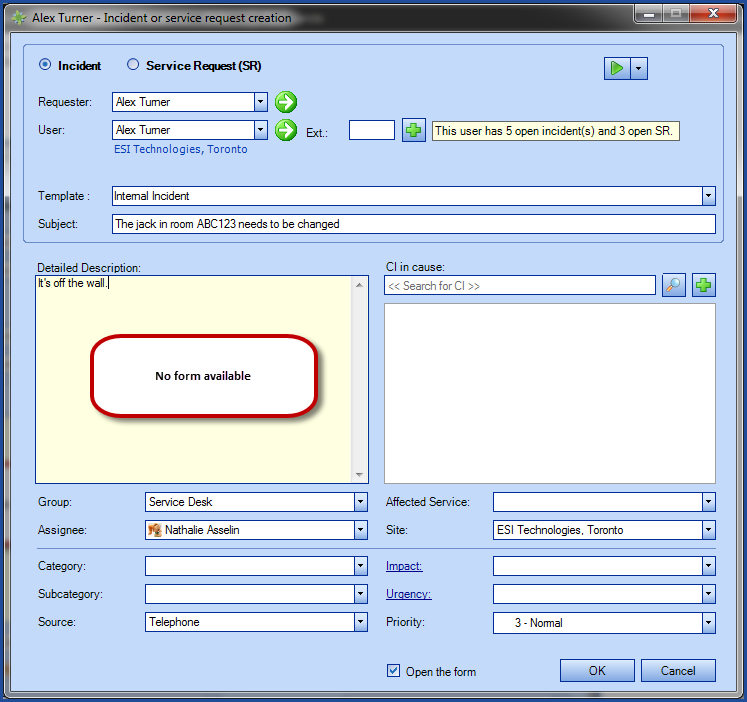
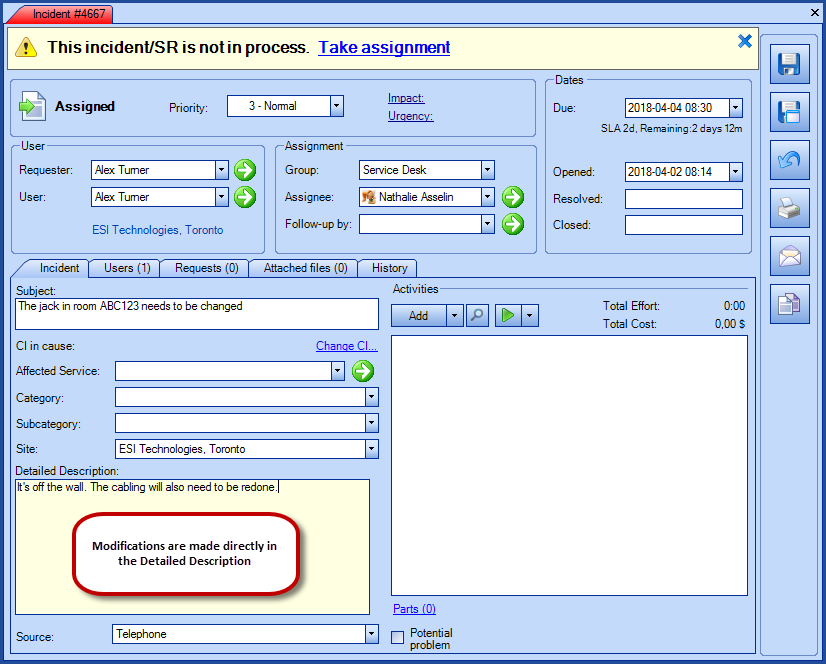
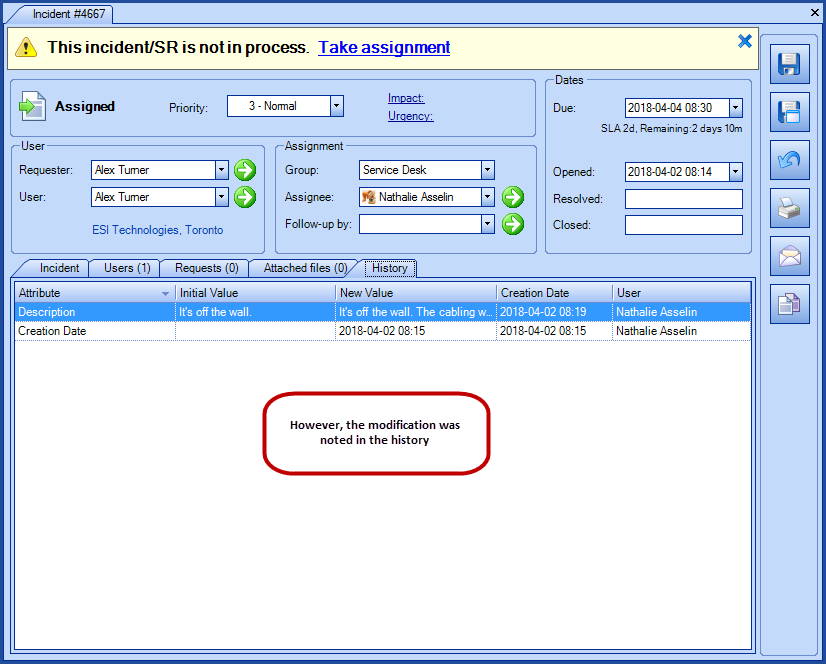
With No Form
You can create a request with no form and edit it directly in the Detailed Description field. Changes to the Detailed Description field will be entered in the history.
Where to Find the Original Description of a Request?
The description with which the request was created can be found in the following places:
- If the description has not been changed.
- In the Detailed Description field.
- If the description has been changed using a form.
- With the Initial Description link.
- In the Initial Description column.
- In the request history.
- If the request has been changed without using a form.
- In the Initial Description column.
- In the request history.


What Happens When the Request's Form is Changed?
Due to its constant modifications and to avoid confusion between the form offered to the user at the time a request is created and the form modified later, Octopus "locks" the form of a request to the one that was used to create the request.
See the Web Forms - Operation Over Time article to find out more.
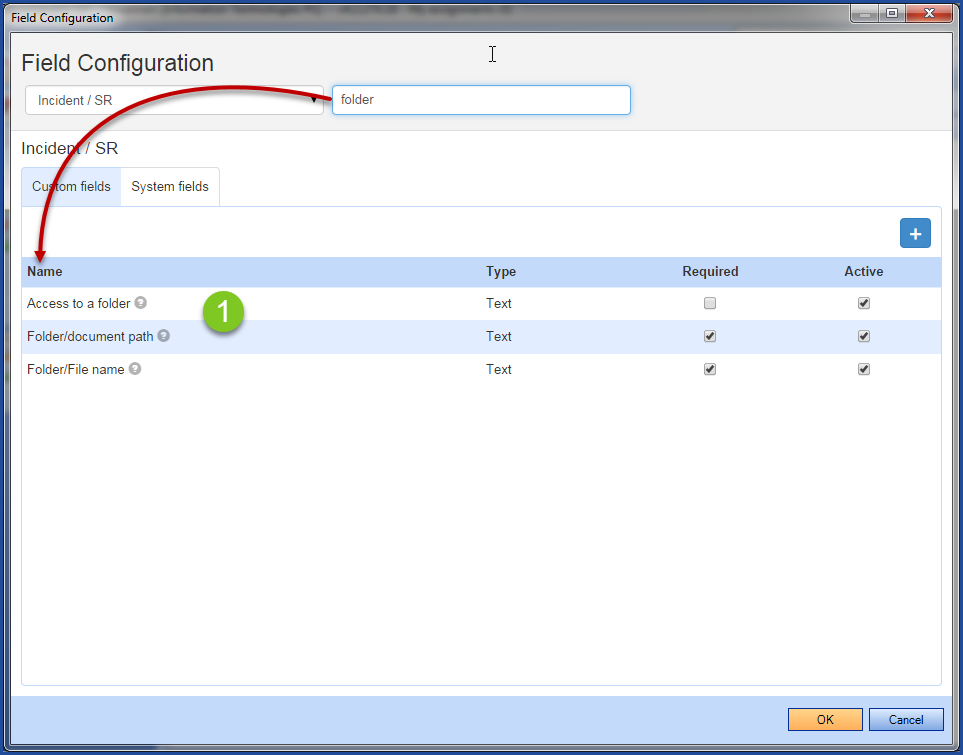
Overview of Field Configuration
The custom fields library is available from the Tools > Configure fields menu in the Custom fields tab.
What you need to know:
To access the custom fields library you must have this permission:
- Administer Octopus
The System fields tab is also available from the field configuration window, but should only be used by experienced administrators.
We suggest that you test carefully before making any modifications to the system fields to avoid impacting operations. Our Octopus consultating services team, can assist you if you need help.
The following can be done from the library:
- See the list of available fields.
- Add fields.
- Manage existing fields.
- Modify.
- Merge.
- Delete.
- See the field usage.
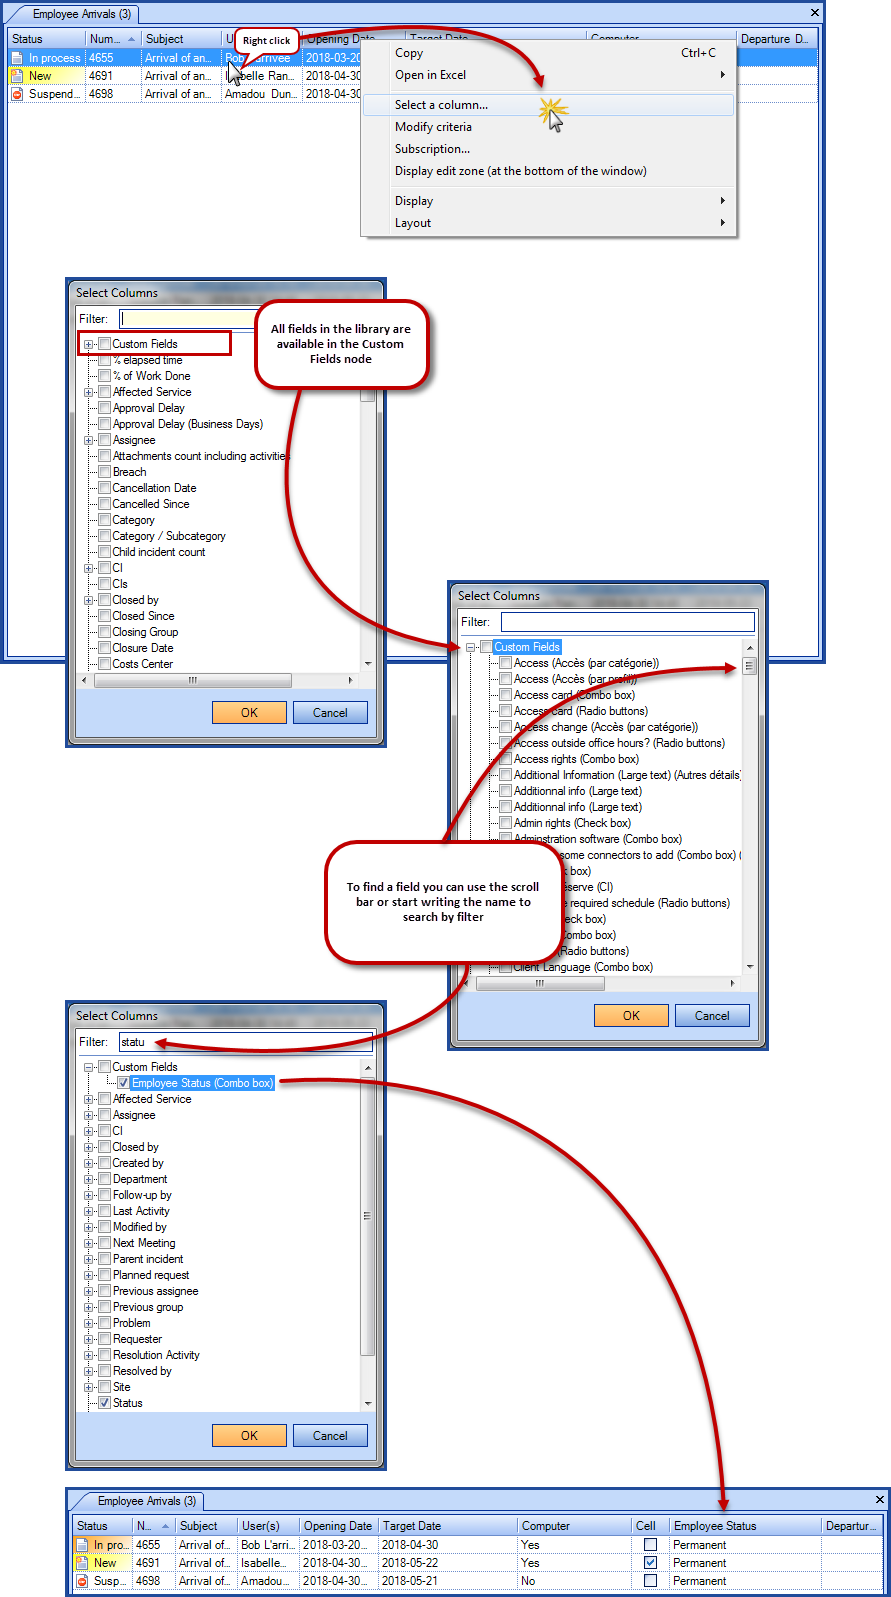
Overview of the Field Library
Click on the images to enlarge them and use the small  to enlarge them a second time.
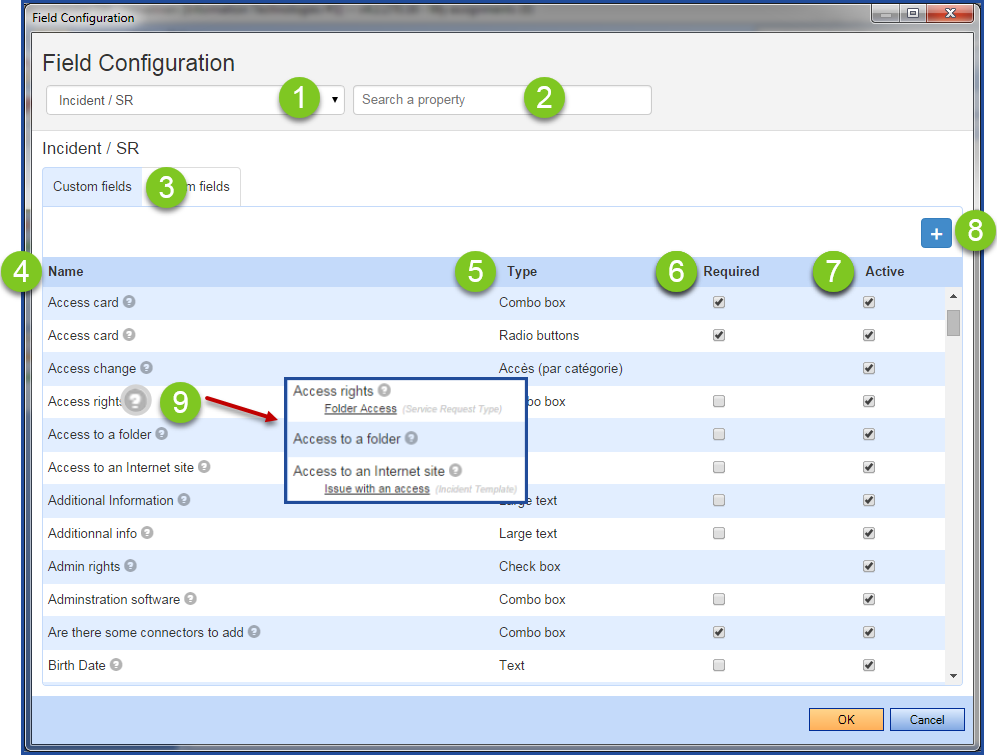
- Represents the module or element.
- Right now this concept exists only for the Incident / SR module.
- Filter based on the label or the name.
- Custom fields tab.
- Represents the Custom fields library.
- Name of the field.
- All the fields included in forms are in the library.
- Except the Header and Comment field types.
- It's possible to create fields in advance in the library before adding them to forms.
- All the fields included in forms are in the library.
- Field Type.
- Indicates the type of the field used in the forms (Text, Checkbox, Date, etc.).
- Indicates if the field is required.
- Indicate if the field is active.
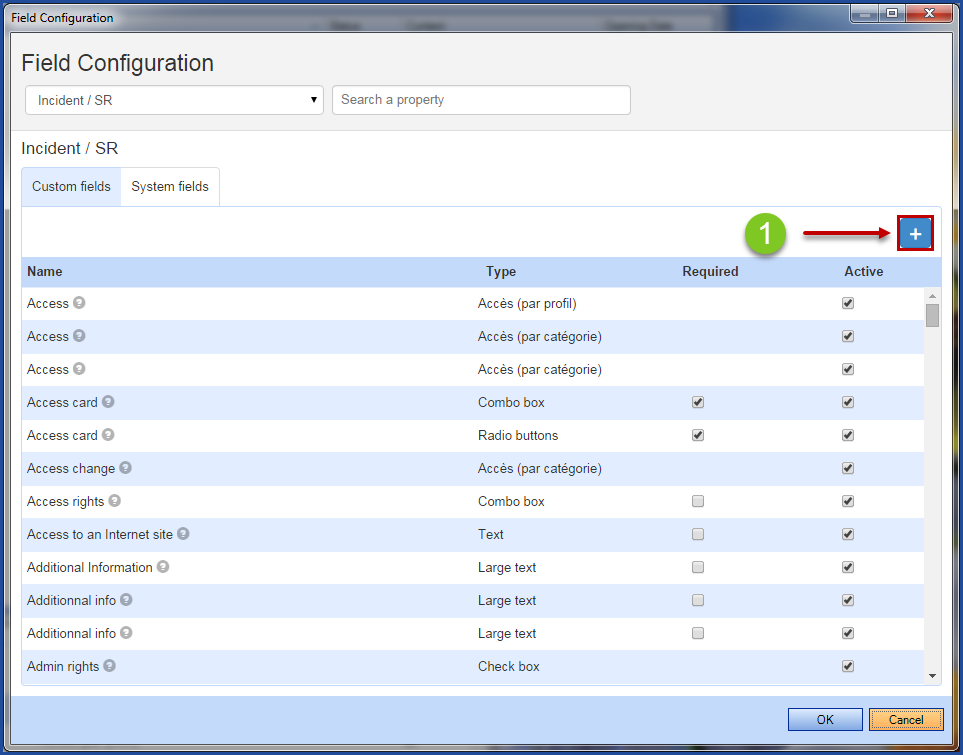
- Create new field button.
-
A new field can be created in the library or directly from a form.
-
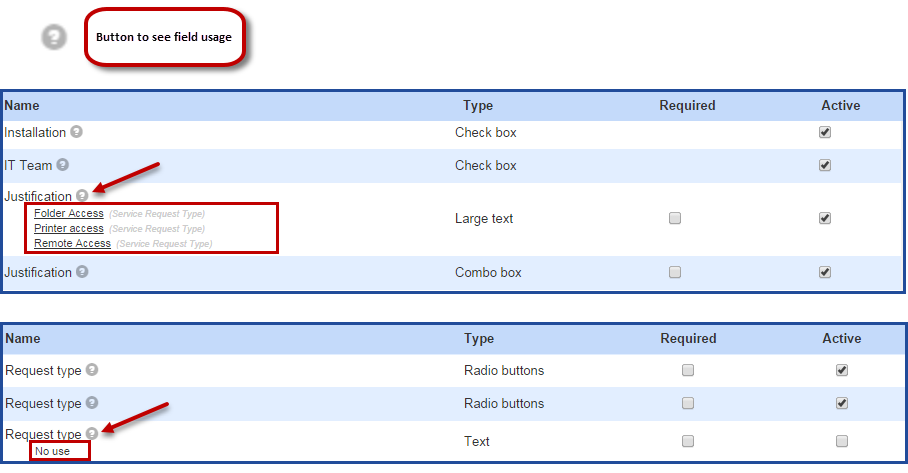
- Field usage button.
- Click the question mark to open the list of the forms where this field is used.
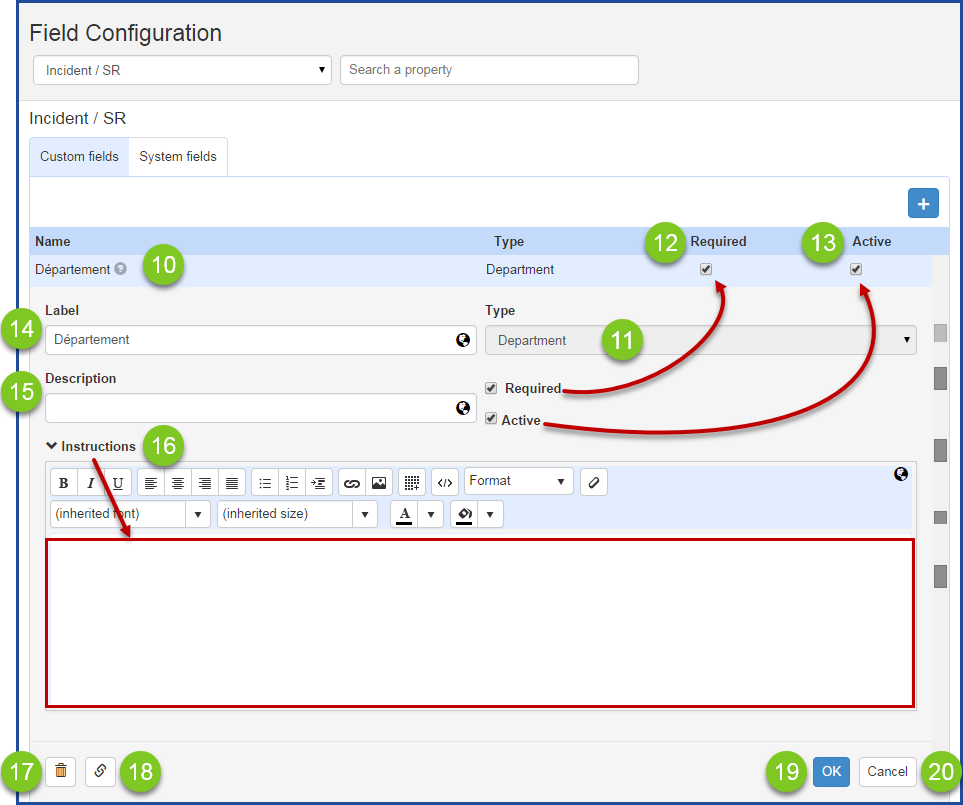
- Click the name or the line of the field to access its configuration.
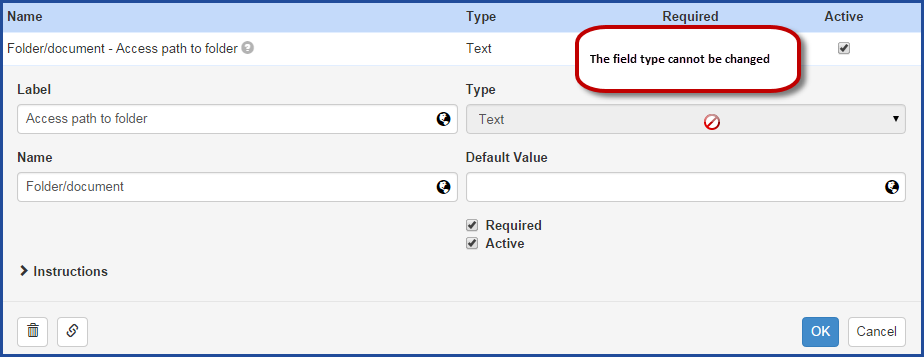
- Indicates the field type.
- Note that the type cannot be modified.

- If the type is wrong, a new field with the right type will need to be created.
- Note that the type cannot be modified.
- Required - same as the column.
-
Active - same as the column.
-
Note that a field cannot be deactivated if it is used in one or more forms.

-
Only an unused field can be deactivated, even if the form is not active.
-
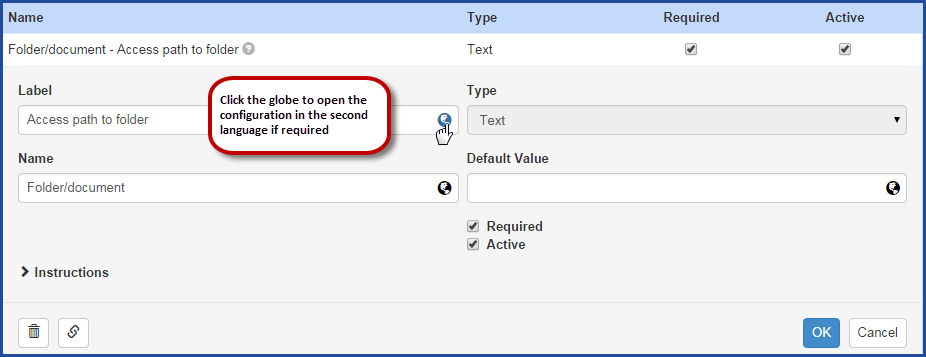
- The label of the fields represents the name of the field in a form.
- The label is also the name of the column in Octopus when the name field is empty.
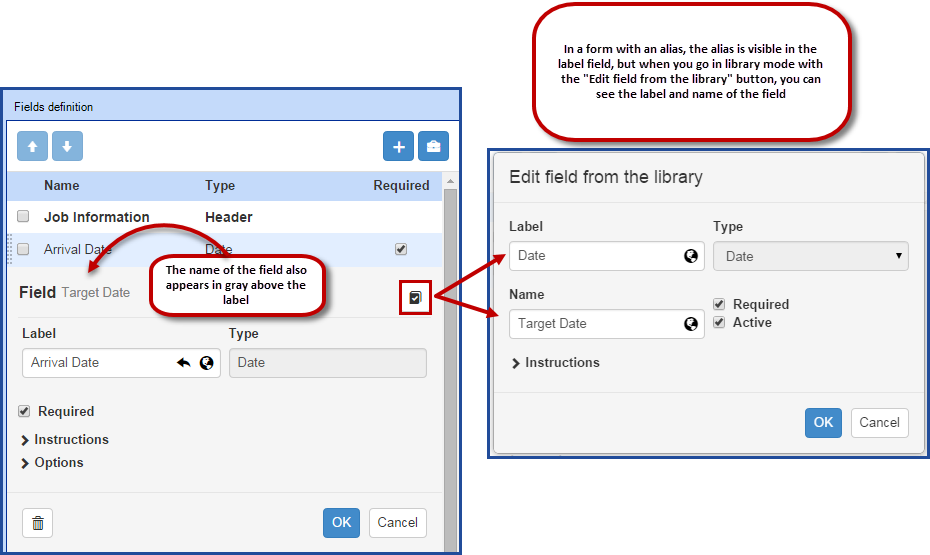
- It is possible to create an alias for a specific form.
- This notion will be explained further.
- The name of the field will be used as the column name in Octopus.
- It is not required if the label is enough.
- When present, will be used as the name of the field in a column.
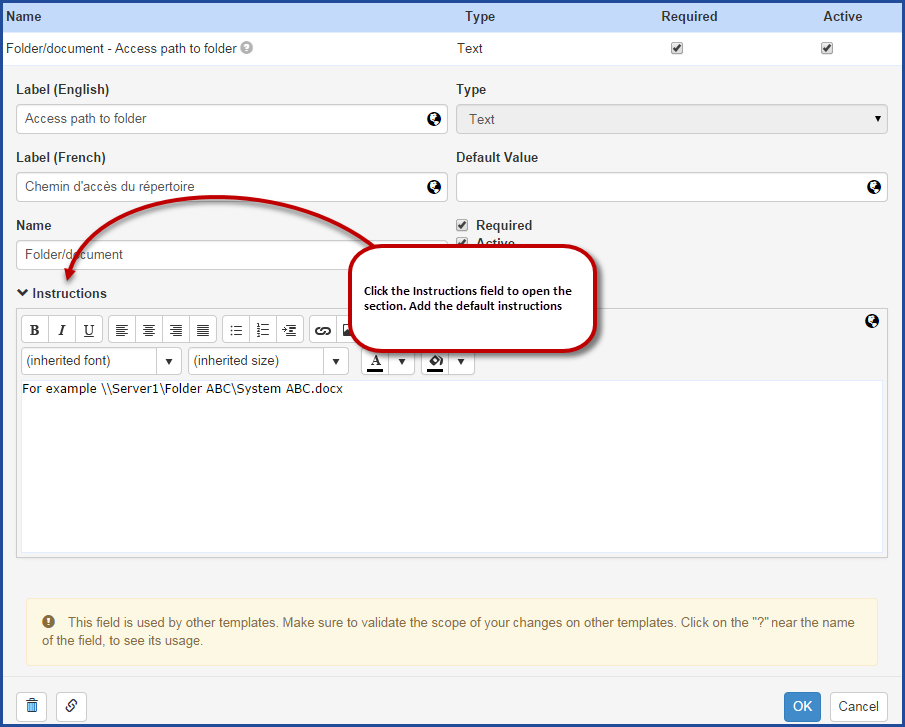
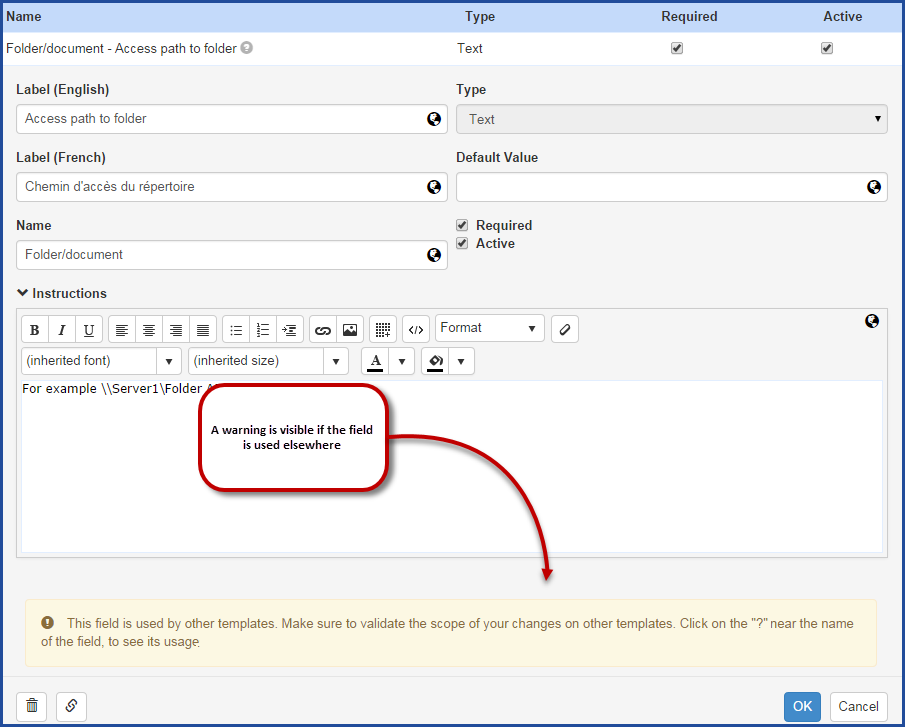
- The instruction allows to add information above the field in a form.
- This instruction will be visible everywhere the field is used.
- Delete button to remove the field from the library.
- Note that a field cannot be deleted if it is used in one or more forms.
- Note that a field cannot be deleted if it is used in one or more forms.
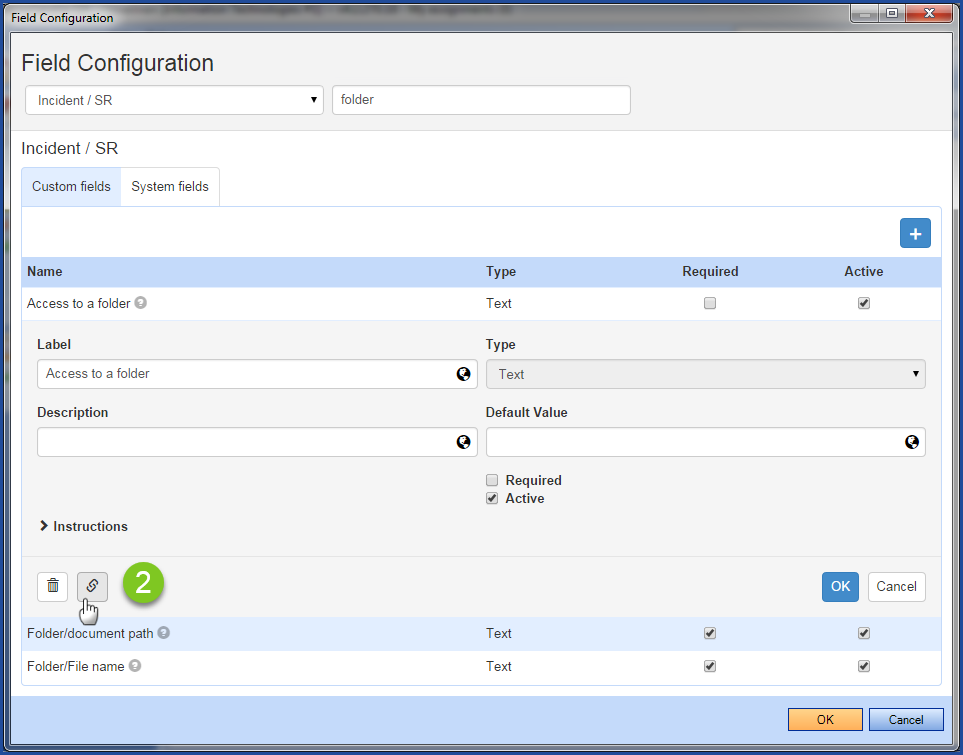
- Merge button.
- Be careful to always start the merge from the field that you want to get rid of.
- OK button
- To finish and save the modifications.
- Cancel button.
- To finish without saving the modifications.
- If some modifications had been made, Octopus will ask for a confirmation. The data has changed. Do you to save these changes?
Possible Manipulations in the Library
Many actions can be done directly from the library. Even before doing the configuration of new forms, we could for example, add the fields that will be used in the form from the library. On a daily basis, the library makes it possible to quickly manage the fields.
Note that the various field modifications or creations made in the Field Configuration window are saved in the library when closing the window.
If modifications have been done, Octopus will restart when you do OK or if you confirm you want to save changes. If the window is closed with the X or the Cancel button without saving, none of the modifications will be saved.
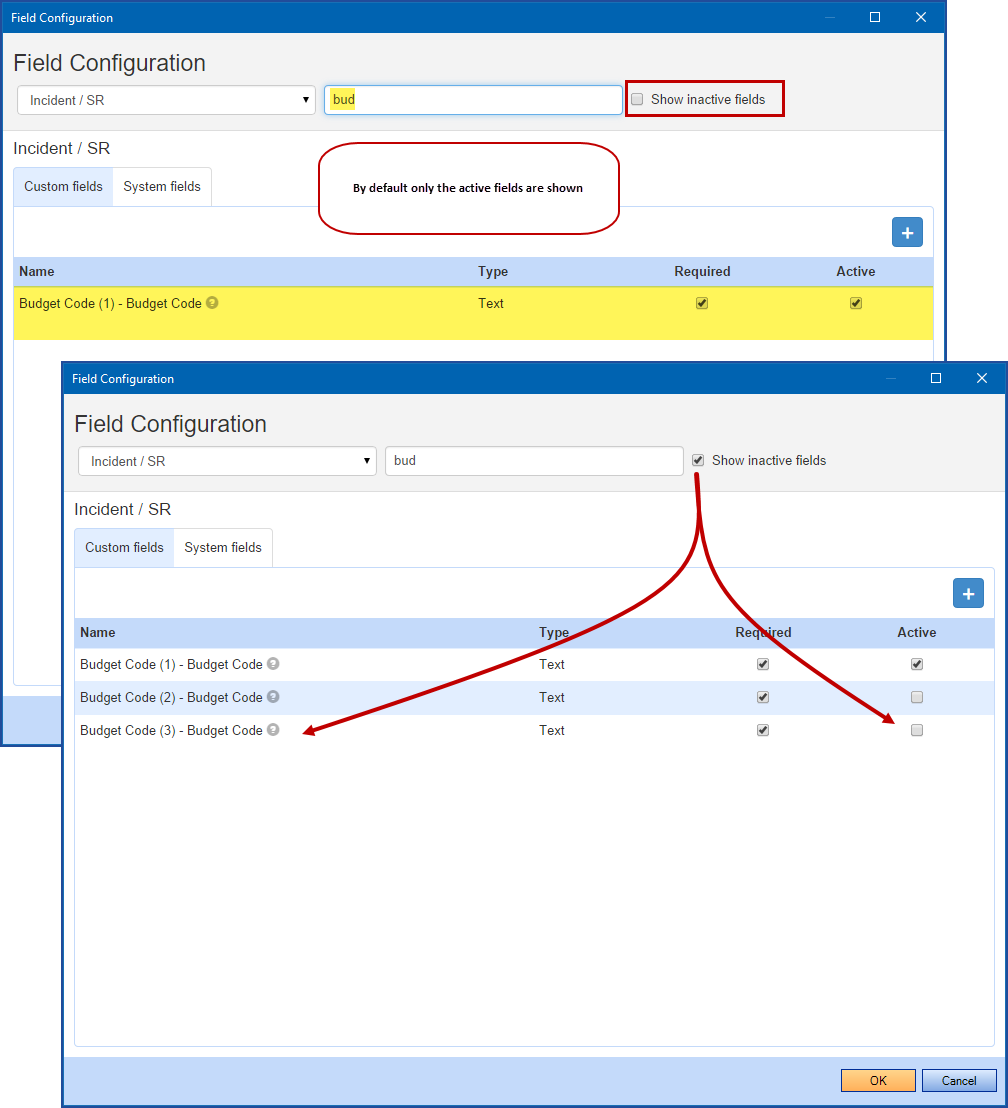
See the List and Search for a Field
By default, the visible fields in the library are the active fields to prevent the library from getting polluted by fields that are not used anymore.
And the search is done only on active fields unless the Show inactive fields option to the right of the search field is checked.
See the Usage of a Field
A field can be added to one or more different forms. The small question mark is used to see where the field is used.
A field that has not been added to any form will have the No use note. It could then be deactivated or deleted as needed.
Library Mode Versus Form Mode - An Important Distinction
Before getting into the configuration of a field, it is important to understand the difference between the library and the form modes. In the first case, we modify the default data of the field everywhere it is used. In the second case, we only modify the field in one form.
Therefore, it is important to distinguish between the two before creating and modifying fields.
Why two modes?
Most of the time when we use a field more than once, we want it to look and behave the same way. This is the library mode.
But on occasion, in one form, the field's nature is the same, but one or more characteristics is different and some modifications are required to use the field. This is the form mode.
In other words, the form mode allows you to use a field, but to modify its default values, one form at a time.
|
Library mode These fields will be the default values |
Form mode Values that can be modified in the form |
|---|---|
| The label | In the label field |
| The type | Non-editable in form mode |
| The name | |
| If the field is active | Only active fields are visible in form mode |
| Default value of the field | In the default value |
| Keep the change history | Non-editable in form mode |
| If the field is required | In the required field |
| The instructions | In the instructions |
| Not available in library mode | The display conditions |
| The destination | |
| Header type field | |
| Comment type field |
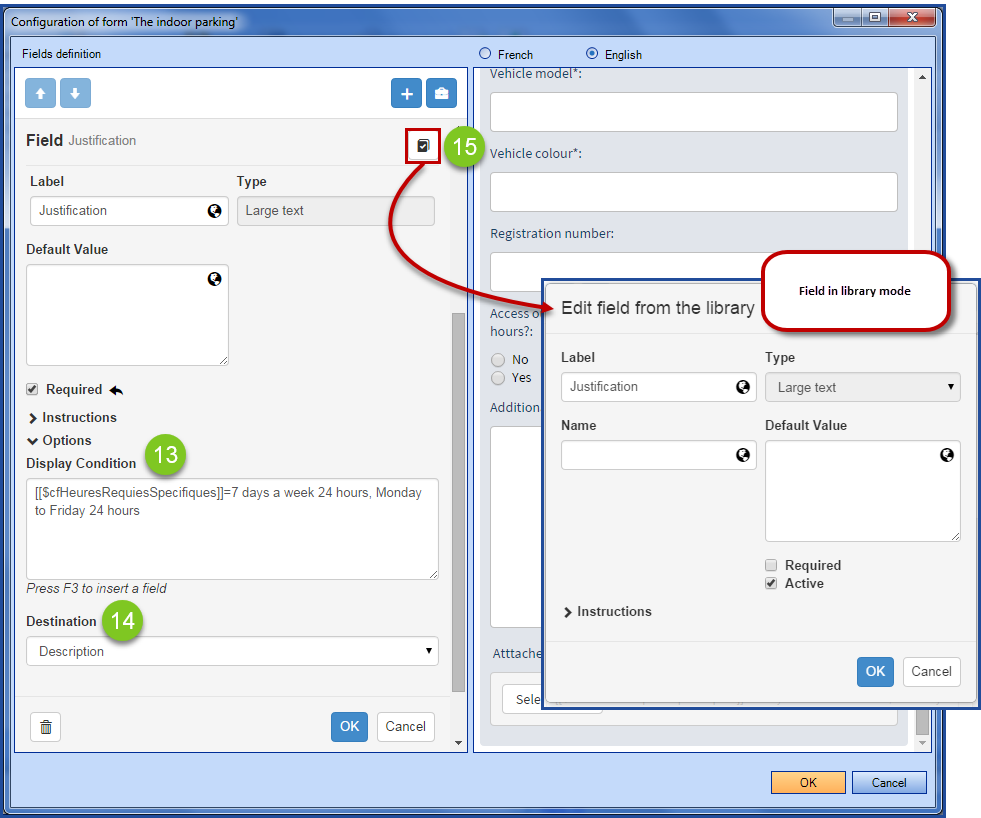
Understanding the following buttons will be very useful when configuring forms.

Edit field from the library button.
Allows you to modify the values of the field in library mode from a form.
Warning: changes made in this mode affect all forms that use this field with the default values of the library.

About the selected fields button.
Shows, in read only, the values of the field in library mode when selecting the field.
If more than one field is chosen, they will all be shown at the same time.
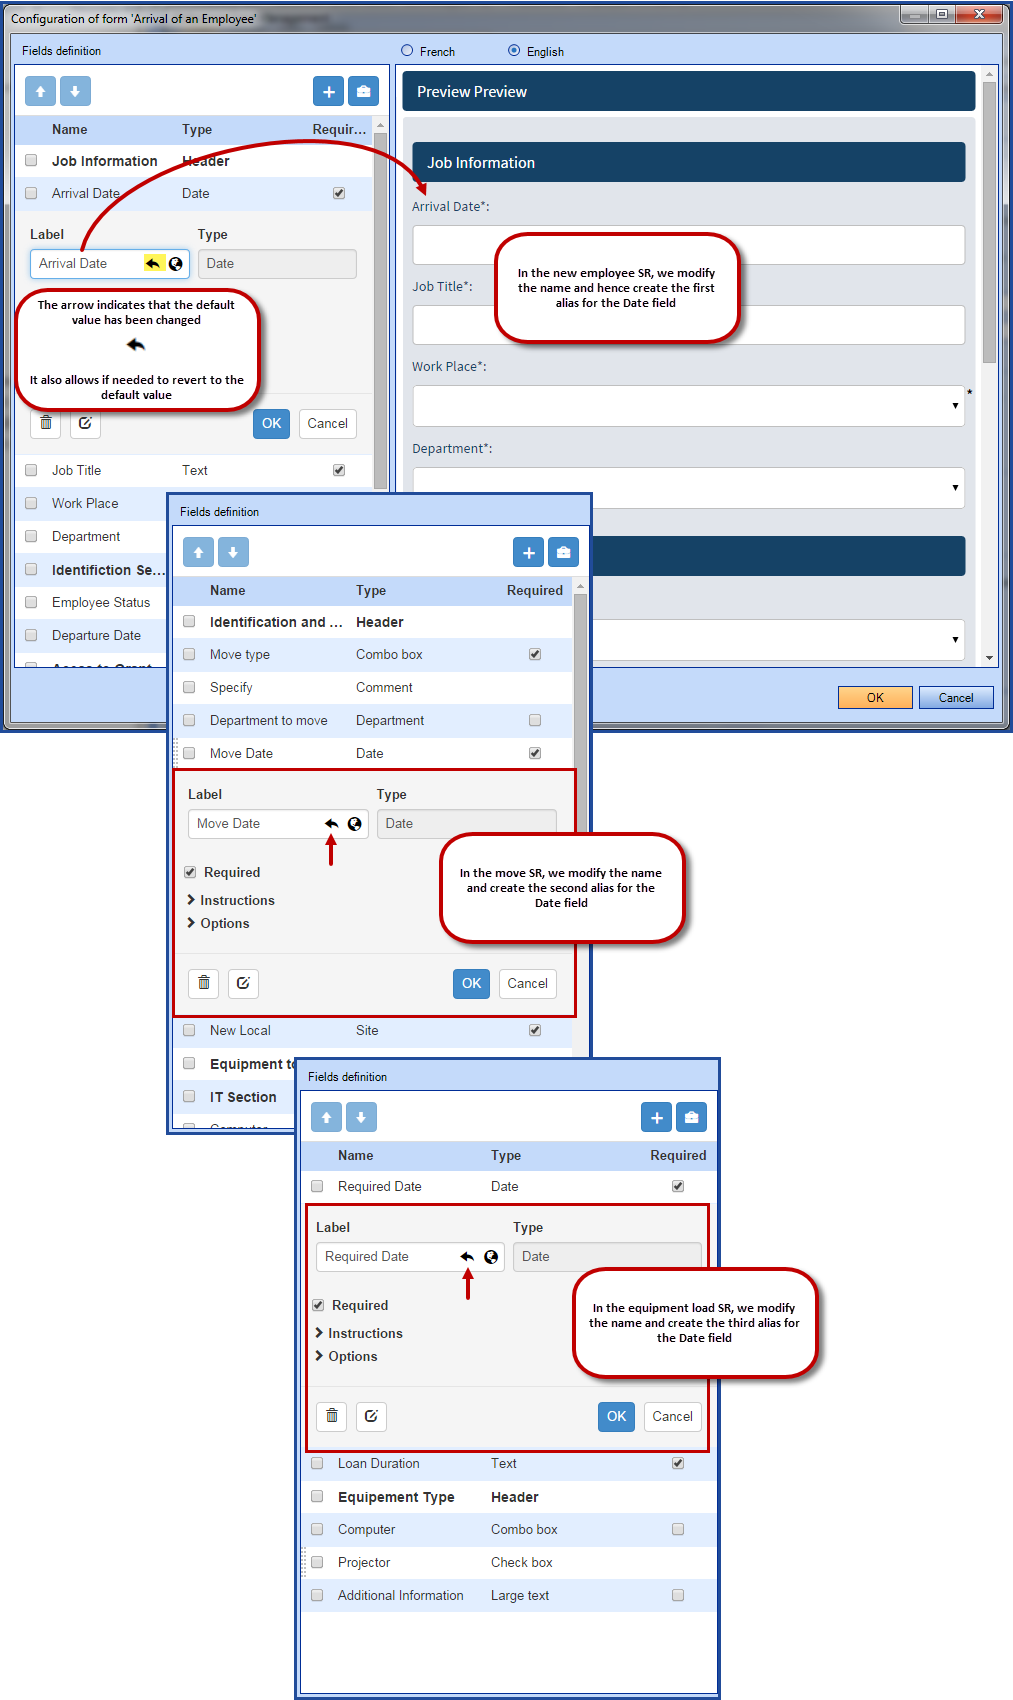
 The arrow indicates that the value is not the default value of the field in the library.
The field returns to the default value of the library, when clicked.
Access the Configuration of a Field
You can click on the name or on the line of a field to open it in configuration mode.
The field configuration will be the default one when this field is added to a form. However, some elements can be modified directly in a form to change the behaviour in this form only. For example, if the field is required, the default value, the instructions, etc.
The type of a field is chosen when it is created and cannot be modified later. If the type no longer meets the need, a new field must be created with the correct type to replace the old one.
You can be determined if the field will be required by default when used in forms. You can also add an instruction that will be visible above the field.
During a modification, a warning will be visible at the bottom of the field.
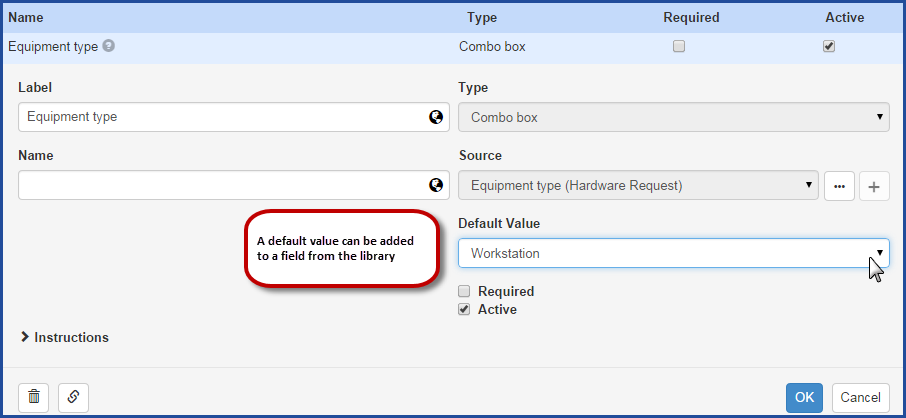
A default value can be chosen. This value can be modified directly in a form if it does not correspond in a specific case.
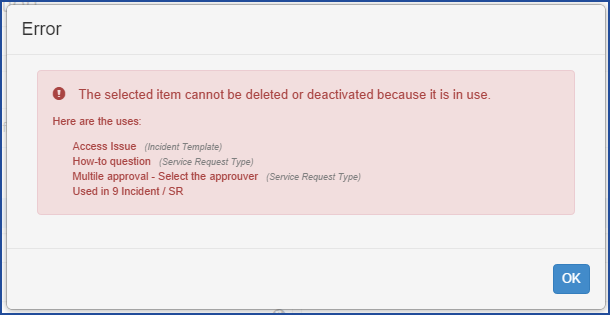
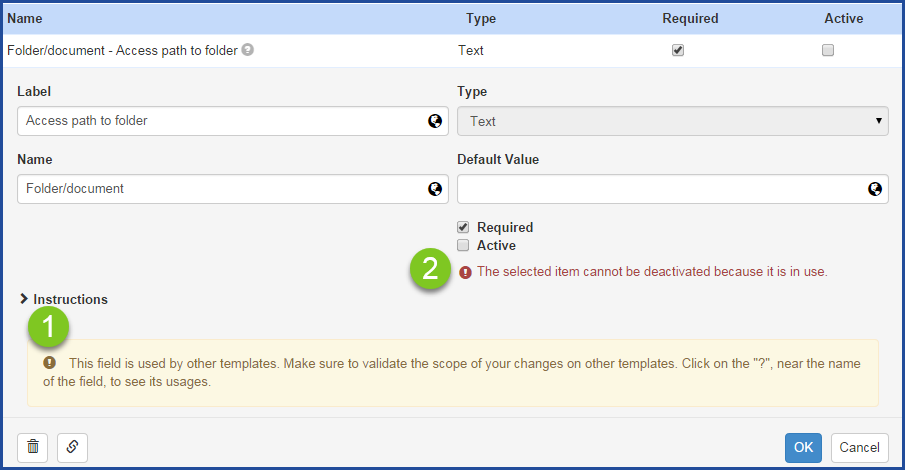
Only a field that is not used can be deactivated. When a change is not allowed, an explanatory message will be displayed.
- The first to say the field is used.
- The second if you try to save the deactivation of the field.
The F3 key does not work in the library, it is only available from the configuration of a field in a form. However, you can copy and pasta a variable directly in the field.
This little trick can be used to add an Octopus variable, for example the phone number of the requester.
@Incident.Querent.FullPhone.

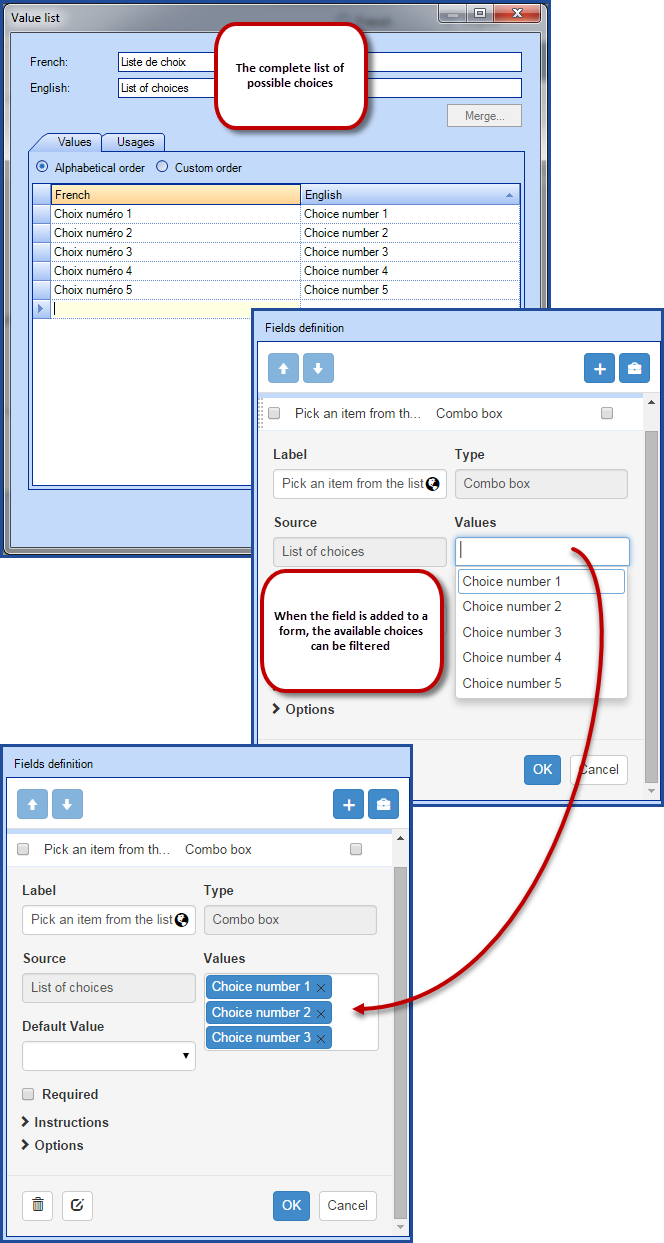
Filtering the Choices of a Value List
Two types of fields use the value lists to offer a choice to the user filling the form:
- Combo box
- Radio buttons
When the field is created in the library, a value list will be associated to the field. When this field is added to a form, the choices can be filtered.
How to Manage the Nomenclature of Fields
When working with the library, we try to keep the structure of fields simple. But a field in a form is often in the form of a question "Need a computer" will not be the name that you want to use in a column. So there is more than one way of naming a field.
Here are the three possibilities to represent the name of a field:
- The label
- The name
- One or more aliases
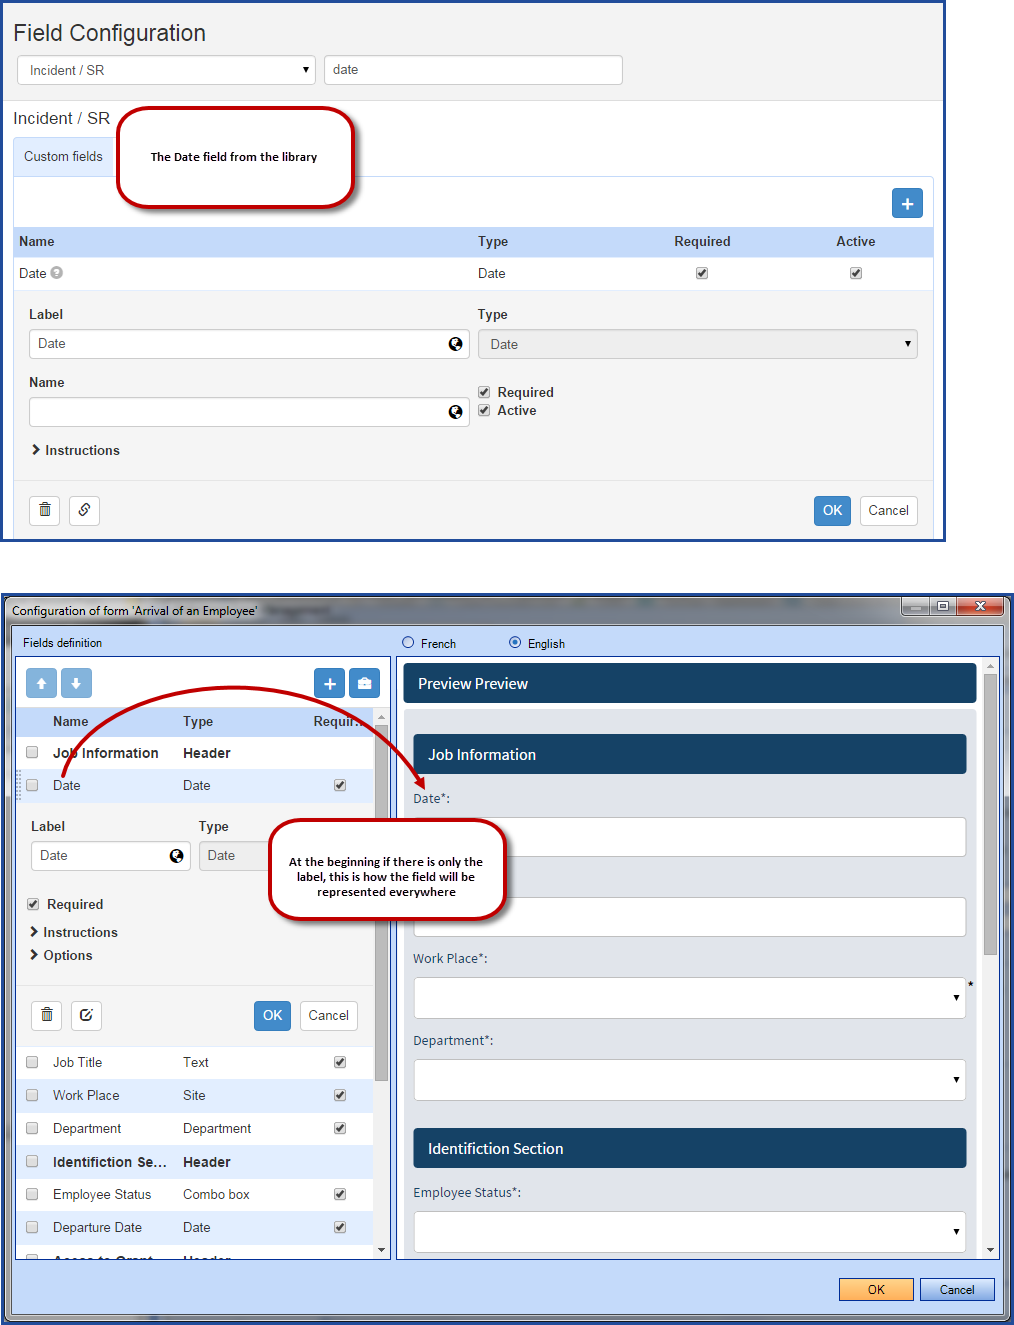
At the beginning the filed only has a label in the forms as well as in a column.
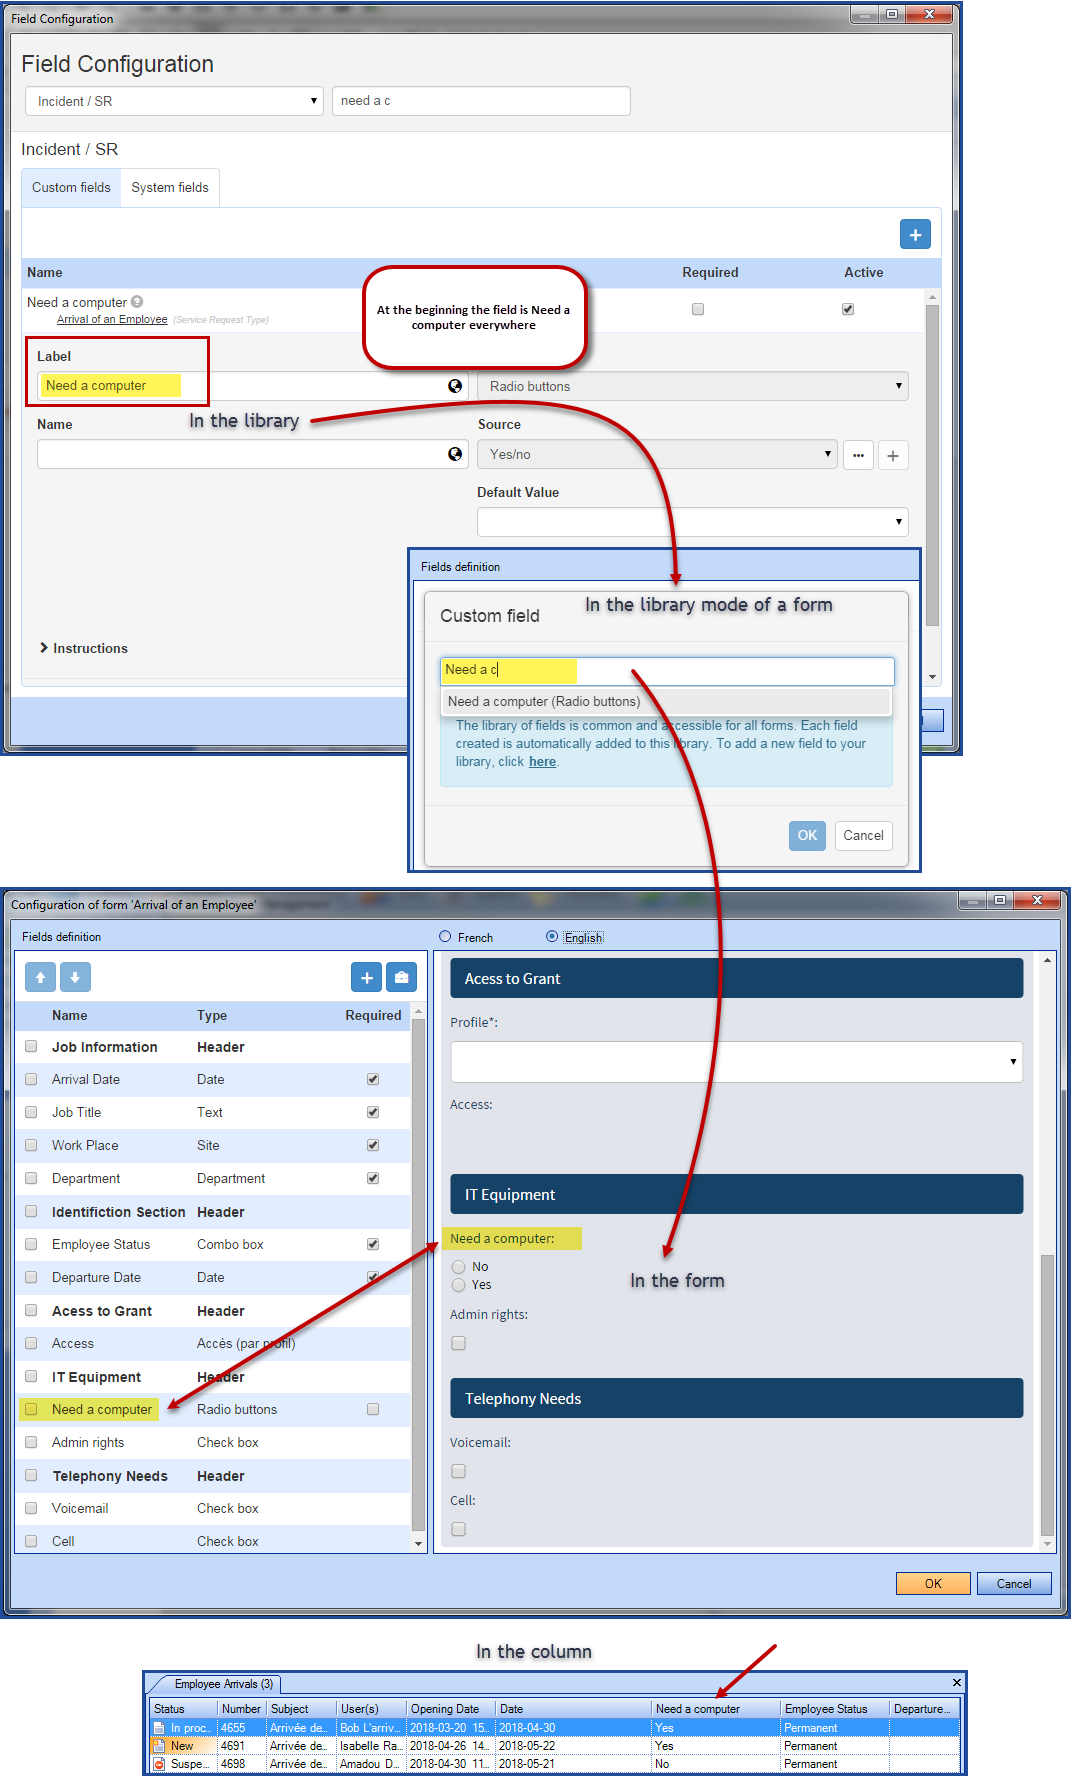
But once a name or an alias is added, the field will be visually different from one place to the next.
In our example, we want a simpler name for the column than Need a computer, so we add the name Computer.
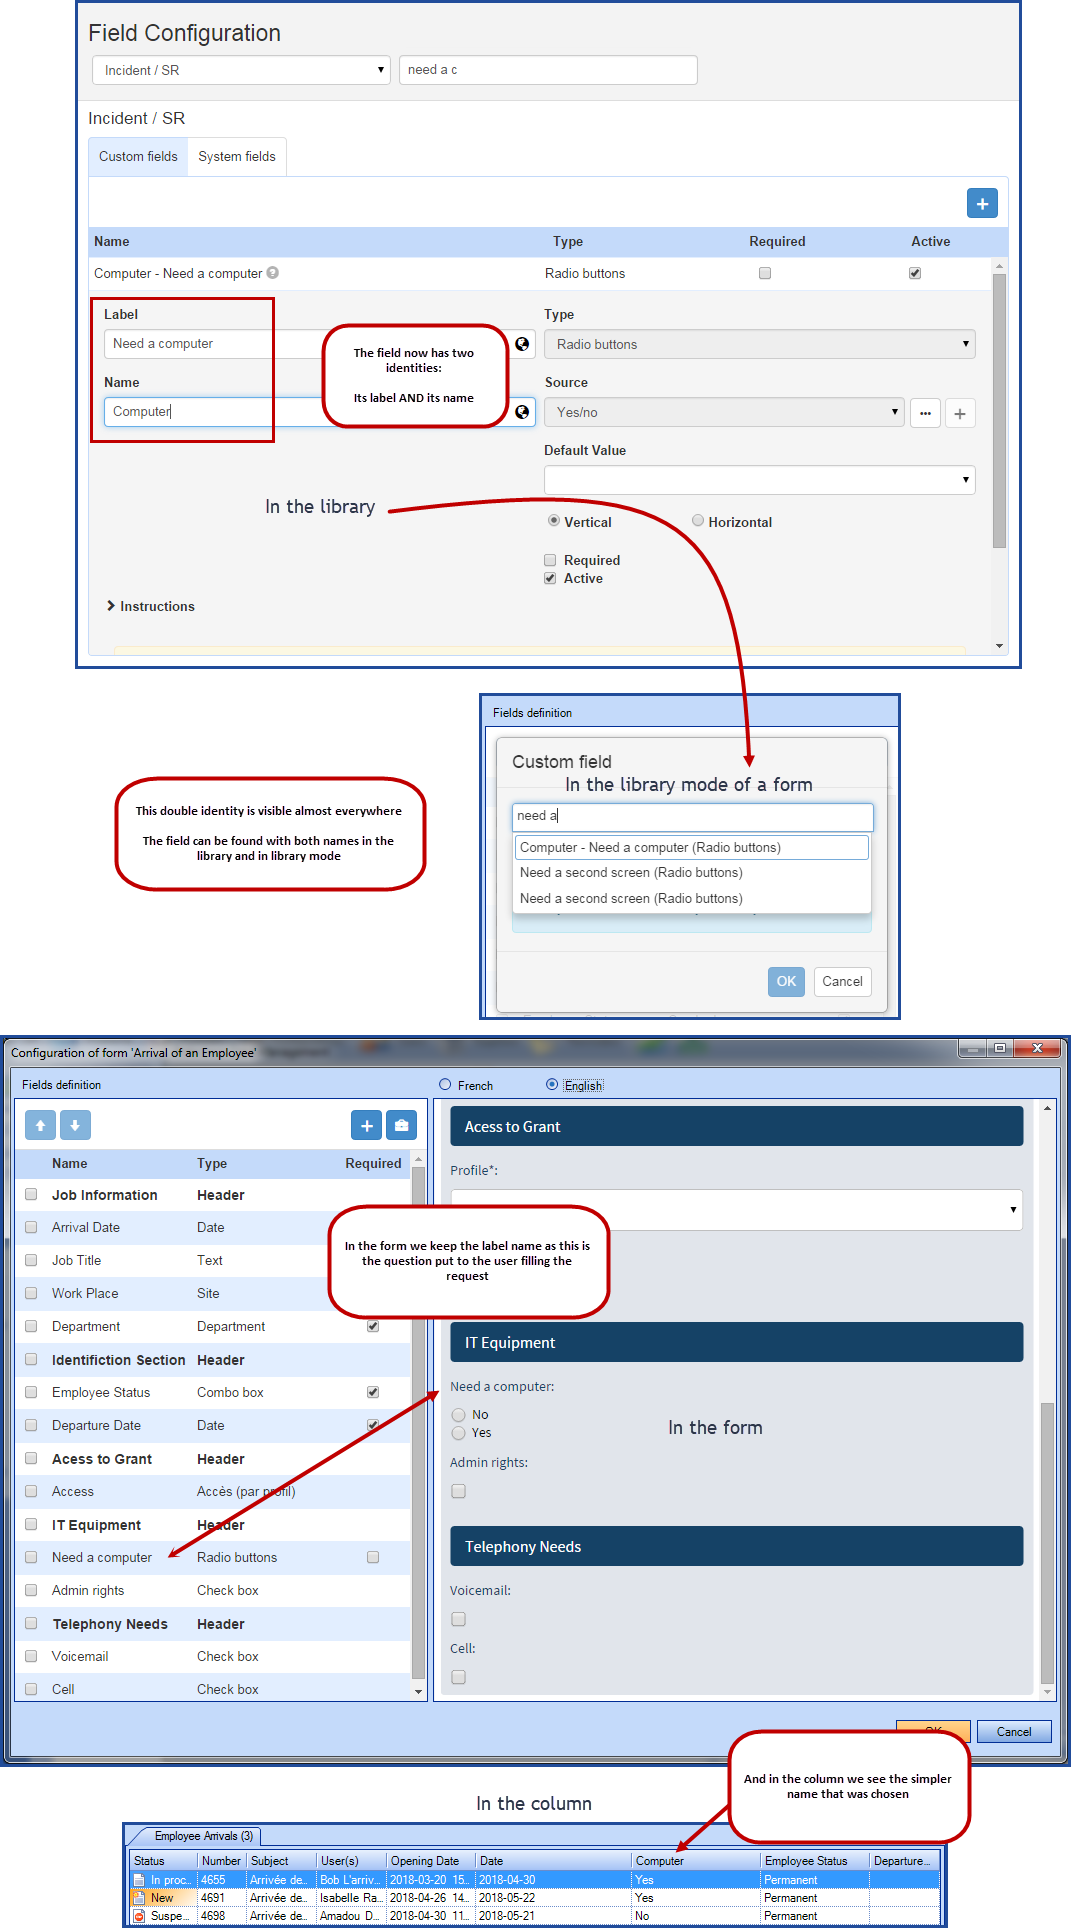
An alias is a name given to a field when editing it in a form.
To illustrate this, here is another scenario to show how aliases work.
A few types of requests require information about a date; the arrival of an employee, a move or a request to loan equipment are three typical cases.
Instead of having three different fields that ask for the same information in different way, we can use one field with multiple aliases.
The label of the field is Date. When it is added to a form it is called Date, but depending on the case, we rename the label in the form. This creates the alias.
Here is the result:
- In the library the name is called Date.
- In the request for a new employee - the field will have the Arrival Date alias.
-
In the request for a move - the field will have the Move Date alias.
- In the request for an equipment loan - the field will have the Required Date alias.
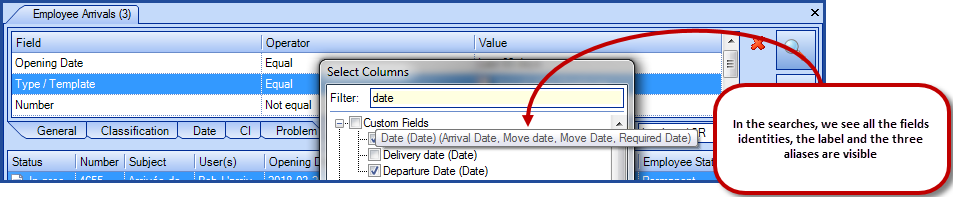
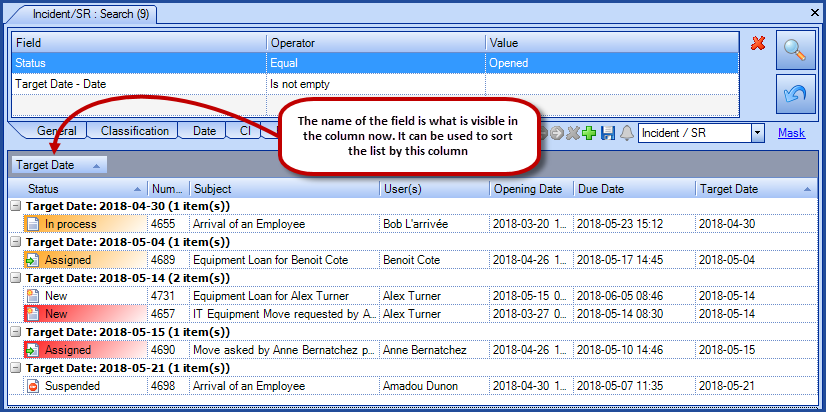
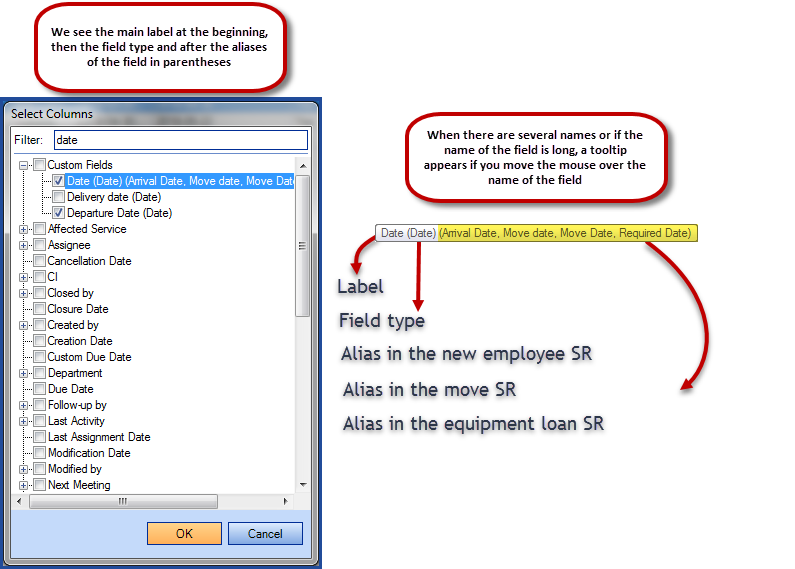
- When you search for the field as a criteria or to add it to a list, the field will show all its names.
- The label followed by the type in parentheses and then each alias in parentheses.
- Date (Date) (Arrival Date, Move Date, Required Date).
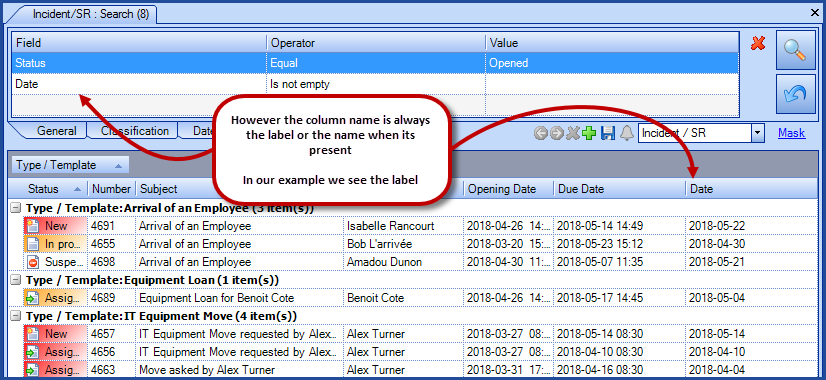
- The column will only have one name.
- By default, it will be the label. This is the case in our example.
- The name if one is present.
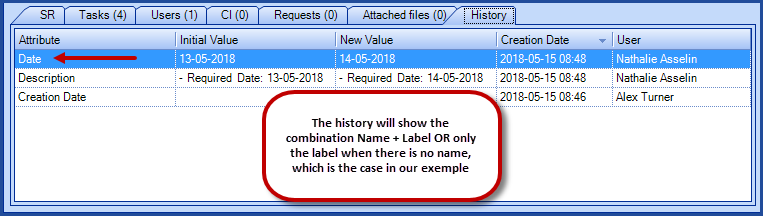
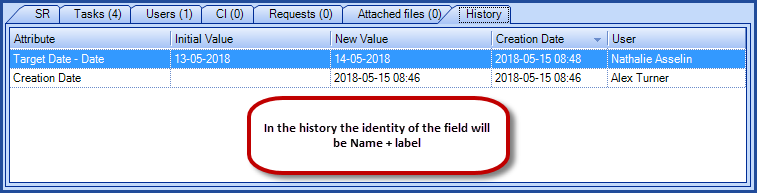
- The name shown in the history will be based on the identity of the field.
- By default, it will be the label. This is the case in our example.
- The combination of the name + the label when a name is present.
To close the loop of possibilities with the nomenclature, we will push our scenario a little bit further.
We now have a list that combines types of requests with an important date, because we have a need linked to that moment. We know that the date requested by the user will not be the due date, however, we also know that we will try to satisfy the need of the user.
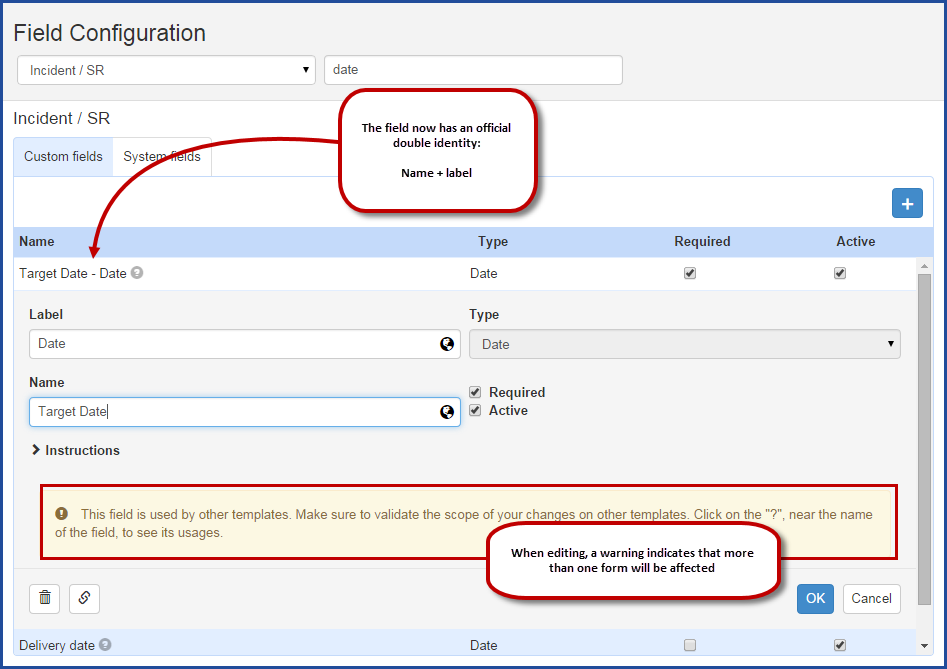
Then you can use the Name field to change the name of the Date to Target Date. It can also be used to sort by this column. Later when reporting, we can compare the Open Date and the Target Date and see at a glance who makes last-minute requests for these types of requests.
From the moment we have a label and a name for a field, the name of the field will change in some places:
- In the library the name is called Target Date - Date.
- In all three requests, the name of the field will be the alias.
- However, if we click the Edit field in the library button to see the field in library mode we will see its official name, Target Date - Date.
- When you search for the field as a criteria or to add it to a list, the field will show all its names.
- The name - the label followed by the type in parentheses and then each alias in parentheses.
- Target Date - Date (Date) (Arrival Date, Move Date, Required Date).
- The column will only have one name.
- The Target Date name, as it is now present.
- Controlling the name of the column is the reason for this behaviour.
- The name shown in the history will be based on the identity of the field.
- The combination of the name + the label when a name is present, Target Date - Date.
- Which is now the case.

Accessing the Configuration of a Form
You can access the configuration of a form from two places.
To access the form from the field configuration:
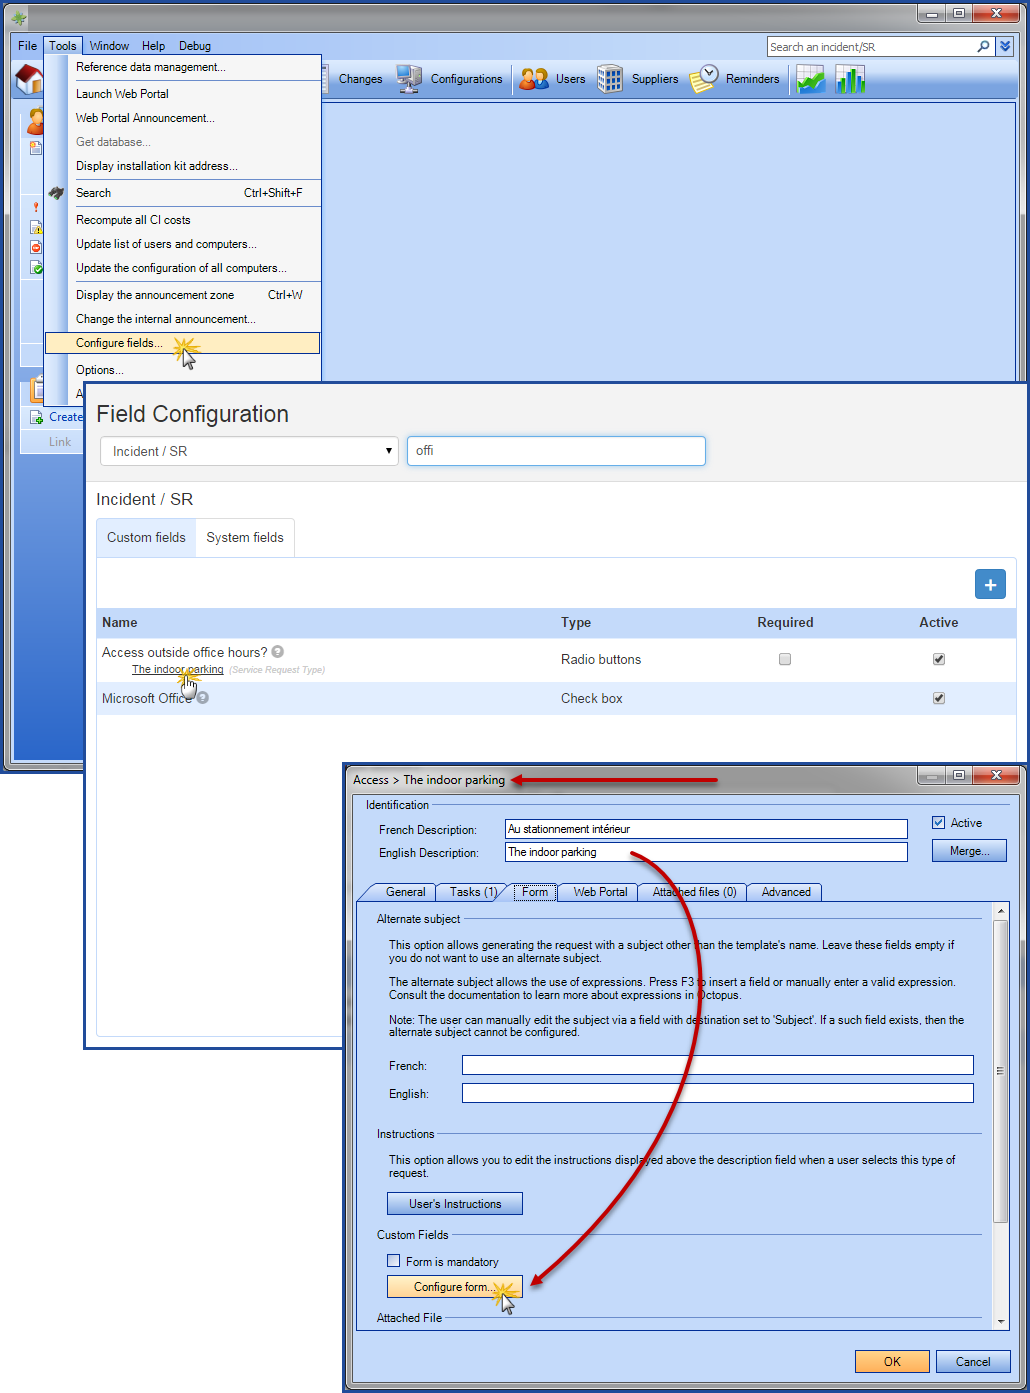
- Go to Tools > Configure fields. In the library, open the usage button and click the link that represents the form where the field is used.
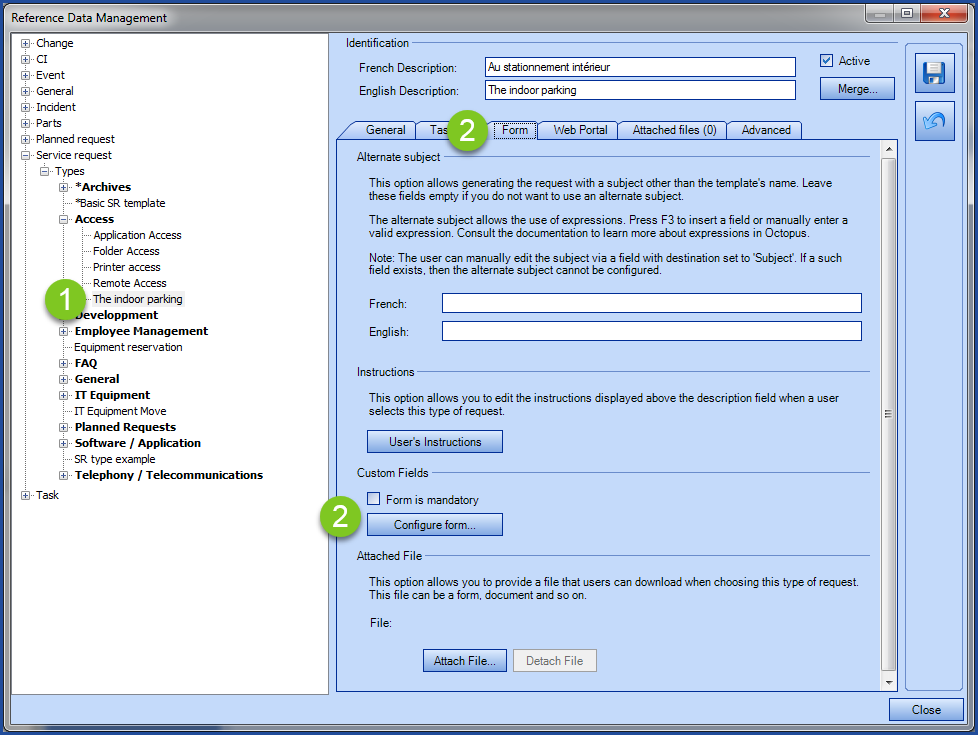
- The Configure form button will be in the Form tab.
To access the form from the Reference data management:
- Go to Tools > Reference data management. Then pick the form to edit.
- The Configure form button will be in the Form tab.

Create a New Field
Note that all the fields are in the library, whether they have been added directly to the library or from a form. And that the choices made during creation like the name, type, description, etc. are the default values when the field is reused in a form.
We recommend looking in the library before adding a new field to prevent duplicates.
From the Library
Mandatory values at the creation of a field are:
- Label
- In a bilingual environment, it is recommended to add the name of the second language during creation.
- Type
- Since the field type cannot be modified after creation, it is important to make the correct selection from the start.
From the Tools > Configure fields menu - Custom fields tab:
- Use the Add a field button.

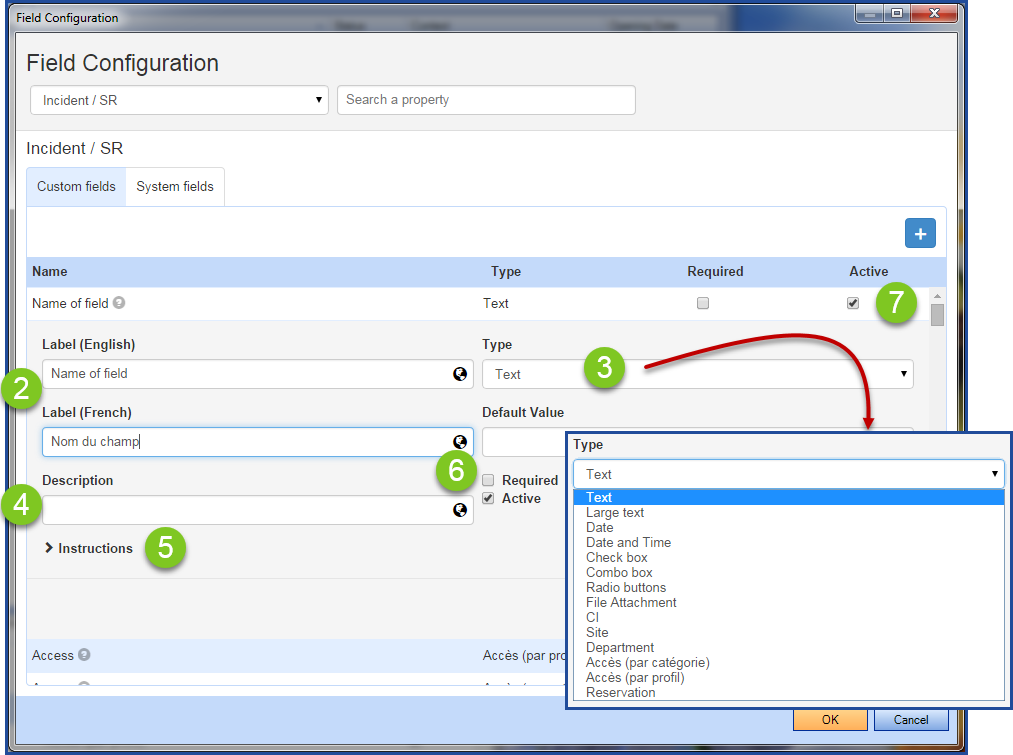
- Enter the name of the field in the Label.
- If required, enter the name in the second language.
- Choose the field type.
- The type cannot be modified after the field is created.
- Add a name if needed.
- If there, will become the official name of the field along with the label.
- Will be the name of the field in the library along with the label.
- Name + label.
- Will be the name of the field in a column or in search criteria.
- Enter the name in the second language if needed.
- Add instructions if required.
- They will be visible above the field when present.
- They will be the default instructions of the field when it is added to one or more forms.
- Enter the instructions in the second language if needed.
- Decide if the field will be required by default.
- This choice can be modified directly in a form when using this field.
- The field will be active by default.
- Only a field with no usage can be deactivated.
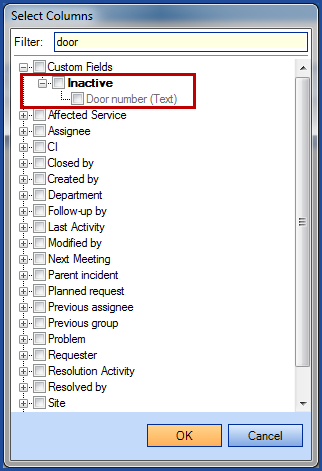
- If a field is inactive, it cannot be added to a form.
- It will in the inactive elements for the columns and search criterias.
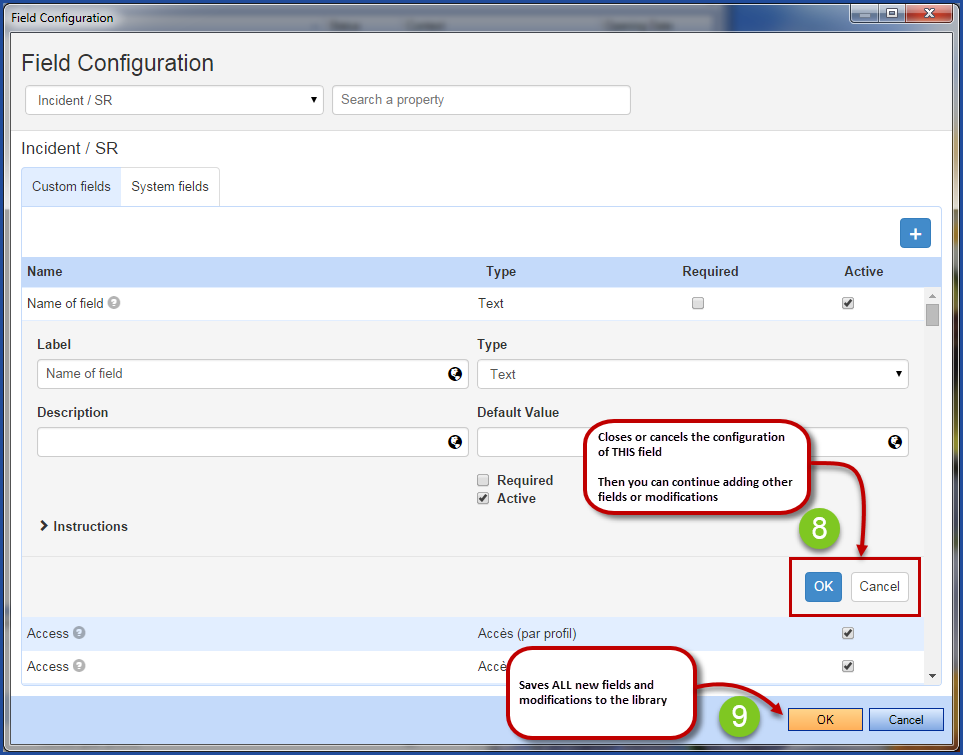
- Close the window with the OK button at the bottom of the field.
- Proceed to other changes or create fields as needed.
- In order to complete the creation of the field and of any other modifications, click OK at the bottom of the window.
- Octopus will restart and the field will be available in the library and from the form configuration.
- Note that if you Cancel or if you close the window with the X at the top, Octopus will show the following message: The data has been changed. Do you want to save these changes?
From a Form
We recommend looking in the library before adding a new field to prevent duplicates.
From the Tools > Reference data management menu:
- Choose the request to configure.
- From the Form tab, go to the Configure form button.
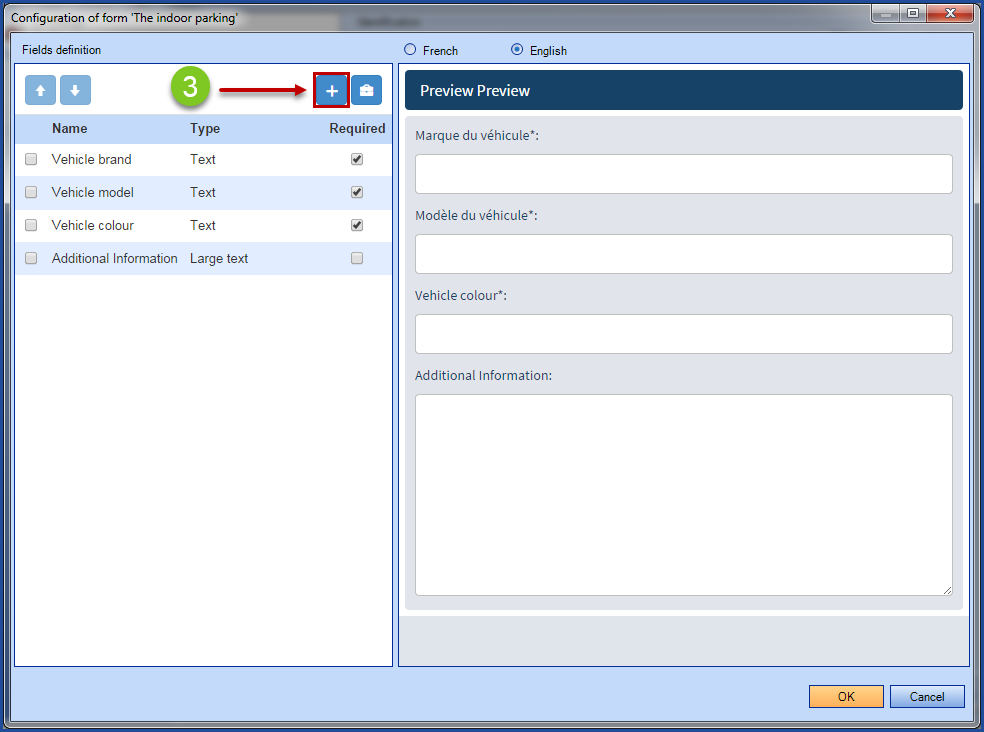
- Use the Add a field button.
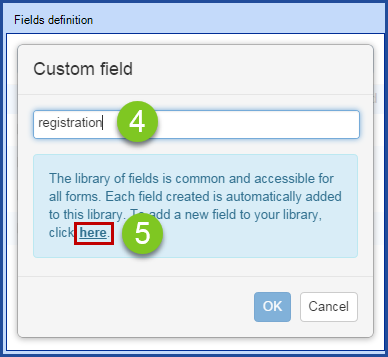
- Search for the field before going ahead with its creation.
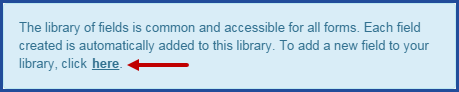
- If it does not exist, use the here link in the window to access the creation window.
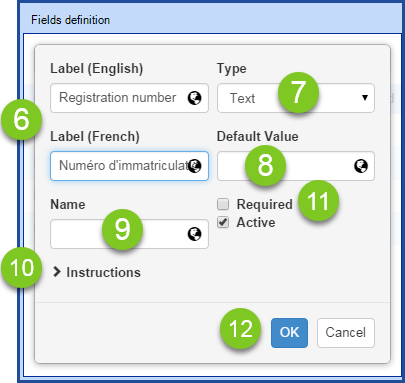
- Enter the name of the field in the label.
- If required, enter the name in the second language.
- Choose the field type.
- The type cannot be modified after the field is created.
- If the wront type is selected, another field will need to be created.
- Add a default value if required.
- This will be the default for the field in the library.
- Add a name if needed.
- If there, will become the official name of the field along with the label.
- Will be the name of the field in the library along with the label.
-
Name + label.
-
- Will be the name of the field in a column or in search criteria.
-
Enter the name in the second language if needed.
- Add instructions if required.
- They will be visible above the field when present.
- They will be the default instructions of the field when it is added to one or more forms.
- Enter the instructions in the second language if needed.
- Decide if the field will be required by default.
- This choice can be modified directly in a form when using this field.
- Close the window with the OK button at the bottom of the field.
- In addition to adding the field in the form, it is now part of the library.
- Add a display condition if required.
- This action can only be done in the form mode.
- This condition will be only valid for the field of this form.
- Add a destination to the field if required.
-
This action can only be done in the form mode.
-
The destination will only be valid for this form.
-
-
Click the Edit field fr0m the library button to open the field in library mode.
-
This button will always let you see the field in library mode.
-
- In order to complete the configuration of this form and any other changes, click OK at the bottom of the window.
- Octopus will restart and the modifications will be saved.
-
Note that if you Cancel or if you close the window with the X at the top, Octopus will show the following message: The data has been changed. Do you want to save these changes?
Merge a Field
Sometimes we find that several fields in the library are similar and could be combined. But before going ahead with the merge, we recommend making the following verification:
- Validate that the fields are of the same type.
- Different type fields cannot be merged.
- If they use value lists, make sure they use the same ones.
- How the fields are used in the forms.
- This is to ensure that they are truly compatible to merge.
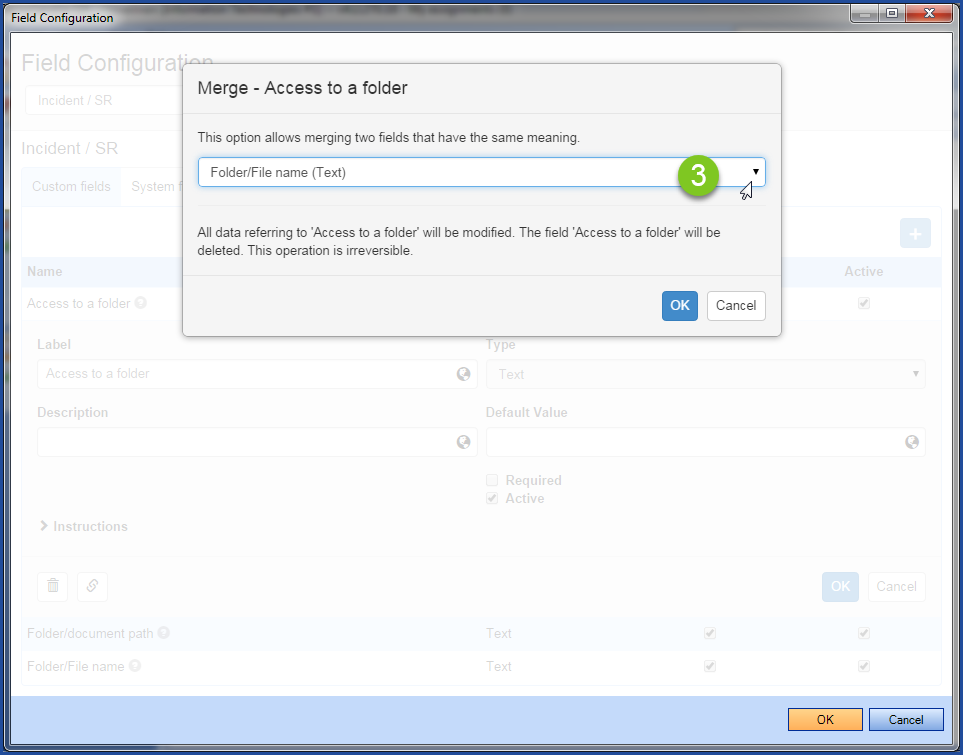
Important to note that:
If the field to be merged is not referenced by the form history, it will be deleted.
If the field to be merged is referenced by the forms history, it will set inactive to maintain data integrity.
Follow these steps to merge:
- Find the fields to merge.
- Use the merge button from the field to be retired.
- Choose the field to keep.
- Validate that the usage of the field reflects the merge.

Delete a Field
From the Library
For a field to be deleted from the library, it must not be associated with a form. Also, it cannot have been used in the past to create a request. It will therefore be rare for a field to be deleted.
Follow these steps to permanently remove a field from the library:
- From the library open the field by clicking on its name.
- Select the Delete button.

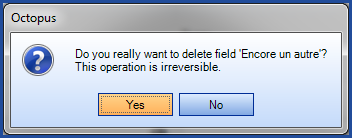
- Octopus will ask for a confirmation.
- In a case where a field has already been used to create an incident or SR, it can be disabled.
It can no longer be added to a form, but it will still be part of the library as inactive.
From a Form
You can easily and at any time remove a field from a form, just open the field by clicking on its name, from the form and click the Delete button.
No confirmation will be requested and the field disappears immediately. As the field remains in the library, it can be added again at any time in case of a mistake.
Add a Field to a Form
The purpose of having a library of fields is primarily to use these fields inside forms. When configuring a new form or to optimize an existing form, the fields of the library will be used.
In the case where a field does not exist yet, it can also be created from a form.
See Create a New Field - From a Form section for more information.
To work from the forms:
- Go to Tools > Reference data management.
- Select a form or create an incident template or SR type and from the Form tab click the Configure form button.
Consult the Create customized forms in Octopus article for the details of how to create new requests.
Once in the form we can add the fields from two buttons:
|
|
|
|
|
Library field types |
Special field types | |
|
|
|
Add a Special Field
Header and comment type fields are considered special fields. They are not part of the library, and it is important to note that they are unique.
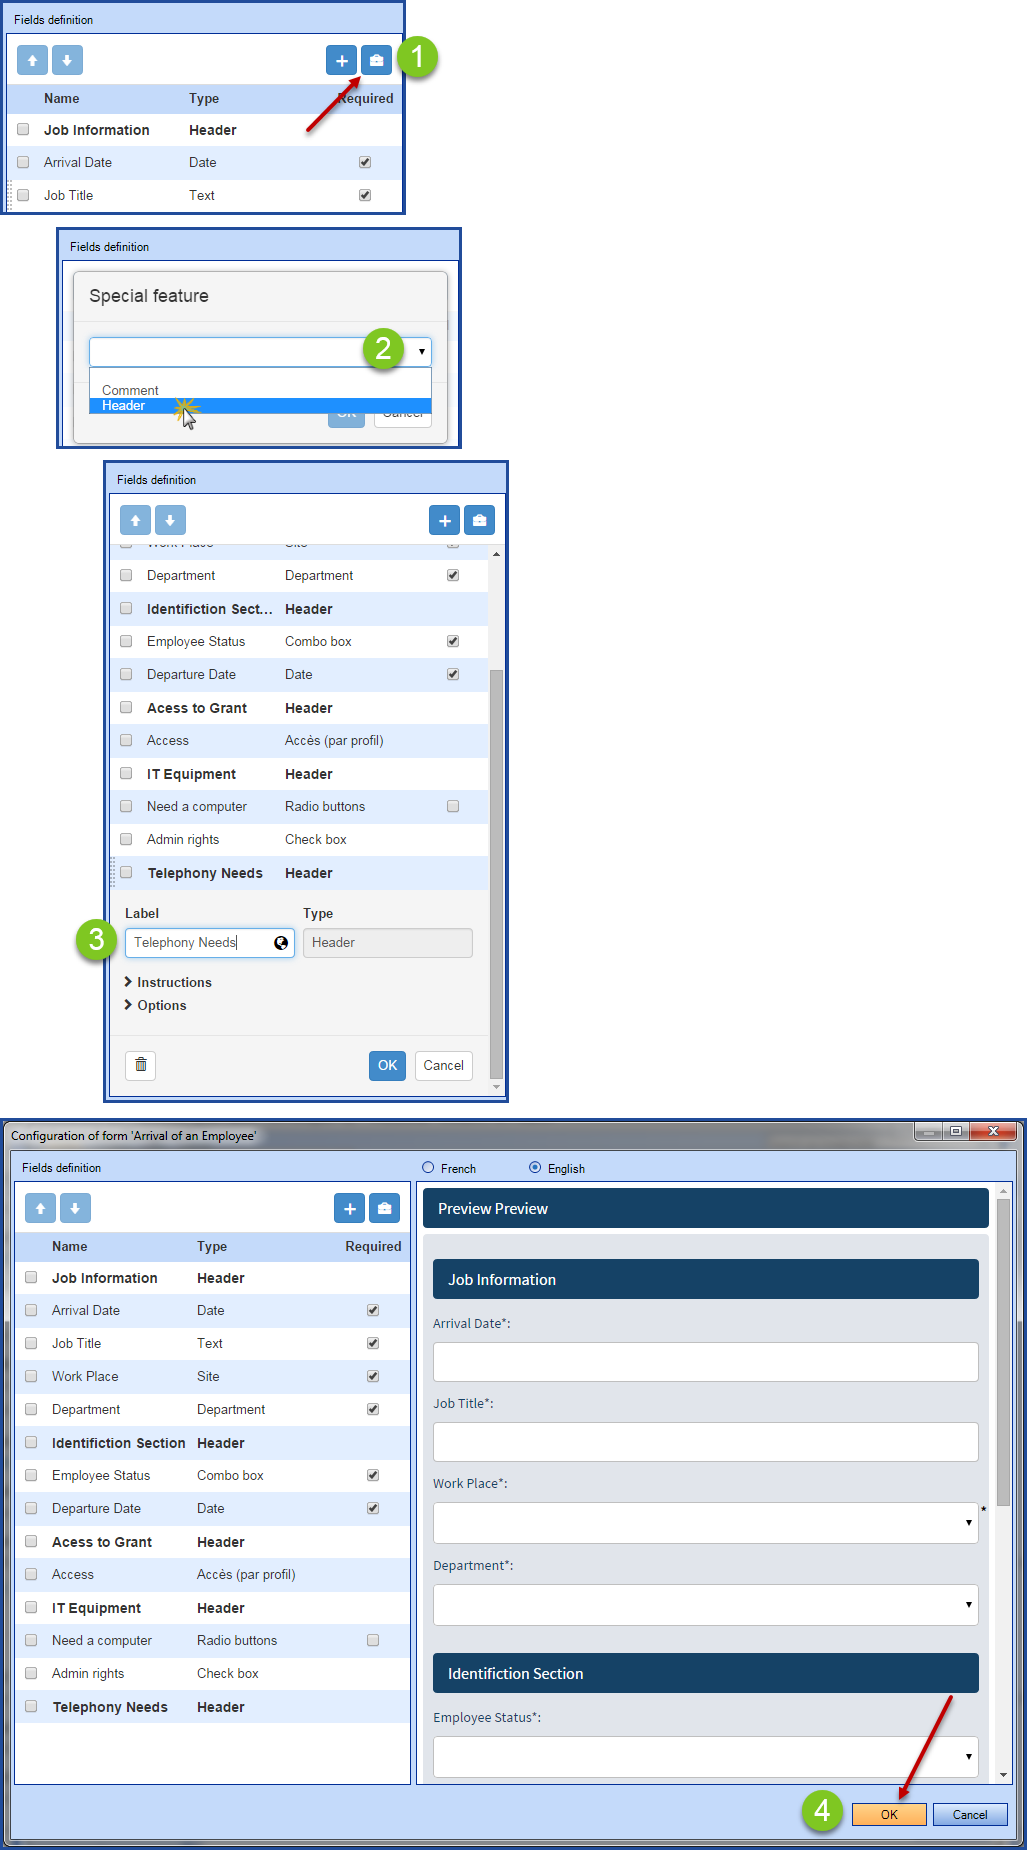
- Use the Add a special field button to open the dialogue window.

- Choose the type of field to add.
- Configure the field in the form.
- Continue with other configurations if needed.
- When all modifications are done, click OK at the bottom of the window.
- Octopus will restart and the modifications will be saved.
- Note that if you Cancel or if you close the window with the X at the top, Octopus will show the following message: The data has been changed. Do you want to save these changes?
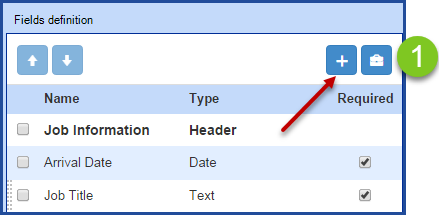
Add a Field From the Library
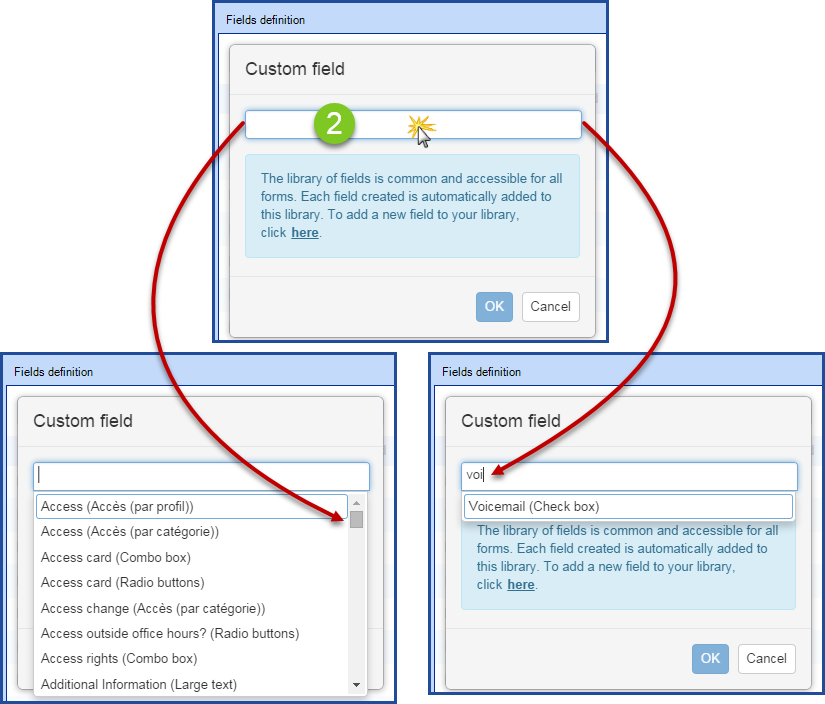
- Use the Add a field button to open the dialogue window.
- Search for the field in the library
- Click inside the field...
- Use the scroll bar to explore the existing fields.
- Or start to write the name of the field to filter the list.
- See the Create a New Field section to create a field that does not exist.
- Click inside the field...
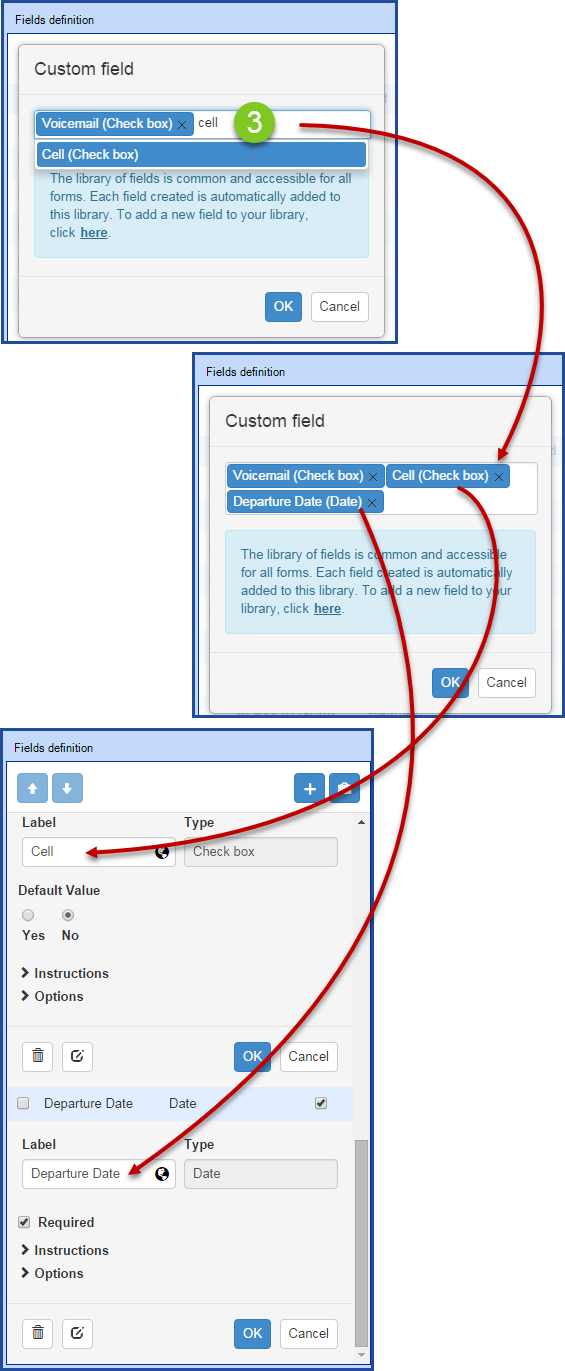
- Choose the field to add.
- You can add more than one field at a time by continuing to search from the library mode.
- When you do OK to close the library, all the chosen fields are added one after the other in the form.
- They will all be open in configuration mode; if the default values do not correspond to the need, configure the field in the form.
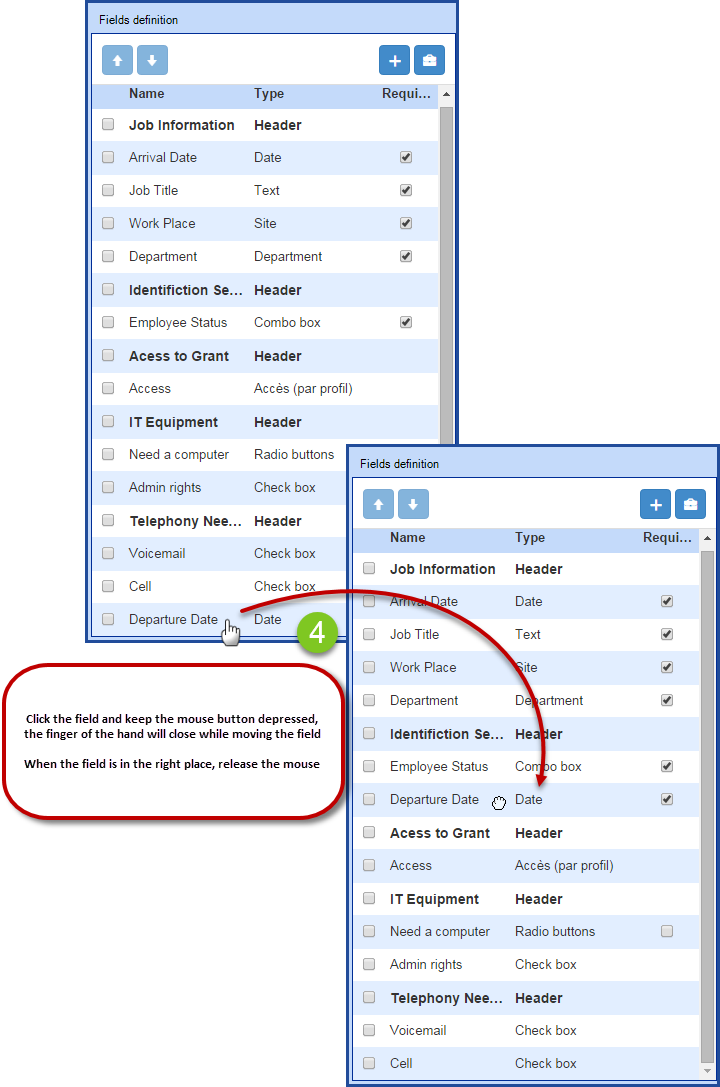
- Move the fields in the form if needed.
- The easiest method is the drag and drop.
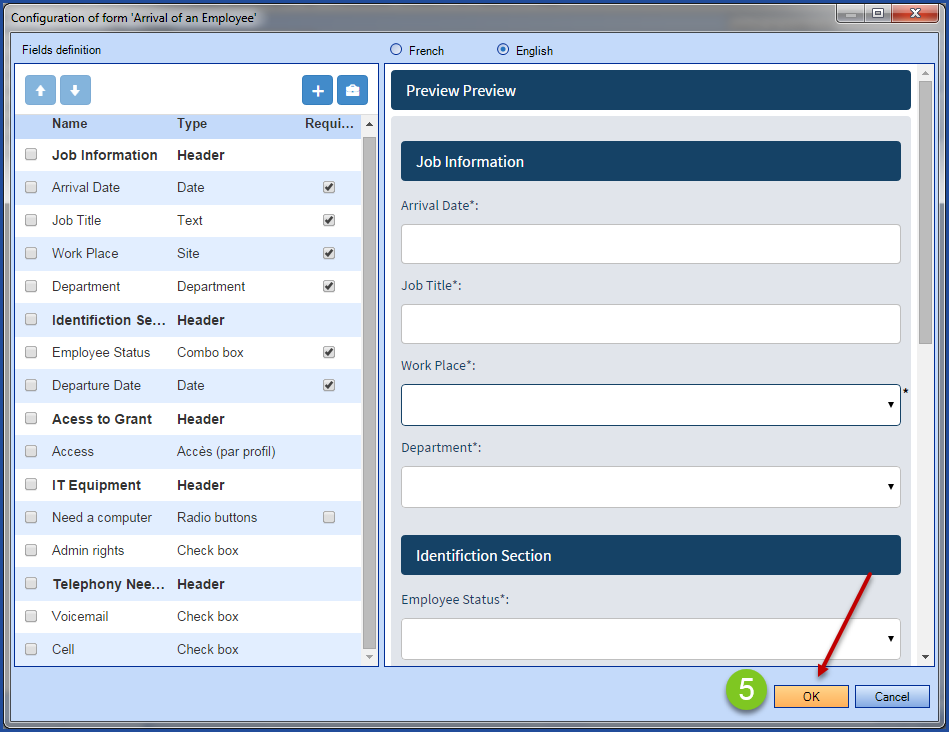
- When all modifications are done, click OK at the bottom of the window.
- Octopus will restart and the modifications will be saved.
- Note that if you Cancel or if you close the window with the X at the top, Octopus will show the following message: The data has been changed. Do you want to save these changes?
Octopus does not allow for to add the same field twice in a form. Fields that are already used in the form will not be presented to select from the library.
If required, create a second field with a different name to add it to the form. The label can be renamed if the same name needs to be used.
Data Exploitation
One of the advantages of Octopus custom fields is that you can add the fields from the forms to lists and use them as search criterias.
For example, if we want to analyze the elements of the arrival requests for new employees. In addition to the usual information, we will want to get the following data:
- The person's arrival date.
- The title.
- The status.
- The departure date, if the status is temporary.
- If the person needs a computer.
- If the person needs a cell.
- Etc.
The information above represents fields in the new employee form. You can just add them as columns to a list.
Click the links to find out how the Advanced Search and List Customization work.
For more flexibility, when searching for a field, all available names for this field will be visible:
- Its label
- Its name
- If there is one.
- The aliases
- If there is one or more.
First example: We have a field that is labelled Date, but in the various requests where it is used, it is called Arrival Date, Required Date, etc. When looking for this field all the names are shown and can be searched.
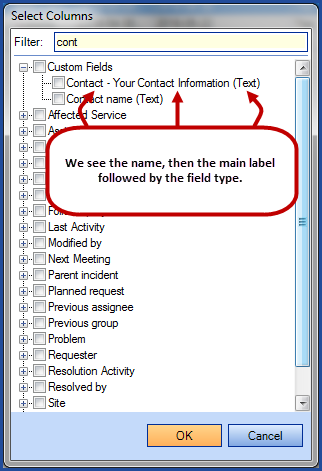
Second example: In all templates we confirm with the requester how to get in touch with the question. Your contact information, but the field is just called Contact. When doing a search, both are displayed.
Modification History of a Field
By default, when a field is updated, an entry is automatically added to the request history. However, there is an option that, if unchecked for a field, will not update the request history.
This option is only available in library mode and will act the same every where the field is used.

Specific Aspects
Request Conversion
It is possible to convert a service request into an incident and vice versa. All changes are entered in the request history.
During the conversion, if the form is mandatory, a message will notify the Octopus user. The form fields for type "Name of the SR type" are required.
An SR can be converted to an incident unless tasks have been activated or stated. In this case the message It is not possible to convert a service request into incident if there are tasks with activities or tasks already started will appear.
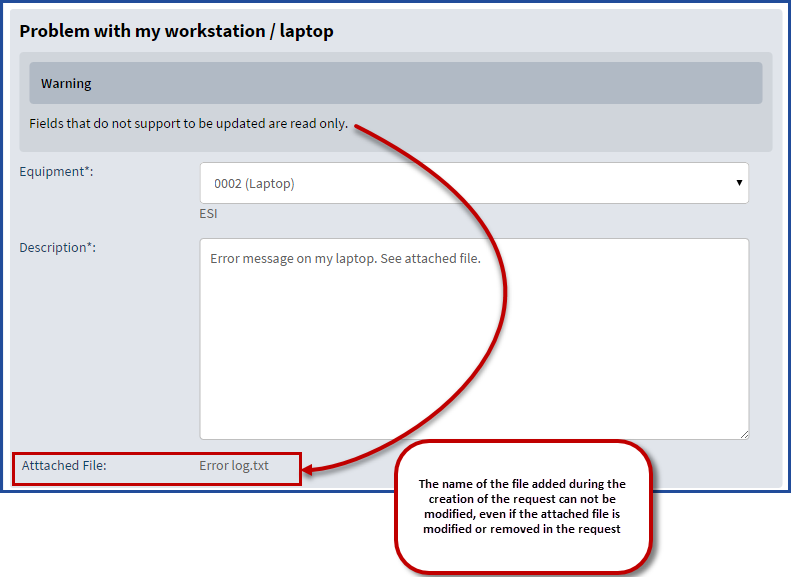
Attached Files
Adding or modifying an attachment is now allowed from the form. The Fields that do not support to be updated are read only warning will be at the top of the page every time a file attachment field type is present.
These files need to be managed from the Attached files tab, but the modifications will not be visible in the form.
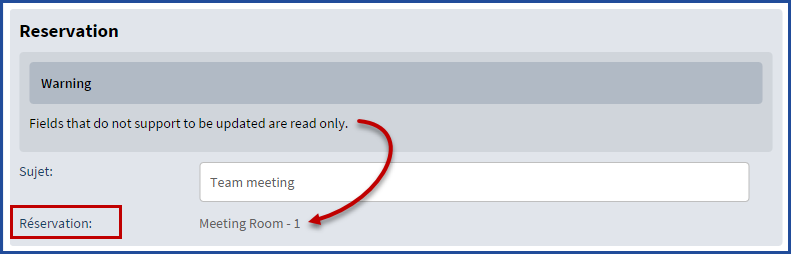
Reservation
In a request that has a reservation field present, the Fields that do not support to be updated are read only warning will appear at the top of the page.
The reservation cannot be modified from the form it must be done by the user on the Web Portal.
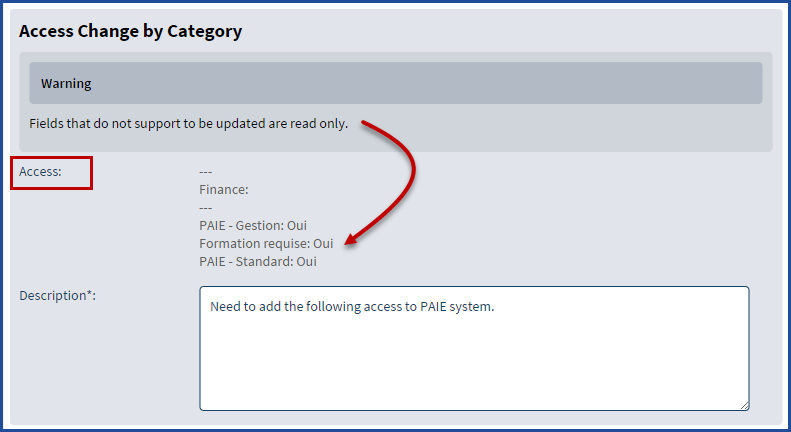
Access Management - AM
Requests that are created with the Access Management plug-in will see the Fields that do not support to be updated are read only warning at the top of the page.
An access request cannot be modified from the form. However other information that is not related to access management can be modified.
Errors and possible solutions
There is no other data compatible with this data
- When merging fields: If you try to merge a field that is the only one to use a value list.
- Merging Radio button or List field types is possible only if both use the same value list.
- This message will normally indicate that the field you are trying to merge is the only one to use this list.
The operation cannot be completed as some fields have been modified. Please save your data and try again.
- When you try to do an operation that may be in conflict with a previous operation in the library.
- For example, merging a field after other fields have just been renamed.
- Octopus recommends going out of the library to back up before proceeding again.
Tips and tricks
Reusing a header structure
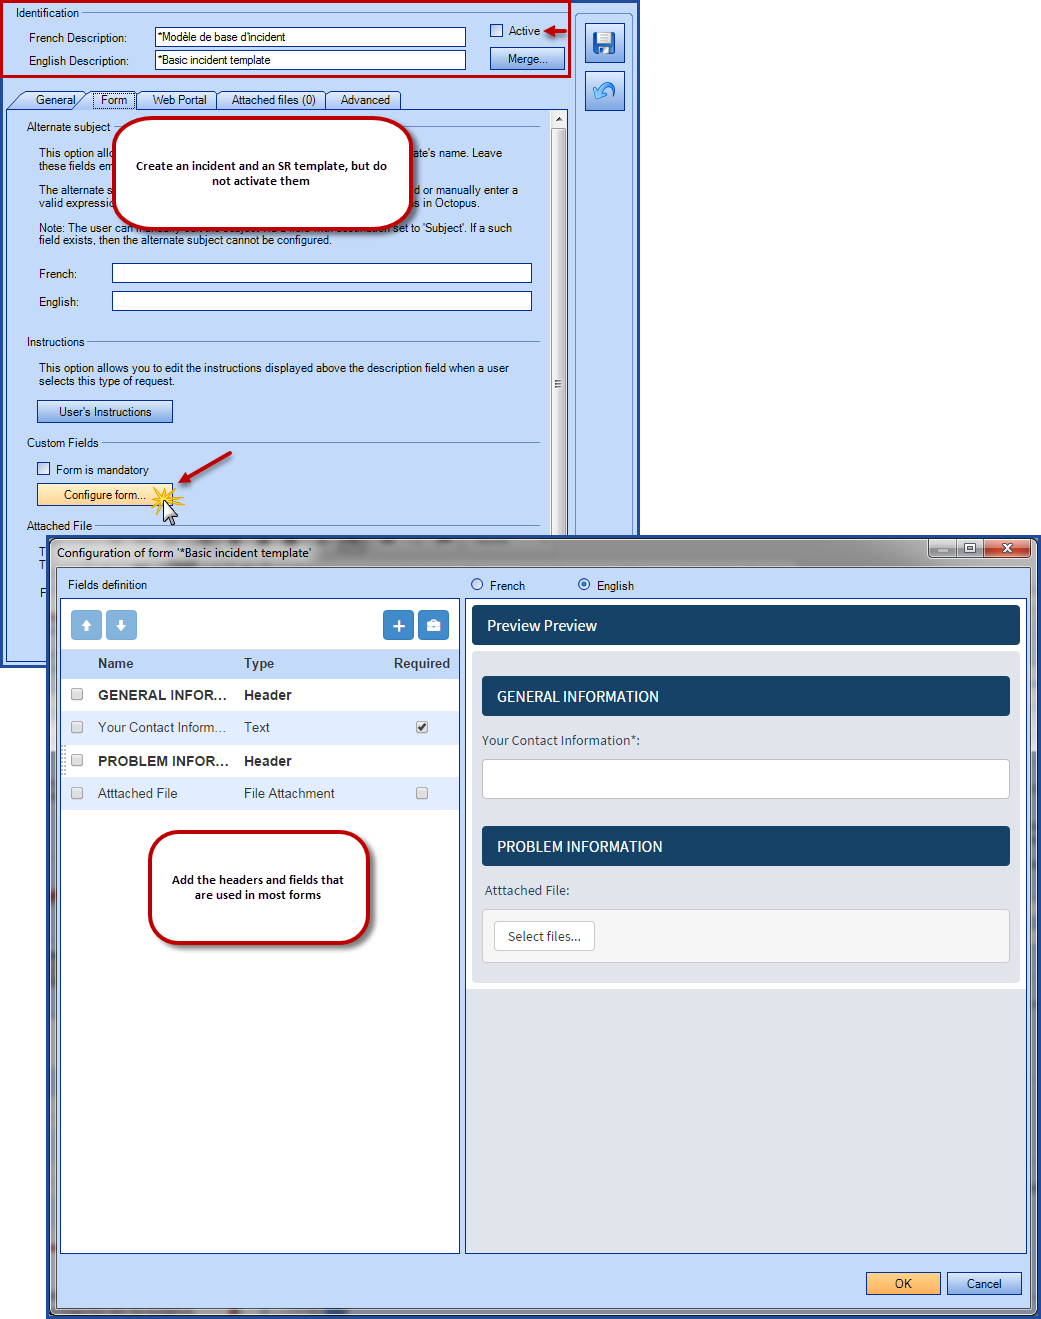
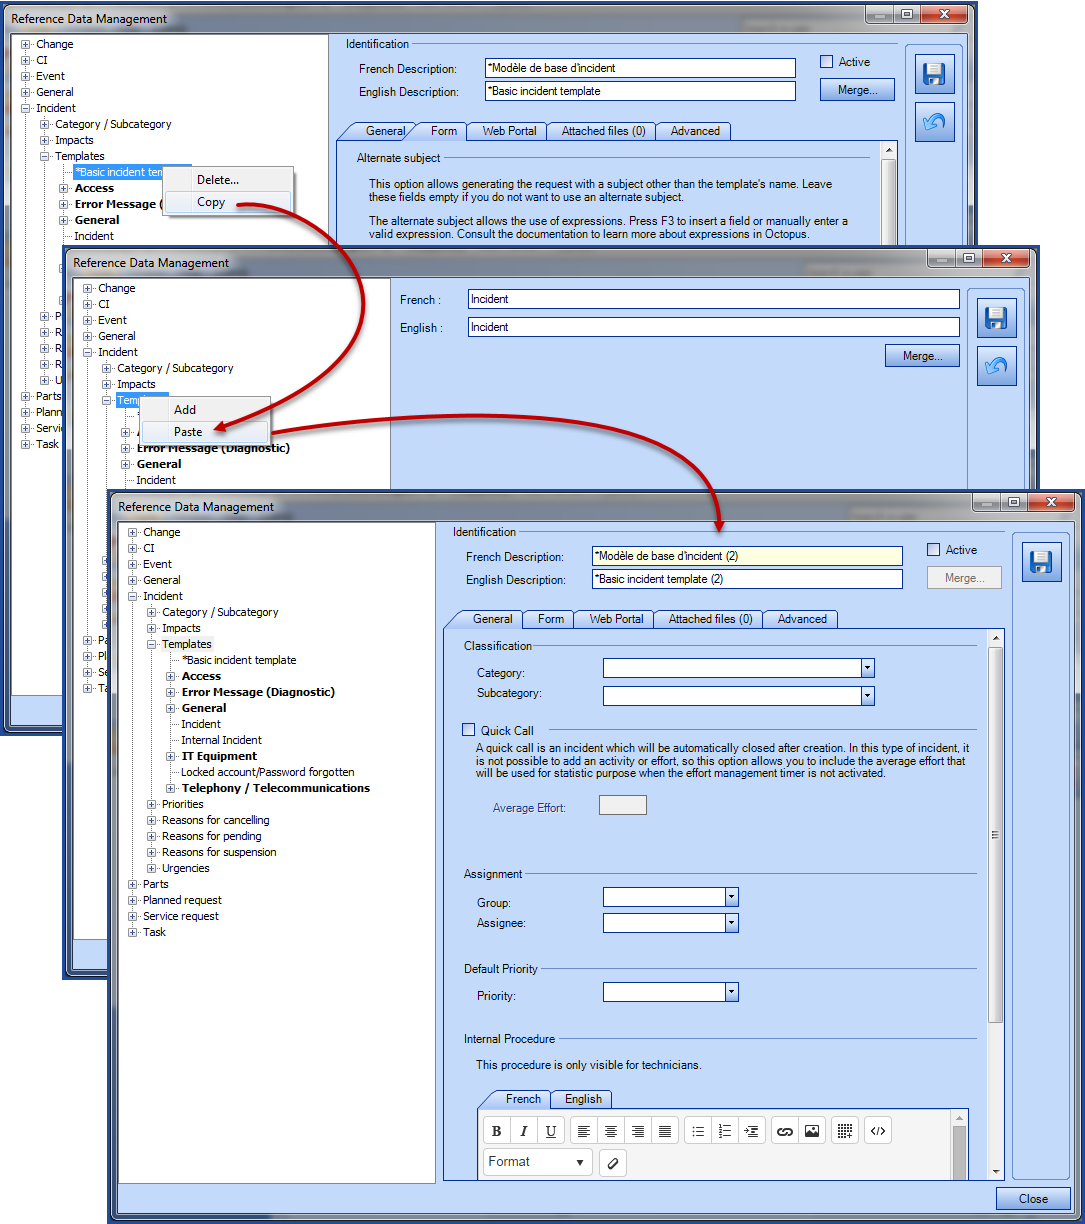
As Header and Comment type fields are unique, they must be recreated each time. To avoid having to redo the same structure with the same headers each time, we can create a template to reuse.
Create an incident template and SR type with the basic structure without activating the request. It can be used to copy / paste to a new request with the right structure, and then all is left is to complete it with the fields from the library.
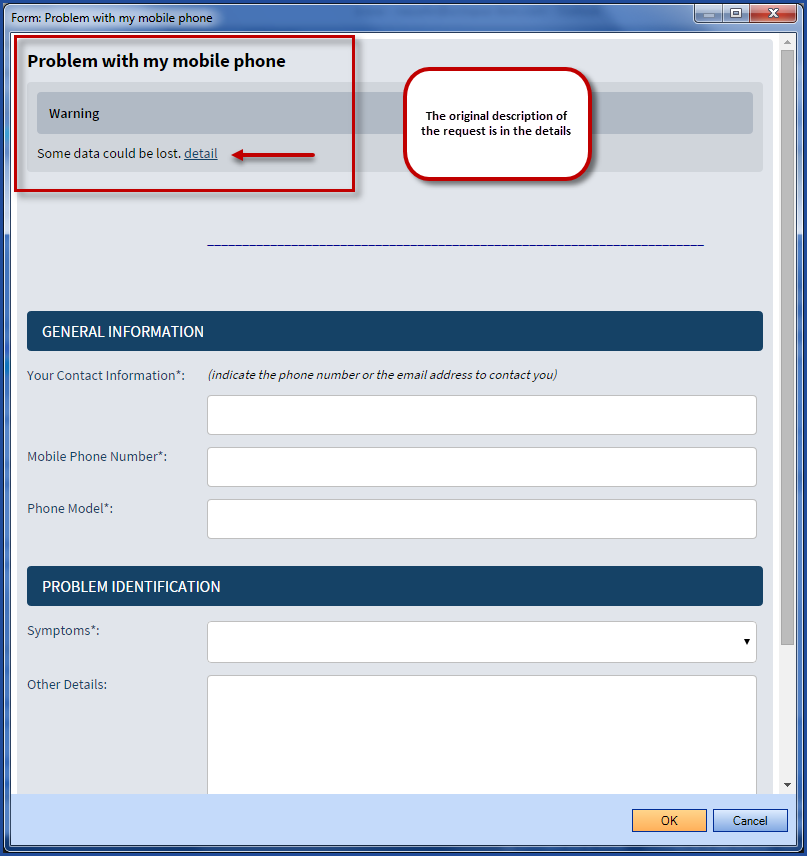
Configure a Destination to Prevent the Loss of Data
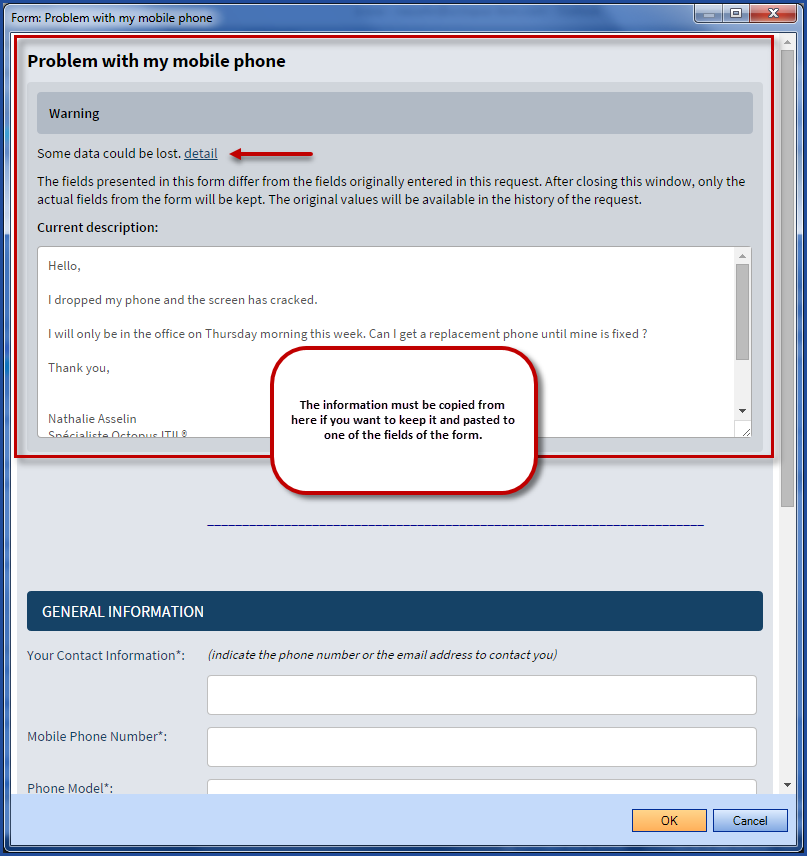
When a request is received by email or when it is created without a form, the modification with a form may result in the loss of the original data in the Detailled descrption field, if we forget to check the details in the warning.
Note that the original information of the Detailled description is kept at all times in the request history.
For more information on this behaviour see the Initial Creation and Behaviour of the Detailed Description Field section.
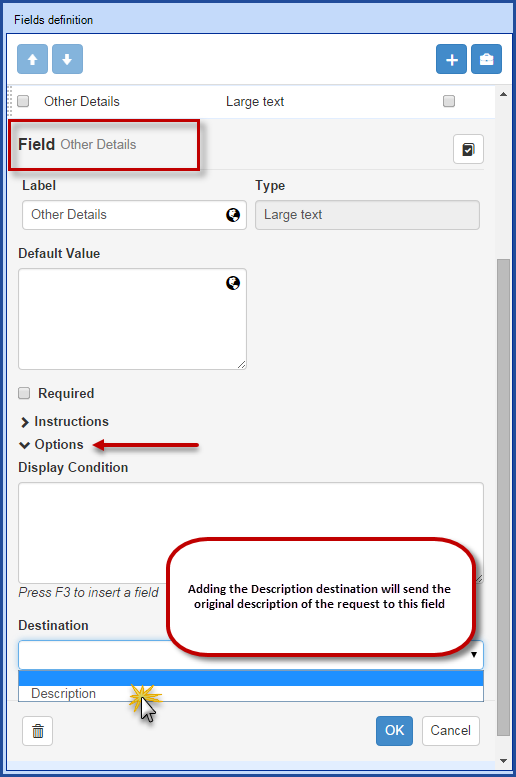
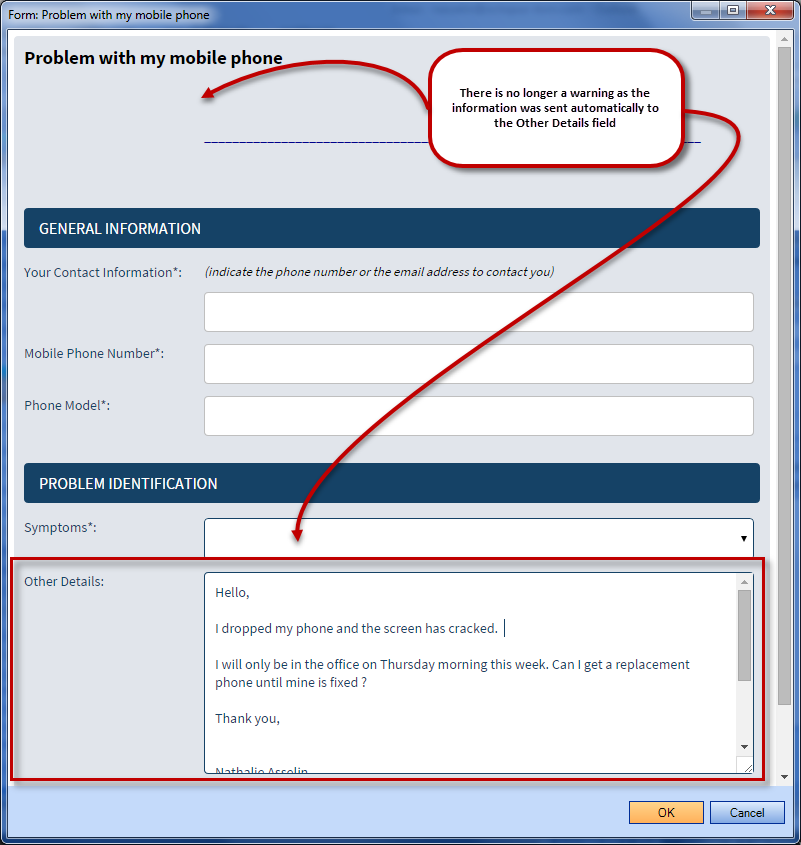
A trick to prevent the loss of data when updating with a form is to configure a large text field type in each of the available forms and add the Description destination.
This will automatically send the request description to the selected field when the request is updated using the form.
Thank you, your message has been sent.