Table of contents
Related articles
- Role management
- External Assignee - How to uses the Tasks
- Time Zones
- Additional information in the selection of a user
Introduction
This article describes the User Management Module, the information that you need to configure for a basic use of Octopus, as well as the configuration for a more complete use of Octopus.
We present the concepts of the different types of users and the information found in their file at the base and in the second part of this document you will find steps and important information on how to create, change and deactivate a user's account.
In this article and in Octopus we use a specific terminology to identify different things in Octopus.
Here is a list that will help you distinguish between the terminology used.
|
Term |
Designates |
|---|---|
|
Octopus user, Octopus technician, technician |
Are the people or technicians who access to the application to process requests |
|
End user or user |
Are defined as the people affected by the incidents and service requests. They can communicate with the Service Desk by phone, email or on the Web Portal |
|
System account |
Generic account used to execute Octopus programs such as ADSIReader, MailIntegration, WMIUpdater, etc. This type of user does not connect (login) directly in the application |
|
External Assignee |
Are users who do not have an Octopus user account, but who participate in the tasks in service requests, for example to to grant accesses. |
|
Approvers |
Are people who can receive approval tasks. These people can be direct employee managers or, in the case of hierarchical approvals, department managers. They can also be the person designated directly in the request as an approver, for example, the person in charge of purchasing |
|
Worker - Tradesman |
Are people such as plumbers, electricians, etc., using a simplified Web interface (WebTech) to view requests and update them. |
|
Roles |
Groups permissions based on the work done by different people using Octopus or the users of the Web Portal. Click on the following link to access Role Management |
|
Permissions |
Determines what users can see and do in Octopus, the Web Portal or Web Tech. Click the following link to see the list of permissions and their descriptions |
For a basic use you need to see the following sections:
- Octopus Licenses
- Octopus
- How to create an Octopus account?
- How to modify a user's groups or rights?
- How to deactivate a user?
Octopus Licenses
Each user needs to be associated to a license type in Octopus.
Here are the different types of licences :
|
Type |
Access authorized by the license type |
|---|---|
|
Batch |
Use to execute recurring tasks such as ADSIReader, WMIUpdater, DataImporter, etc. . This license is free, this account cannot connect directly to Octopus. The Octopus system account should normally use this type of license. |
|
End User (Web Portal) |
Default license, allows users to connect to the Web Portal. This license is free and the number of users are unlimited. |
|
External Assignee |
For an assignee who is not part of the main team. Allows to complete tasks from the Web Portal. |
|
Tradesman (Building facilities) |
Reserved to the Building facilities or Building management services who's workers only use WebTech. |
|
Standard |
For Octopus users, this gives them full access to the application. |
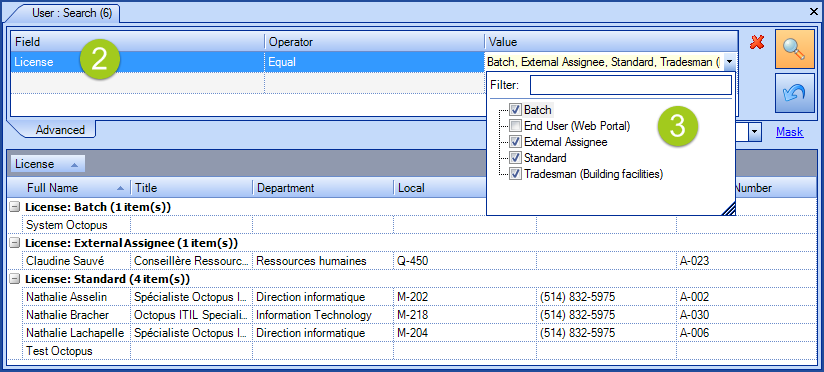
 Tip : To follow the number of licenses used for Octopus, create a personalized list that looks for the license fields for the types that need to be check on (Standard, Batch, External assignee, Tradesman).
- In an advanced search, select the User Module
- Lookup the License field
- Check the types that you want to follow
User file
This file is used to consult of modify the information about a user. In general, this information is imported from Active Directory or from another database containing the information.
However it is possible to create users manually in Octopus if required.
User Identification
Here is the information found in this section. Some of these points are detailed further in this document:
- Avatar
- At the discretion of the users.
- First Name
- Last Name
- Employee ID
- Information used by Access Management (Octopus plug-in module).
- Windows Username
- Important field to connect to Octopus, to the Web Portal or to WebTech.
- Active
- User status.
- Shared Account
Avatar
An image representing the user is visible to the left of their name.
There are three options for the avatar, they are accessed with a right click on the image:
- No profile photo
- Use Gravatar.com
- Select a file
The avatar will also be visible in the activities of the user if the Modern view type is used.
Different image types are used:
![]() If the avatar is found on Gravatar.com.
If the avatar is found on Gravatar.com.
![]() If the image is added with an .ico file.
If the image is added with an .ico file.
![]() If no avatar is found and the user is an Octopus user.
If no avatar is found and the user is an Octopus user.
![]() If no avatar is found and the user's Professional Email field is empty.
If no avatar is found and the user's Professional Email field is empty.
![]() If no avatar is found and the user's Professional Email field is empty. Note that the generic image will take on various colours and patterns in this case.
If no avatar is found and the user's Professional Email field is empty. Note that the generic image will take on various colours and patterns in this case.
The avatar need to have been previously configured on Gravatar.com, then the association is made through the user's Professional Email.
As the avatar is a purely esthetic object in Octopus, wether it is present or not has no impact on the system functionalities. We therefore leave it up to the customer's discretion to use an support this option.
Tip : If Internet Explorer is installed on your computer and the avatar does not appear in Octopus, clear up the navigation history.
User status
The status is a checkbox, the user can therefore be Active or Inactive.
By default, upon creation the user will be active. The change of status should be done when the user leaves the company permanently, as the links to the CIs will be lost upon deactivation.
See the how to deactivate a user section below to learn how.
Windows Username
This is an important fields as it the information contained in this field that is used to identify all user types. To connect to the application, the Web Portal or to WebTech.
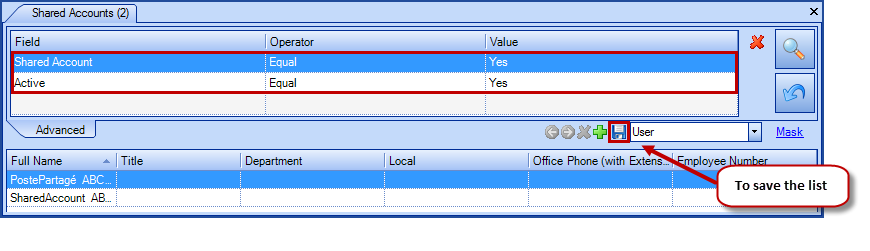
Shared Account
This field identifies generic or shared accounts. Either to control the number of these accounts or to allow the people who used a shared computer to access the Web Portal with their personal Windows username.

Control and inventory of shared accounts
- Do a search to find the Shared account that are active.
- Save this search as a list.
- Add this list to the User Module.
Configuration for local customers
To allow the people that work on shared computers to access the Web Portal with their Windows username, follow these steps:
- Identify the shared accounts from the user files.
- Communicated with our Service Desk to change the connection mode to the Windows Authentication mode.
- Communicate to the users who work on a shared workstation that they will be able to connect to the Web Portal by using their Windows username and password.
Function
This section is used to identify the information in relation with the job of the user:
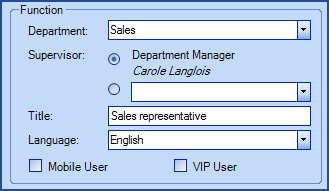
- Department
- Main department of the user.
- Supervisor
- Can be the department manager (if specified in the reference data management) or the direct supervisor. This information is used by Octopus for hierarchical approvals.
- Title
- Professional title of user.
- Language
- Main language of user. This information is used by the automated emails sent to the user.
* This option can be limited by the administrators (Tools, Options, Available languages in the Windows application and the Web portal)
- Main language of user. This information is used by the automated emails sent to the user.
- Mobile User
- Used to identify the people who connect to multiple workstations and tell WMIUpdater not to systematically relate the user to the workstations that he logged on.
- VIP User
- In the request creation window [VIP] will appear in square brackets after the name of the user. The line will be dark red to be more visible.
- For example, Jim Jones [VIP].
- Once the request created, the name will still have the [VIP] mention, but will be in black.
- Note that this does not affect the service-level targets, it is only for information purposes.
Visual explanation
Contact Information
This section is used to identify how to communicate with the user:
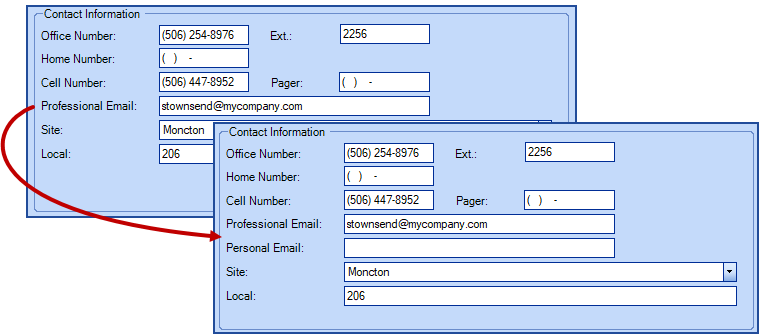
- Office Number
- Ext.
- Cell Number
- Pager
- Professionnal Email
- Will be used by Octopus to communicate by email with the user.
- Personal Email
-
Is optionally available and configurable by team.
-
For more informaiton see the Personal Email | Activation and Use article.
-
- Site
- The user's main site, this information is configured from the reference data management.
- Local
- Text field containing the office number of the user.
- Text field containing the office number of the user.
Lower part of the file | tabs

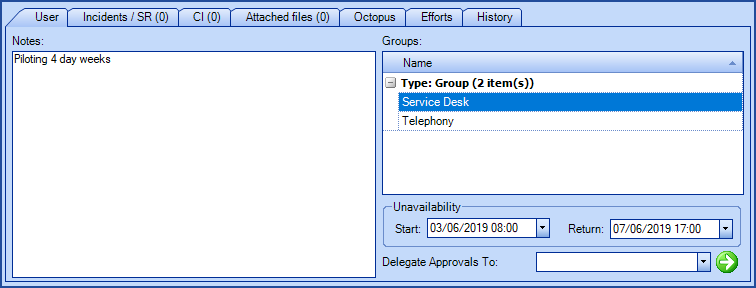
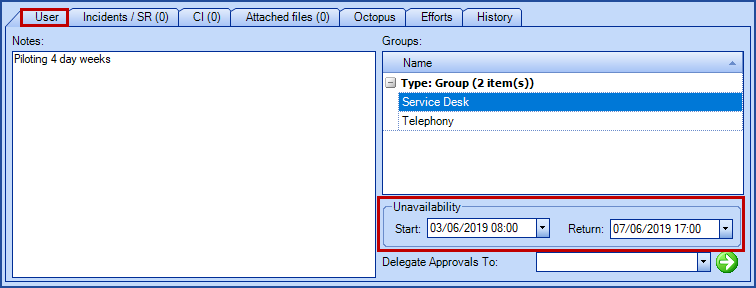
User
The User tab gathers complementary information to the upper part of the user file. You can find:
- Notes
- The user's groups
- If this person is an Octopus user in this team.
- User groups
- These groups are used for automated approvals, external assignees or to restrict the use of Web forms.
- Unavailable
- Allows to add start and return dates when unavailable.
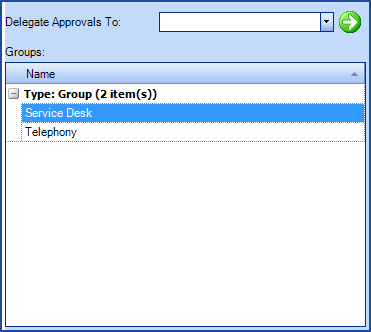
- Delegate Approvals To
- Warning; the approval delegation field is not linked to the unavailability and must be added and removed manually.
Unavailable users
When an Octopus or a regular user leaves on vacation or is unavailable for a while, he can change add the dates for which he will be unavailable. The user can change his own status from his user profile on the Web Portal or another person can do it for him.
If the unavailable person is an Octopus user, when he returns, Octopus will remind him of his unavailable status and allow him to change his status back from the top of the window with the I'm back link.
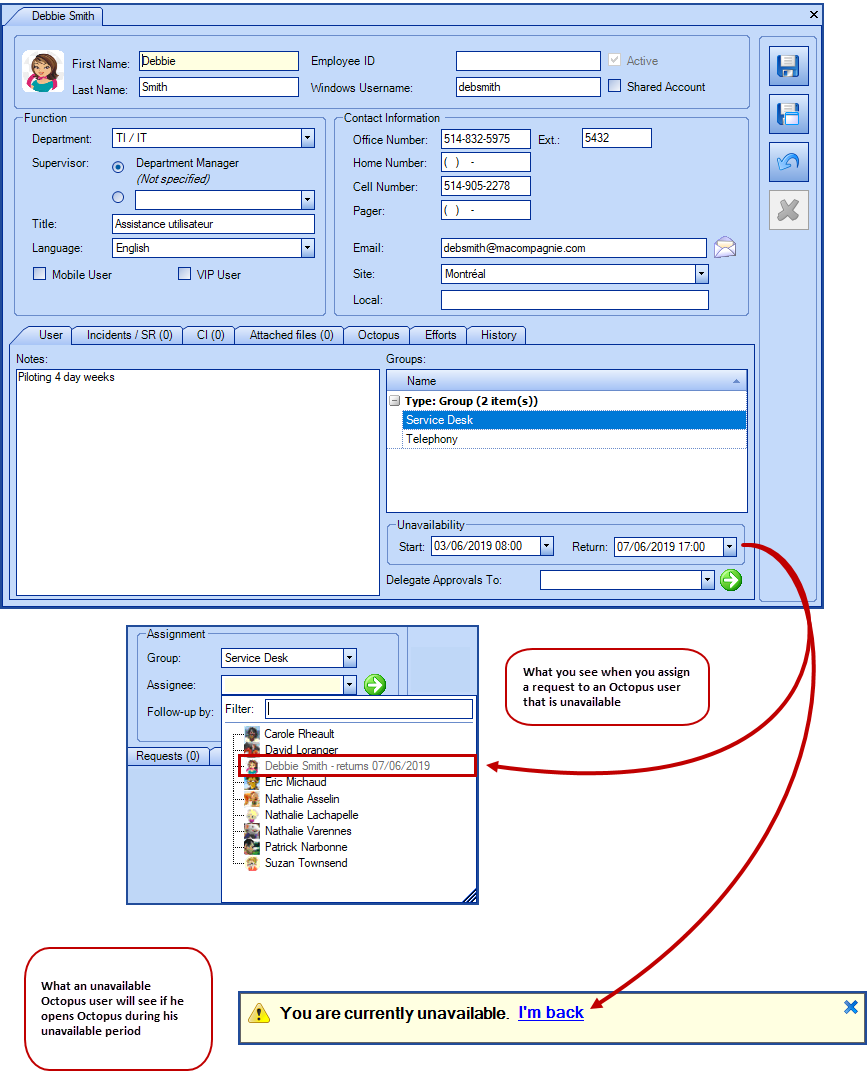
To make these changes in a user file you need the following permissions:
- Modify his profile - if the Octopus user is to change the option himself.
- Create and modify an Octopus user - if the modification is done by another Octopus user.
For more details on permissions, see the Role Management wiki article.
Detailed operation of the unavailable user section
From the user file:
- Go to the User tab, in the bottom right section.
- In the Unavailable section.
- Add a Start and a Return date if this one is known.
- Both dates need to be in the future.
- You may also specify a time.
- The return date is optional but recommended.
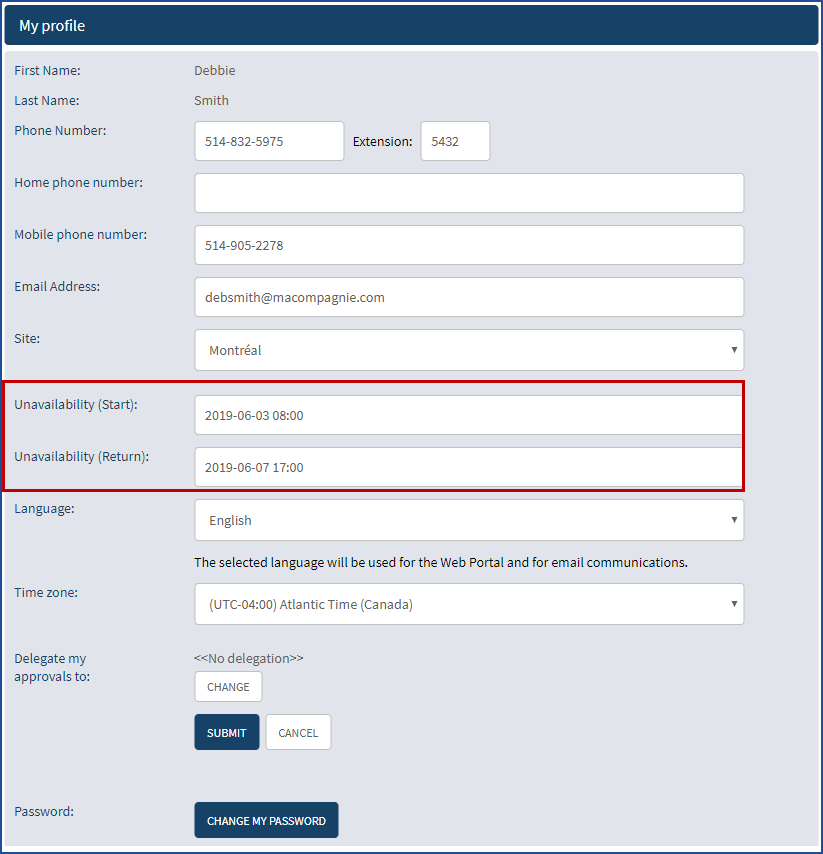
From the Web Portal:
- Go to the My profile section.
-
Add the dates for the unavailability period; Start and Return if the date is known
-
Both dates need to be in the future.
-
You may also specify a time.
-
The return date is optional but recommended.
-
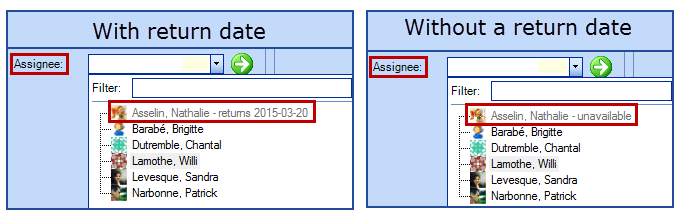
During his absence, if a person assigns a request to the unavailable Octopus user, the following information will advise them that the person is not available:
In Octopus
- In the assignment field.
- The user's name will be grayed out.
- With the word unavailable or a return date.
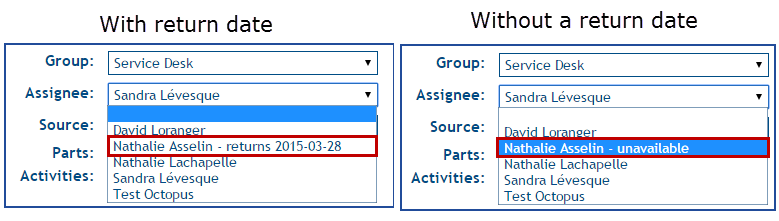
- From an activity, when adding an unavailable recepient.
-
The recepient's name will have a grey background.
-
If a return date was specified it will be visible after the name.
-
- The Assignment to an unavailable person and Addition of an activity to a request/task assigned to an unavailable person notifications will be received if:
- This notification has been selected.
- One is member of the unavailable user's group.
- The Return date is filled.

In WebTech
-
In the assignment field.
-
The Octopus user's name will appear with the word unavailable or a return date.
-
-
The Assignment to an unavailable person notification will be received if:
-
This notification has been selected.
-
One is member of the unavailable user's group.
-
Incidents/SR
The Incident/SR tab allows to consult the user's history in relation to incidents and service requests.
This tab shows the requests related to the user. Hence, it is important to consult this information when updating requests or creating new ones, to avoid duplication.

CI
The CI tab allows to consult the CIs related to the user. If you open a CI file, you can see the requests where this CI is the CI in cause.

Attached files
Here you can add files related to the user, for example a signed copy of the company's security policy.
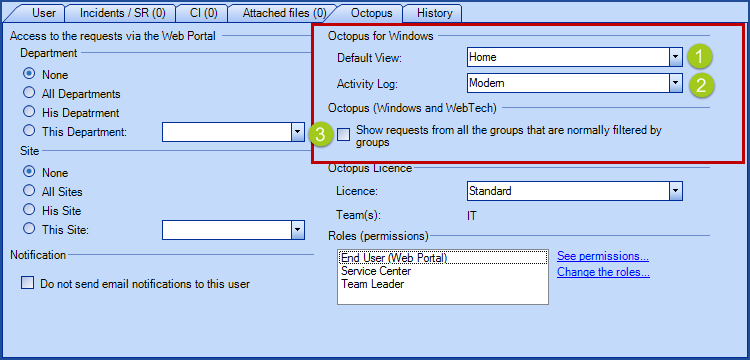
Octopus
This tab has multiple sections giving information on the type of account and the behavior it will have in the application and the Web Portal.
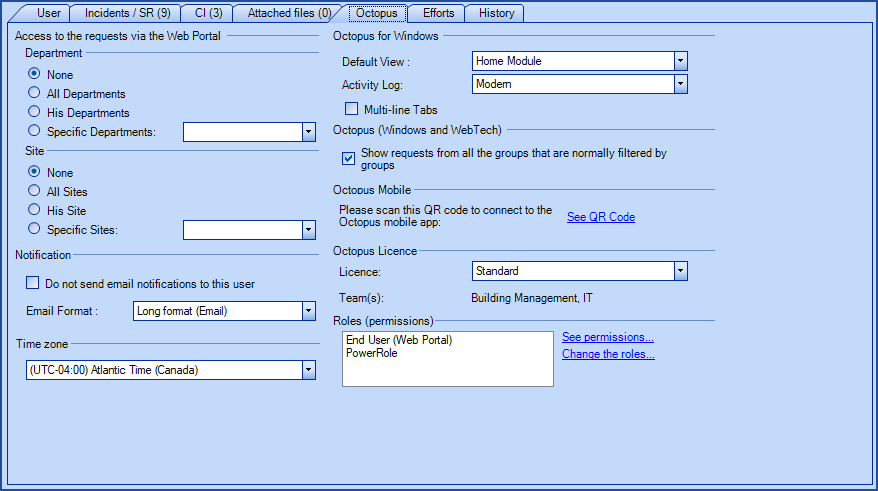
- Access to the requests via the Web Portal
- Allows the user to see requests from other departments or sites according to what is selected.
- Notifications
- If a user does not want to receive automated notifications from Octopus, check this option. Be careful, as this should not be checked if the user is a potential approver.
- Octopus for Windows
- Default View: Incidents or Home. If you use tasks, events, problems or changes, we recommend to use Home as it let's you see all your requests upon opening Octopus.
- Activity Log: Classic (previous versions of Octopus) or Modern (visual presentation with avatar)
- Multi-line Tabs
- When checked, the tabs will be on more than one line.
- Octopus (Windows and WebTech)
- Show requests from all the groups that are normally filtered by groups; checkbox that allows an Octopus user to see all request from all the groups from his service (Team).
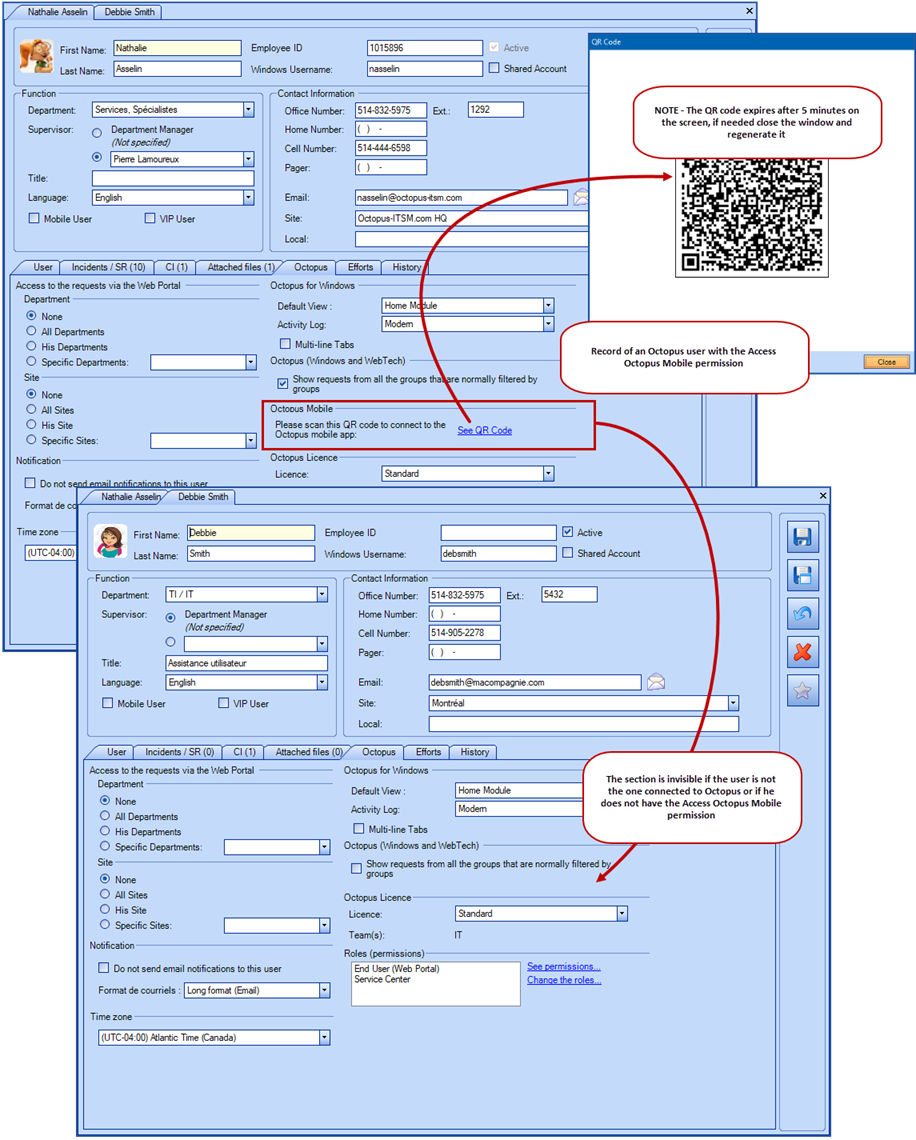
- Octopus Mobile
- Note - The section is only available in the record of the user who is connected.
- Location to find the QR code to connect to the Octopus app.
- The QR code expires after 5 minutes on the screen.
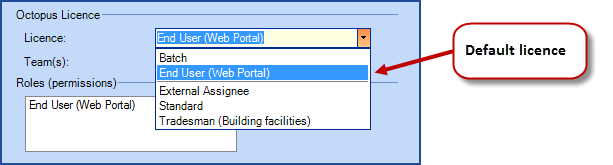
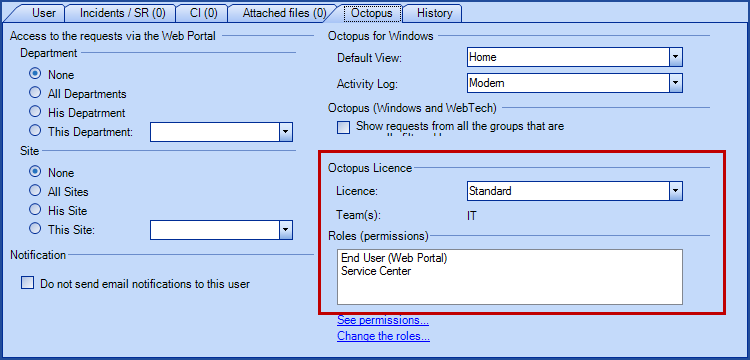
- Octopus License
- Each user needs to have a license, the End User license is for a customer in the Octopus database.
- The name of the team or teams where the user has an Octopus user role.
- Roles (permissions)
- The user's role will represent the permissions that he will have as a customer or an Octopus user in the application, on the Web Portal or in WebTech.
- The default role is called End User (Web Portal).
- Link See permissions
- Shows the list of the user's permissions. Note that if the user has more then one role, this list the sum of the user's permissions
- Link Change the roles
- Opens a window that shows all the available roles for the type of license of the user.
- From the Change the roles window, you can go to the Open the Role Manager using the link.
What you need to know:
For a sound management of accesses, it is very important to give the right role to users. For details on this subject, please see the Role Management article.
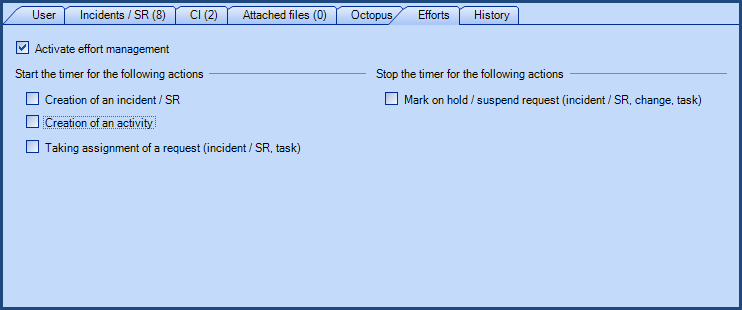
Efforts
Determines the behavior of Octopus in relation with Effort Management.
- Activate effort management
- Activated by default, will make the effort management control appear in the activities section.

- Activated by default, will make the effort management control appear in the activities section.
- Start timer for the following actions.
- Creation of an incident / SR: Starts the timer as soon as the incident /SR is created.
- Creation of an activity: Starts the timer as soon as the activity is created.
- Taking assignment of a request (incident / SR, task): Starts the timer once assignment is assigned.
- Stop the timer for the following actions.
- Mark on hold/suspend request (incident / SR, change, task): Stops timer as soon as the action is selected.
History
Keeps the list of changes made to the user's account. We can see the Initial Value, the New Value, the date of the change and the user who made the change.

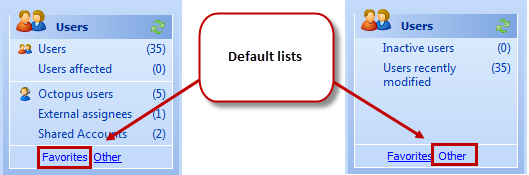
User lists
By default
A few lists are available by default in the User Module. They were designed to help manage the user and are split in two sections, the favorites and the others.
To add if you manage more then one team
If you have more then one team, you may want to see the Octopus users of the other teams. Here is a list that you can add:
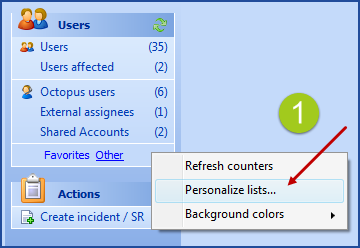
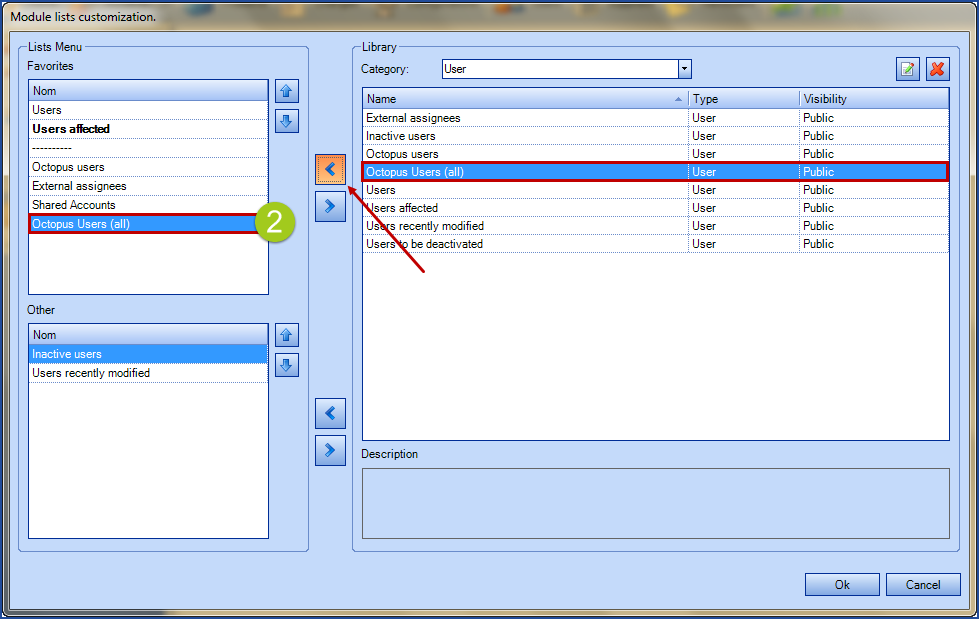
- Right click in the list section and select Personalize list.
- From the User category, select the list named Octopus Users (All) and click OK.
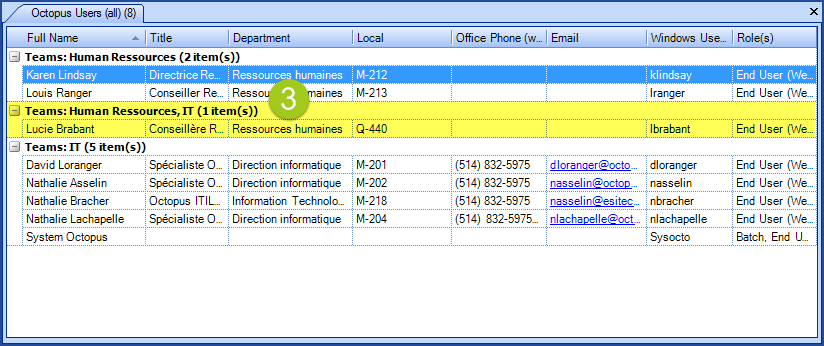
- Back in your lists, you can now see the Octopus users by teams and the ones that belong to more then one team.
NOTE: You can only see the groups, roles and permissions of an Octopus user for the current team you are looking at. So in order to see the complete set of permissions that an Octopus user has, you would need to login to all the teams they are part of.
Available actions
As with the other modules, you can find the actions available in the User Module at the bottom left.
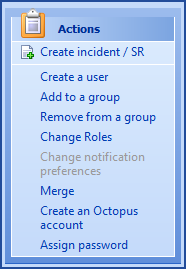
- Create an incident/SR; action available from all the Octopus modules.
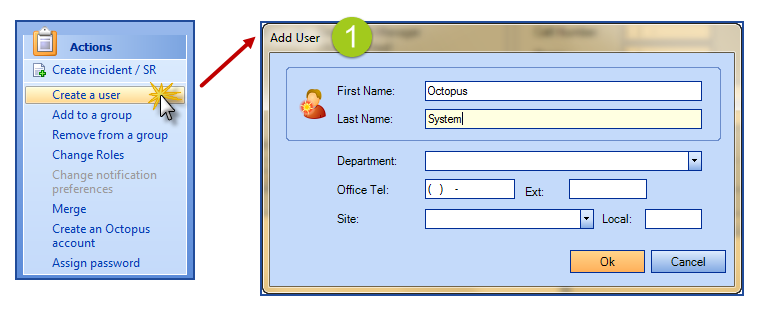
- Create a user; to manually create a user.
- NOTE: If you have more then one team in Octopus, it is possible that a recurring import of users is made by the IT team. If this is your case, find out about it before preceding with creating user.
- Add to a group
- To add the user to one or more groups (Octopus or User groups).
- Remove from a group
- To remove the user of one or more groups (Octopus or User groups).
- Change roles
- To change the roles of one or more users.
- NOTE: Roles give the permissions in the system and are linked to the license type.
- Change notification preferences
- For Octopus users only.
- Merge
- Allows to merge two user accounts.
NOTE:
- The merge needs to be initiated from the account that will disappear. If the user has a license other then End User, the merge must be done in the team that has the highest license type.
- When merging, only incidents /SRs, change and CIs associated with users will be reassigned and changed.
- The merge will not change some information such as job titles, phone number and site
- Allows to merge two user accounts.
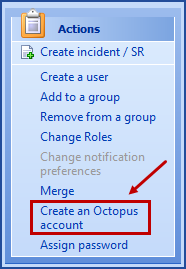
- Create an Octopus account
- Uses a form to help create an Octopus account quickly.
- Assign password
- Allows to change the user's password. Here are the password rules, note that the license type makes a difference.
- For an End User license: Mininum of 4 characters and must contain at least a letter and a number.
- For an Standard license: Mininum of 8 characters and contain as lease three of the following characters types:
How to create an Octopus account?
Before being able to connect as an Octopus user, external assignee or before using an system account, the correct type of license, the right groups and roles must be given to the user. He must also have a password link to his account.
Some of the steps need to be done in a specific order, that is why we have create the Create an Octopus account action from the bottom left menu, to assist you in this task.
Octopus account creation form
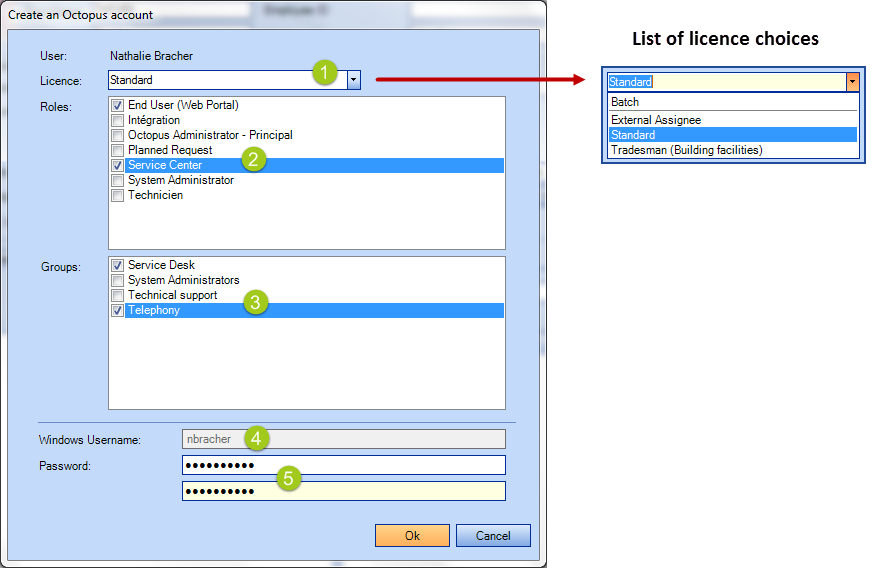
- Choose the license type that corresponds to the need. An Octopus user uses a standard license
- Check the roles that correspond to the work done by the user
- Check the assignment groups of the user
- If the user already has a Windows username, it will appear grayed out. If the field is empty, you can add the Windows username and it will fill it in the user file. This name must be unique, since it identifies the user in all aspects of Octopus
- Give a password to the Octopus use

Once you are done with you selections, click OK. The selected elements will have been recorded in the user's file.
Octopus password rules
The password must have a mininum of 8 characters and contain as lease three of the following characters types:
- Lowercase letters
- Uppercase letters
- Numbers
- Punctuation or special characters
There is no rule for the frequency of passord changes.
Additional option for the Octopus account
These options can be use for an Octopus account:
- Select the Default view when Octopus opens. If you use the tasks or modules on top of Incident/SR, we recommend to use the Home Option. Three choices are available.
- The Activity Log, can be Modern or Classic, the default choice is modern.
- Show requests from all the groups that are normally filtered by groups; allows the user to see the requests form groups other then his own. This option is useful for the Octopus users of the Service Desk.
System Account
This section is for Octopus technical administrators, to execute Octopus programs such as ADSIReader. It is recommended to have a system account for these types of tasks, as if you run them with the account of an Octopus user, you are at risk that the tasks will no longer run if this person changes roles or leaves the company.
The best practice is to create a system account and document the tasks that run with it, the frequency, the command lines used, etc.
To create a system account, you use the same steps as to create an Octopus account, but you will not associate this account with any group.
- Manually create the user for the system account, if it does not already exist.
- Choose the Batch license type.
- Associate the Batch role (this role can be added from the role library).
- Do not add to a group, this account cannot login directly to Octopus, therefore it cannot be part of any Octopus user groups.
- Validate the Windows username, give a password and click OK.

Multi-team Octopus account / How to create an Octopus user in another team
A user that already has an Octopus account will have a Standard license in his file and will already be associated to a team.
To allow this person to become an Octopus user in another team, the administrator of the other team simply needs to assign him to the proper roles and groups in the new team.
Follow these steps, from the team in which the new user needs to be created:
- Find the file of the user to give Octopus user rights.
- Go to the Octopus tab.
- Validate that the user already has a Standard licence. If not, follow the instructions from the How to create an octopus account? section.
- Add one of more roles to the user in this team.
- Valide the default view.
- Valide the format of the activity log.
- Add the user to one of more groups in the team.
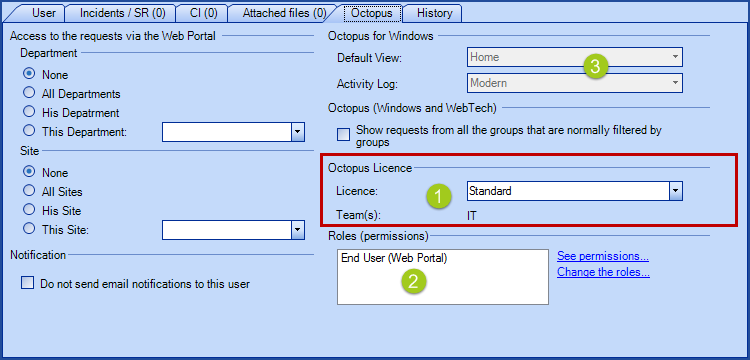
View of an IT Octopus user, seen from the HR team before giving him rights in the new team.
- You can see the Standard license with only the IT team.
- In the HR team, right now, he is only an end user according to his role.
- You cannot select the default view or activity log as he is only an end user for now.
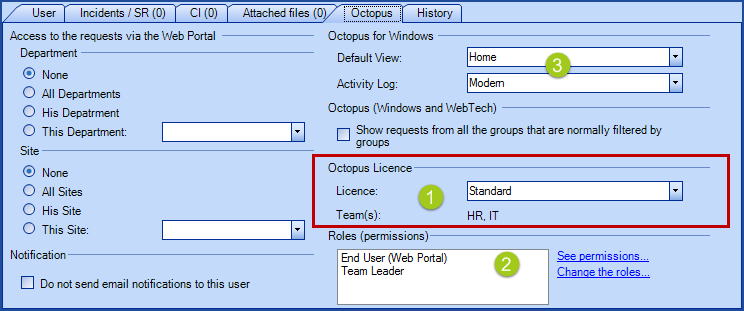
View of the same Octopus user from the HR team after having given him rights to the HR team.
- We can now see that he is associate to two teams.
- We can see his new role in the HR team.
- The view and log options are now available.
How to modify a user's groups or rights?
Modify the groups
The groups associated to the user are visible from the User tab. To add some, use the Add to a group button in the actions menu (bottom left). The Remove from a group button from the same section will remove the user from groups.
What you need to know:
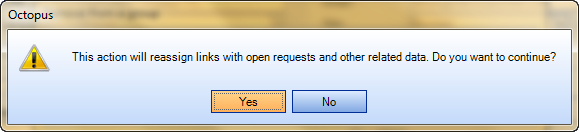
If the user is assigned to one or more request, you will get a warning message. If you answer yes to the message, Octopus will automatically remove the name of the Octopus user from the requests and will reassign them directly to the group they were removed from.
Modify the roles (rights)
You can see the Octopus user's roles at the bottom right of the Octopus. The See the permissions link shows the list of the permissions accumulated by the user through his roles. And the Change the roles link allows to add or remove roles quickly.
The rights of the Octopus users depend on the permissions associated to their roles, for more information on the subject, see the Role Management Wiki.
What you need to know:
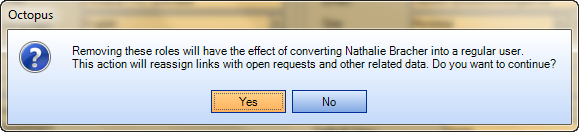
When you try to remove an Octopus user role, if the user is assigned to one or more request, you will get a warning message. If you answer yes to the message, Octopus will automatically remove the name of the Octopus user from the requests and will reassign them directly to the group they were removed from.
How to deactivate a user?
Companies have different processes on how to handle short or long term leave of absence of employees. Some leave the accounts active, while other deactivate them. By default, when a user is deactivated in Octopus, the links between the user and its CIs are removed. This could be problematic in certain environments.
It is possible to modify this behaviour and ensure that the status of a user does not affect its link to CIs.
If needed, communicate with the Octopus Service Desk, to have this option modified.
The user status can be managed directly from the status of the user in AD, to find out how to use this option, see the ADSIReader - Integration to Active Directory Wiki.
Temporary departure
If an Octopus user or a user that is involved in the processing of request leaves temporarily, you may want to remove him from the Octopus user groups to ensure that requests cannot be assigned to him.
See the How to modify a user's groups or rights section for the detailed steps on how to do this.
It is very important to find and reassign the requests assigned to this person before proceeding to prevent these requests from being forgotten.
Job change or permanent departure
If a person leaves the company or changes functions and no longer needs to be: Octopus user, External user or Tradesman, you need to change the associated license.
Before you proceed, follow these steps:
- Do a search on all the requests assigned to this person.
- Reassign the requests to another Octopus user, external assignee or tradesman, Otherwise when the account is deactivated, all assigned requests of this person will automatically be assigned to the group.
- Remove the person from all his groups.
- Change the license type to End User.
- For a permanent departure, deactivate the account by unchecking the Active field at the top of the user file.
When you try to change the standard license for an Octopus user who works in more then one team, if this person sill has Octopus user roles associated to them, Octopus will give an error message. You must first remove all Octopus user groups and roles from the user before you can change the license type.
Ultimately if the user is not longer an Octopus user in one team but is still in another, the user needs to keep the standard license. Simply remove the Octopus user groups and roles from the team the user is leaving.

Thank you, your message has been sent.